The Best Southern Fried Chicken Recipe: Crispy, Juicy, and Unforgettable
A Taste of True South
I’ll never forget the first time I got it right. It wasn’t in a fancy restaurant, but in my own humble kitchen, with oil sputtering and the scent of paprika and pepper hanging in the air. I was trying to recreate the magic from a roadside joint I’d visited years ago in Georgia—the kind of place where the chicken was so impossibly crispy and the meat inside so unbelievably tender and juicy, it ruined all other fried chicken for me. After countless attempts, this recipe emerged. It’s a tribute to that memory, a perfect harmony of a shatteringly crisp crust and deeply seasoned, succulent chicken. This isn’t just frying; it’s a ritual that yields pure, golden-brown comfort.
Why You’ll Love This
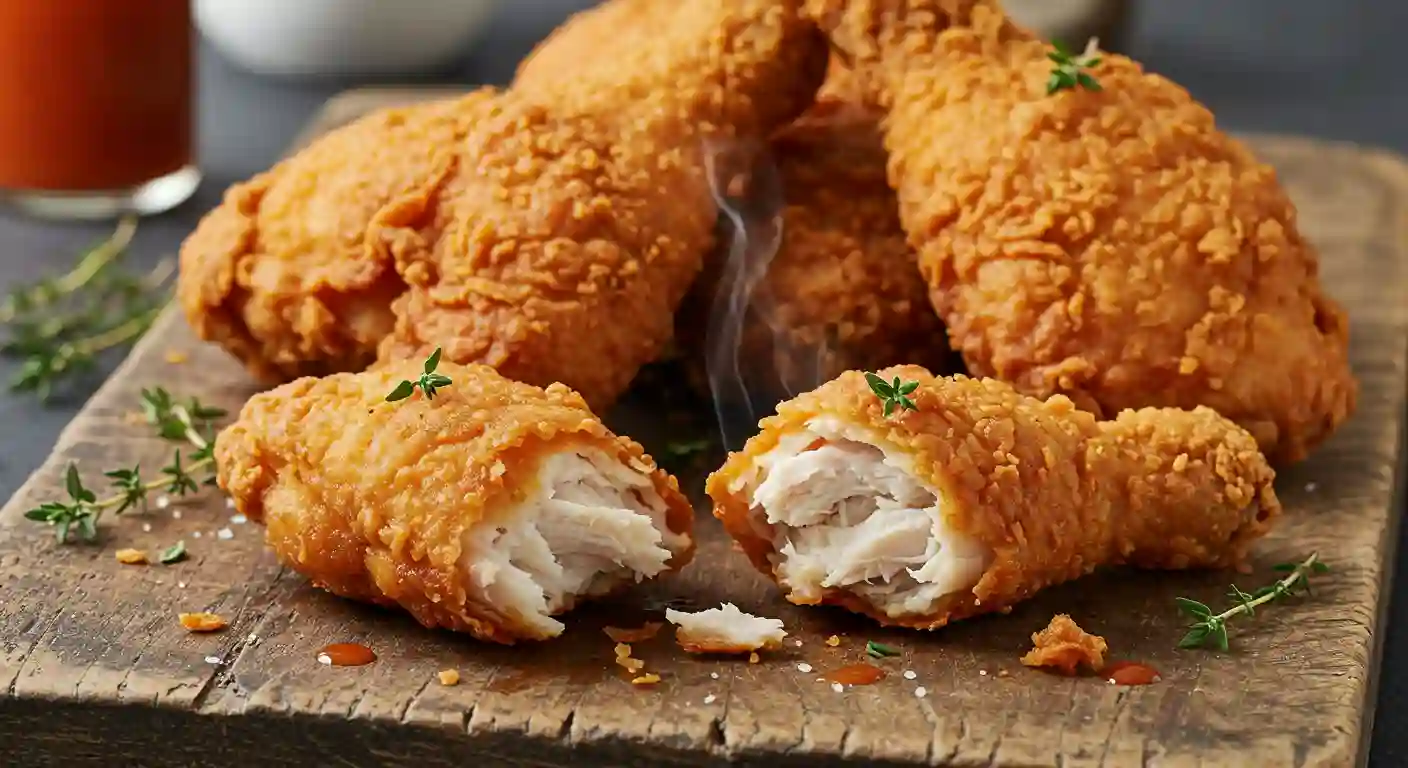
The Ultimate Crunch: The combination of flour and cornstarch creates a crust that is audibly crispy, light, and never greasy.
Juice You Can Almost Guarantee: The buttermilk marinade is the secret weapon, tenderizing the chicken for hours to ensure every single bite is moist and flavorful.
A Flavor That Lingers: This isn’t a bland crust waiting for sauce. The seasoning is built into every layer, from the marinade to the flour, for a complete taste experience.
It Feels Like Home: There’s a deep, soul-satisfying pride that comes from pulling a platter of perfectly fried, golden chicken from your own stove.
The Ultimate Compliment
I once made this for a friend’s child, a legendary picky eater whose diet seemed to consist solely of beige foods. He eyed the chicken with suspicion, noting its “spots” of black pepper. With great reluctance, he took a small bite. Then, without a word, he took another, larger one. He finished the entire drumstick and quietly asked for a second piece. His mother looked at me as if I’d performed a magic trick. That’s the power of this recipe—it wins over even the toughest critics.
What Makes It Special
The Buttermilk & Hot Sauce Brine: This isn’t just for tenderizing. The buttermilk’s tang and the hot sauce’s subtle kick penetrate the meat, adding layers of flavor that go beyond the surface.
The Cornstarch Secret: Cornstarch is the key to a crust that’s incredibly crisp and light, avoiding the heaviness that sometimes comes with a flour-only coating.
Double-Duty Seasoning: We season the chicken directly and the flour mixture. This builds a foundation of flavor that ensures every component, from the first crunch to the last tender bite, is perfectly salted and spiced.
Peanut Oil for Frying: With its high smoke point and neutral flavor, peanut oil allows us to achieve a deep, golden-brown fry without any off-tastes, resulting in a cleaner, crispier crust.
Making It Happen
Begin by giving your chicken its first layer of personality. Sprinkle the salt, garlic powder, and onion powder directly onto the pieces and toss them with your hands, making sure every nook and cranny is covered. This is where the foundational flavor starts.
Now, pour in the buttermilk and hot sauce. Stir it all together until the chicken is fully submerged in that creamy, tangy bath. Cover the bowl and tuck it into the refrigerator. Let the magic happen for at least two hours, but if you have the patience, let it go overnight. The longer it marinates, the more tender and flavorful your chicken will be.
When you’re ready to fry, whisk together your dry ingredients—the flour, cornstarch, and spices—in a separate bowl. This is what will create that iconic, craggy, golden crust. Now, heat your peanut oil in a heavy-duty pot or deep fryer to 325°F. This temperature is crucial; it’s hot enough to seal the crust quickly without burning, but not so hot that the inside remains undercooked.
Working with one piece at a time, pull a chicken piece from the buttermilk, letting the excess drip away. Dredge it thoroughly in the flour mixture, pressing gently to make sure the coating adheres. A pro tip here is to let the coated chicken sit on a wire rack for about 5-10 minutes. You’ll see the coating start to look a little pasty—this is what helps it cling during frying and creates an extra-crispy texture.
Carefully lower a few pieces of chicken into the hot oil. Do not overcrowd the pot; this will cause the temperature to drop and make the chicken greasy. Fry in batches. You’ll hear that satisfying sizzle as the chicken hits the oil. Let it cook, turning occasionally, until it’s a deep, glorious golden brown. The real test is a meat thermometer: the internal temperature should read 165°F. Dark meat may take 12-14 minutes, while white meat is often done in 8-10.
As each piece finishes, transfer it to a tray lined with paper towels and immediately sprinkle with a little flaked salt. This final hit of salt while the crust is still hot and porous makes all the difference.
You Must Know
Patience with Temperature: Use a thermometer to monitor your oil. 325°F is the sweet spot. If the chicken browns too quickly, lower the heat slightly.
Don’t Skip the Rest: Letting the dredged chicken sit for a few minutes before frying is a non-negotiable step for the crispiest crust.
Fry in Batches: Overcrowding is the enemy of crispy fried chicken. It steams the chicken instead of frying it.
Trust the Thermometer, Not Just the Clock: Cook to temperature, not time. A reliable instant-read thermometer is your best friend here.
Serving It Up
This Southern fried chicken is a glorious centerpiece. Serve it hot and fresh from the fryer for the ultimate experience. Pair it with classic comfort sides like creamy mashed potatoes with gravy, collard greens simmered with a hint of smoke, or a crisp, tangy coleslaw to cut through the richness. For a drink, a sweet iced tea is the traditional and perfect partner, though a crisp lager or hard cider would also complement the savory, crispy flavors beautifully.
Make It Different
Gluten-Free: Substitute the all-purpose flour with your favorite 1:1 gluten-free flour blend.
Spice It Up: Add a teaspoon of cayenne pepper or smoked chili powder to the flour mixture for a gentle, warming heat.
Herb-Infused: Add a tablespoon of dried thyme or oregano to the flour mixture for an aromatic, earthy twist.
Oven “Fried” Alternative: For a lighter version, after dredging, place the chicken on a wire rack over a baking sheet. Spray generously with cooking oil and bake at 400°F until cooked through and crispy, about 45-50 minutes.
Storing and Reheating Your Masterpiece
Leftover fried chicken is a treasure. Store it in an airtight container in the refrigerator for up to 3 days. To reheat and restore the crunch, avoid the microwave. Instead, place the chicken on a wire rack set over a baking sheet and warm it in a 375°F oven for 15-20 minutes, until hot and crisp. For an even crispier result, you can re-fry it in hot oil for a minute or two.
Success Tips
For the absolute best results, start with cold chicken straight from the fridge. A cold center helps ensure the inside is fully cooked by the time the crust is perfectly golden. If you are using a mix of white and dark meat, consider frying the dark meat first and keeping it warm in a low oven, as it generally takes a few minutes longer to cook.
Frequently Asked Questions
Can I use boneless, skinless chicken breasts?
You can, but you’ll miss out on some of the classic texture. The skin contributes immensely to the flavor and crispness of the crust. If you do use them, reduce the frying time significantly to avoid drying out the meat.
I don’t have buttermilk. What can I use?
A great substitute is to add one tablespoon of lemon juice or white vinegar to one cup of regular milk. Let it sit for 5-10 minutes until it curdles and thickens slightly.
Why is my coating falling off?
This usually happens if the oil isn’t hot enough when the chicken is added, or if you didn’t let the dredged chicken rest to form a “pasty” coating. Ensure your oil is at 325°F and let the coated chicken sit for 5-10 minutes before frying.
Can I make this ahead of time?
You can marinate the chicken in the buttermilk for up to 24 hours, which actually makes it better. However, for the best texture, dredge and fry the chicken just before serving.
What’s the best oil for frying?
We recommend peanut oil for its high smoke point and neutral flavor. Canola or vegetable oil are also excellent, neutral alternatives.
Recipe Card: The Best Southern Fried Chicken
Prep time: 20 minutes (plus at least 2 hours marinating)
Cook time: 30 minutes
Total time: 50 minutes (plus marinating time)
Category: Main Course
Difficulty: Intermediate
Cuisine: Southern American
Yield: 4-6 servings
Ingredients
▢1 whole chicken, cut up (or 8 pieces of your favorite cuts of chicken)
▢2 teaspoons kosher salt
▢2 teaspoons garlic powder
▢2 teaspoons onion powder
▢2 cups buttermilk
▢2 Tablespoons hot sauce
▢2 cups all-purpose flour
▢1 cup cornstarch
▢2 teaspoons kosher salt
▢2 teaspoons paprika
▢2 teaspoons black pepper
▢Peanut oil, for frying
▢Flaked salt, for serving (optional)
Instructions
Season the chicken pieces with 2 tsp salt, garlic powder, and onion powder. Place in a large bowl.
Add buttermilk and hot sauce, stir to combine. Cover and marinate in the refrigerator for at least 2 hours, or up to overnight.
In a separate bowl, whisk together flour, cornstarch, the remaining 2 tsp salt, paprika, and black pepper.
Heat 2-3 inches of peanut oil in a heavy pot or deep fryer to 325°F.
Remove chicken from buttermilk, letting excess drip off. Dredge each piece thoroughly in the flour mixture, pressing to adhere. Place on a wire rack and let sit for 5-10 minutes until the coating looks pasty.
Fry chicken in batches (do not overcrowd) until golden brown and internal temperature reaches 165°F, about 8-14 minutes depending on the cut, turning occasionally.
Drain on a paper towel-lined tray and sprinkle immediately with flaked salt. Serve warm.
Notes
For best results, use a deep-fry thermometer to maintain oil temperature. Leftovers can be stored in the refrigerator and reheated in the oven to maintain crispness.
Allergy Info: Contains gluten, dairy.
Nutrition (estimated per serving): Calories: 520 | Fat: 22g | Carbs: 45g | Protein: 35g