The Pie That Stole My Heart (and Probably Will Steal Yours): Amish Peanut Butter Cream Pie
There’s a certain magic in Amish country kitchens. It’s the scent of slow-rising bread, the gentle thump-thump of a rolling pin on dough, and the promise of desserts so comforting, they feel like a warm hug. That’s exactly where I discovered this legend: the Amish Peanut Butter Cream Pie. Picture this: a crisp, flaky, buttery crust giving way to a layer of pure, velvety peanut butter bliss. Then, crowned with a cloud of whipped cream so light and sweet, it melts on your tongue like a dream. One bite at a roadside farm stand years ago, and I was utterly smitten. It wasn’t just pie; it was pure, unadulterated joy on a plate. Today, I’m sharing that magic with you – the recipe that tastes like sunshine and nostalgia, all wrapped up in creamy peanut butter perfection.
Why You’ll Love This Amish Peanut Butter Cream Pie:
Pure Comfort in Every Bite: This pie is the edible equivalent of your favorite cozy blanket – rich, satisfying, and deeply comforting.
Surprisingly Simple: Don’t be fooled by its luxurious taste! It uses straightforward ingredients and comes together beautifully without fancy techniques.
The Ultimate Crowd-Pleaser: From kids to grandparents, peanut butter lovers unite! This pie vanishes faster than you can say “seconds, please.”
No-Bake Filling Bliss: Perfect for warm weather – no oven required for the creamy, dreamy filling. Just focus on that flaky crust!
Nostalgia on a Plate: It evokes warm memories of church suppers, family gatherings, and simple, delicious homemade goodness.
An Unexpected Fan Club: I’ll never forget serving this to my friend Sarah, a self-proclaimed “chocolate-or-bust” dessert devotee. She eyed the peanut butter pie skeptically. “Just a tiny sliver,” she insisted. Ten minutes later? Her plate was clean, crumbs meticulously scraped, and she was sheepishly asking for the recipe. “Okay, fine,” she laughed, “this might just be the best pie I’ve ever had.” Consider the chocolate-only club officially breached!
What Makes This Amish Peanut Butter Cream Pie Special:
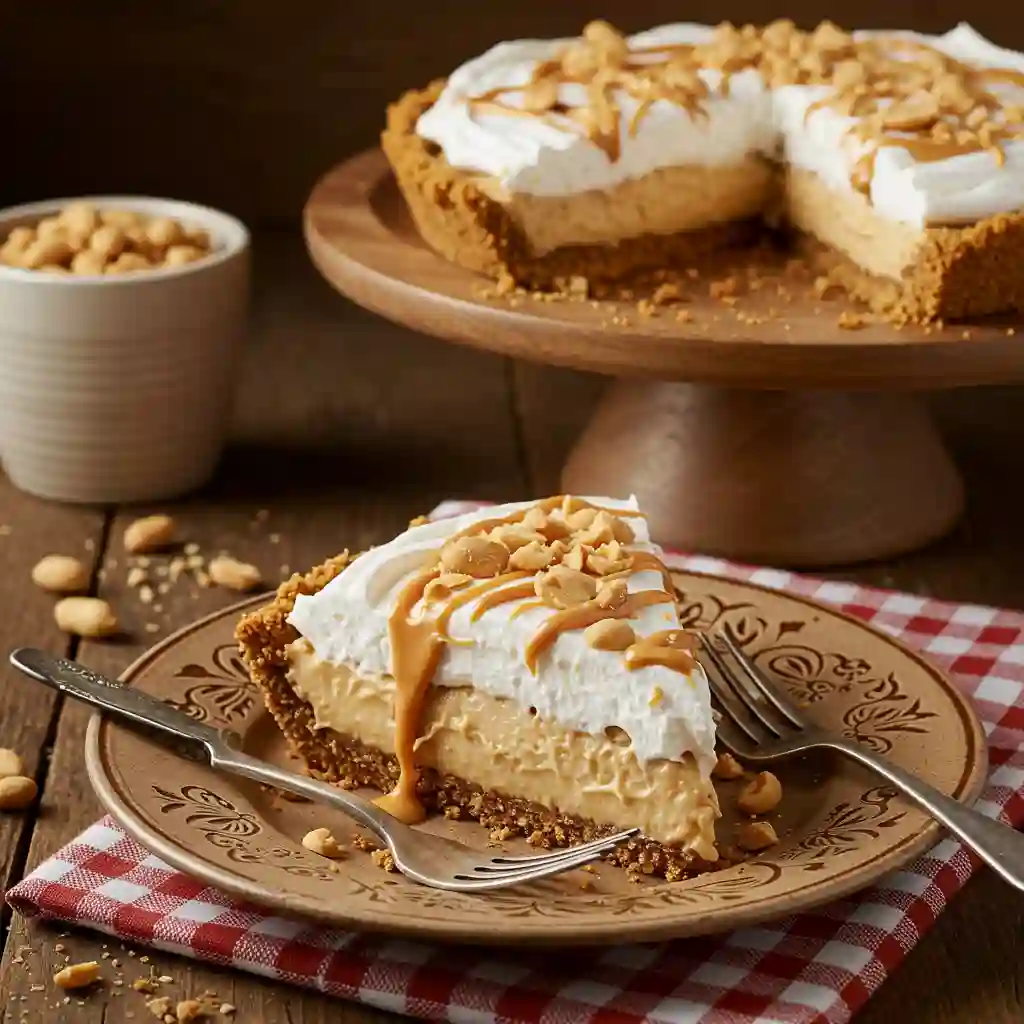
The Creamy Peanut Butter Layer: A magical blend of smooth peanut butter, cream cheese, and confectioners’ sugar creates a filling that’s unbelievably rich, velvety smooth, and intensely peanut buttery. It holds its shape beautifully yet melts luxuriously on the tongue.
The Whipped Cream Crown: Not just a dollop, but a generous, billowy layer of freshly whipped cream lightly sweetened. It provides the perfect light, airy contrast to the dense peanut butter filling.
The Buttery Crust Foundation: A pre-baked, flaky, golden pie crust (homemade or quality store-bought) is essential. It adds crisp texture and rich flavor that complements the creamy layers perfectly.
Pure & Simple Ingredients: This pie celebrates the magic of pantry staples – peanut butter, cream cheese, sugar, cream – transformed into something extraordinary.
Making It Happen: Crafting Your Creamy Dream Pie
Alright, let’s roll up our sleeves and create this masterpiece! First, ensure your cream cheese is softened to room temperature – this is crucial for achieving that silky smooth filling without lumps. Grab a large bowl and beat that softened cream cheese with an electric mixer until it’s perfectly creamy and smooth. Now, the star of the show: add the smooth peanut butter and confectioners’ sugar. Beat them together on medium speed until the mixture becomes light, fluffy, and completely homogeneous. It should look like the most decadent peanut butter cloud you’ve ever seen.
In a separate bowl (or stand mixer), pour in your heavy whipping cream and vanilla extract. Whip it on medium-high speed until soft peaks form – that lovely stage where the cream holds its shape but the tip curls over gently when you lift the beater. Now, here comes the magic touch: gently fold about one-third of the whipped cream into the peanut butter mixture. This lightens it up beautifully. Then, carefully fold in the remaining whipped cream until just combined. Be gentle! We want to keep all that lovely airiness. Pour this luscious, cloud-like peanut butter filling into your completely cooled, pre-baked pie crust. Smooth the top into an even, inviting layer.
Now, whip up another batch of whipped cream with the remaining heavy cream and confectioners’ sugar (and vanilla) for the topping. Spread this billowy, sweetened cream over the peanut butter layer, creating beautiful peaks and swirls. For the final flourish, sprinkle chopped peanuts generously over the top – adding delightful crunch and visual appeal. The hardest part? Patiently letting it chill! Refrigerate your pie for at least 4 hours, but ideally overnight. This allows the filling to set perfectly, becoming firm yet yielding, ready to slice into pure bliss.
You Must Know Tips for Success:
Room Temp is Key: Softened cream cheese blends smoothly. Cold cream cheese = lumpy filling.
Chill Time is Non-Negotiable: Don’t rush it! The pie needs those hours in the fridge to set properly and develop its full flavor.
Gentle Folding: Overmixing the whipped cream into the peanut butter mixture will deflate it. Fold gently until just combined.
Pre-Baked & Cooled Crust: Ensure your crust is fully baked and completely cooled before adding the filling. A warm crust = soggy bottom!
Quality Peanut Butter: Use a standard smooth peanut butter (like Jif or Skippy). Natural peanut butter (oil-separated) often leads to a greasy, less stable filling.
Serving Ideas:
This Amish Peanut Butter Cream Pie is a star all on its own! Serve generous slices chilled. For an extra touch of elegance, drizzle slices with warm chocolate sauce or a sprinkle of sea salt before serving. Pair it with a cold glass of milk (a classic!), a hot cup of coffee, or even a glass of sweet dessert wine like Moscato d’Asti. It’s perfect for potlucks, holiday gatherings, or anytime you need a guaranteed showstopper.
Make It Different: Customize Your Creation
Chocolate Lover’s Dream: Add 1/2 cup mini chocolate chips to the peanut butter filling, or drizzle the top with melted chocolate before adding the final whipped cream.
Nutty Crunch: Mix chopped peanuts into the peanut butter filling for extra texture.
Cookie Crust: Swap the traditional pie crust for an Oreo cookie crust for a chocolatey twist.
Lighter Touch: Use reduced-fat cream cheese and whipped topping (like Cool Whip) instead of fresh whipped cream (texture will be slightly less airy). Reduce confectioners’ sugar slightly to taste.
Gluten-Free: Use your favorite certified gluten-free pie crust.
Sugar-Free: Use a sugar-free peanut butter, sugar-free confectioners’ sweetener, and sugar-free whipped topping (check labels carefully). The texture may vary slightly.
Storing Your Slice of Heaven:
Refrigeration: Store the pie tightly covered with plastic wrap or in an airtight container in the refrigerator. It will keep well for 3-4 days.
Freezing (With Care): The pie can be frozen without the final whipped cream topping. Wrap the filled pie crust tightly in plastic wrap and then foil. Freeze for up to 1-2 months. Thaw overnight in the refrigerator. Whip fresh cream and add the topping just before serving. (The whipped cream topping itself does not freeze well and will become watery when thawed).
Reheating: Not applicable! This pie is meant to be served cold and refreshing straight from the fridge.
Pie Perfection Pointers:
Avoid Weeping Filling: Ensure your filling is well-chilled and that you use full-fat ingredients. Don’t overwhip the cream for the topping – stop at stiff peaks.
Clean Slices: For picture-perfect slices, dip a sharp knife in hot water and wipe it dry between each cut.
Crust Shield: If making your own crust, use pie weights or dried beans when blind baking to prevent the crust from puffing up or shrinking excessively. Protect the crust edges with foil if they start browning too quickly.
Peanut Butter Power: For the most intense flavor, use a peanut butter you absolutely love!
Frequently Asked Questions (FAQ):
Can I use natural peanut butter? It’s generally not recommended. The oils in natural peanut butter can separate, leading to a greasy texture and a filling that might not set properly. Stick with conventional smooth peanut butter like Jif or Skippy for best results.
My filling seems too soft, even after chilling. What happened? This can happen if the cream cheese wasn’t fully softened, if the filling was under-whipped, or if the heavy cream wasn’t whipped to stiff enough peaks. Ensure proper whipping times and chill sufficiently. Overfolding can also deflate the mixture.
Can I make this ahead of time? Absolutely! In fact, it’s highly recommended. Making it the day before allows the flavors to meld and the filling to set perfectly. Just add the final whipped cream topping and peanuts within a few hours of serving for the freshest look.
Do I have to use cream cheese? Yes, the cream cheese is essential. It provides structure and a delightful tang that balances the sweetness and peanut butter richness. Omitting it will result in a runny pie.
Can I use a graham cracker crust instead? You can! A graham cracker crust adds a lovely sweet and crumbly contrast. Pre-bake it according to package directions and let it cool completely before filling.
Amish Peanut Butter Cream Pie
Prep Time: 30 minutes
Cook Time: 15 minutes (for crust, if baking)
Chill Time: 4 hours (minimum, preferably overnight)
Total Time: 4 hours 45 minutes (plus chilling)
Category: Dessert
Cuisine: Amish, American
Difficulty: Easy
Yield: 1 (9-inch) Pie (8-10 servings)
Ingredients:
For the Filling:
1 (8 oz) package cream cheese, softened to room temperature
1 cup (about 260g) smooth peanut butter (like Jif or Skippy)
1 cup (120g) confectioners’ sugar (powdered sugar)
1 cup (240ml) heavy whipping cream (divided – see instructions)
1 teaspoon pure vanilla extract (divided – see instructions)
For the Topping:
1 cup (240ml) heavy whipping cream (remaining from above)
1/4 cup (30g) confectioners’ sugar (powdered sugar)
1/2 teaspoon pure vanilla extract (remaining from above)
1/3 cup chopped peanuts (salted or unsalted)
For the Crust:
1 (9-inch) unbaked pie crust, homemade or store-bought, pre-baked and fully cooled
Instructions:
Prepare Crust: Bake your 9-inch pie crust according to package or recipe directions until golden brown. Let it cool completely on a wire rack before filling.
Beat Cream Cheese: In a large bowl using an electric mixer, beat the softened cream cheese on medium speed until completely smooth and creamy (about 1-2 minutes).
Make Peanut Butter Base: Add the smooth peanut butter and 1 cup confectioners’ sugar to the cream cheese. Beat on medium speed until the mixture is very smooth, light, and fluffy (about 2-3 minutes). Scrape down the sides as needed.
Whip First Cream: In a separate medium bowl (or stand mixer bowl), combine 1 cup of the heavy whipping cream and 1/2 teaspoon of the vanilla extract. Beat on medium-high speed until soft peaks form (the cream holds its shape but the tip curls over).
Fold Cream into Base: Gently fold about one-third of the whipped cream into the peanut butter mixture using a rubber spatula until mostly incorporated. This lightens the base. Then, carefully fold in the remaining whipped cream until just combined and no white streaks remain. Be gentle to keep it airy.
Fill the Crust: Pour the peanut butter cream filling into the cooled pie crust. Spread it evenly with an offset spatula or the back of a spoon.
Make Topping & Decorate: In the same bowl used for the first cream (no need to wash thoroughly), combine the remaining 1 cup heavy whipping cream, 1/4 cup confectioners’ sugar, and remaining 1/2 teaspoon vanilla extract. Beat on medium-high speed until stiff peaks form (the cream holds a firm peak when the beaters are lifted). Spread this whipped cream evenly over the peanut butter layer. Create decorative swirls with the back of a spoon. Sprinkle the chopped peanuts evenly over the top.
Chill Thoroughly: Refrigerate the pie for at least 4 hours, but preferably overnight, to allow the filling to set completely.
Serve: Slice with a sharp knife dipped in hot water (for clean cuts) and serve chilled. Enjoy the creamy, dreamy goodness!
Notes:
Peanut Butter: Use conventional smooth peanut butter for best texture and stability. Natural peanut butter is not recommended.
Chill Time: Patience is key! The pie needs ample chilling time to set properly.
Cream Cheese: Must be softened to room temperature for a smooth filling.
Whipping Cream: Ensure your cream and beaters are very cold for best whipping results.
Tools You’ll Need:
9-inch pie plate
Electric hand mixer or stand mixer
Large mixing bowl
Medium mixing bowl
Rubber spatula
Offset spatula or spoon (for spreading)
Measuring cups and spoons
Allergy Info:
Contains: Dairy (cream cheese, heavy cream), Peanuts, Gluten (pie crust), Eggs (often in pie crust), Soy (often in peanut butter/crust). Check all ingredient labels carefully.
Potential Allergens: Wheat (crust), Tree Nuts (peanuts).
Nutrition Disclaimer: Nutrition information is an estimate only and can vary greatly based on specific ingredients used and serving size. This is a rich dessert.