Clothespin Cookies: The Cream-Filled Pastry Rolls Your Grandma Never Wrote Down
There’s a particular kind of magic in a recipe that needs a kitchen tool you’d never expect. Clothespin cookies get their name from exactly that: wooden clothespins, greased and wrapped in ribbons of buttery dough, baked until golden, then slid free and filled with billowy cream. The first time I made these, my kitchen smelled like a bakery that time forgot — warm butter, a whisper of vanilla, and that faint toasted-sugar smell that means something good is happening in the oven.
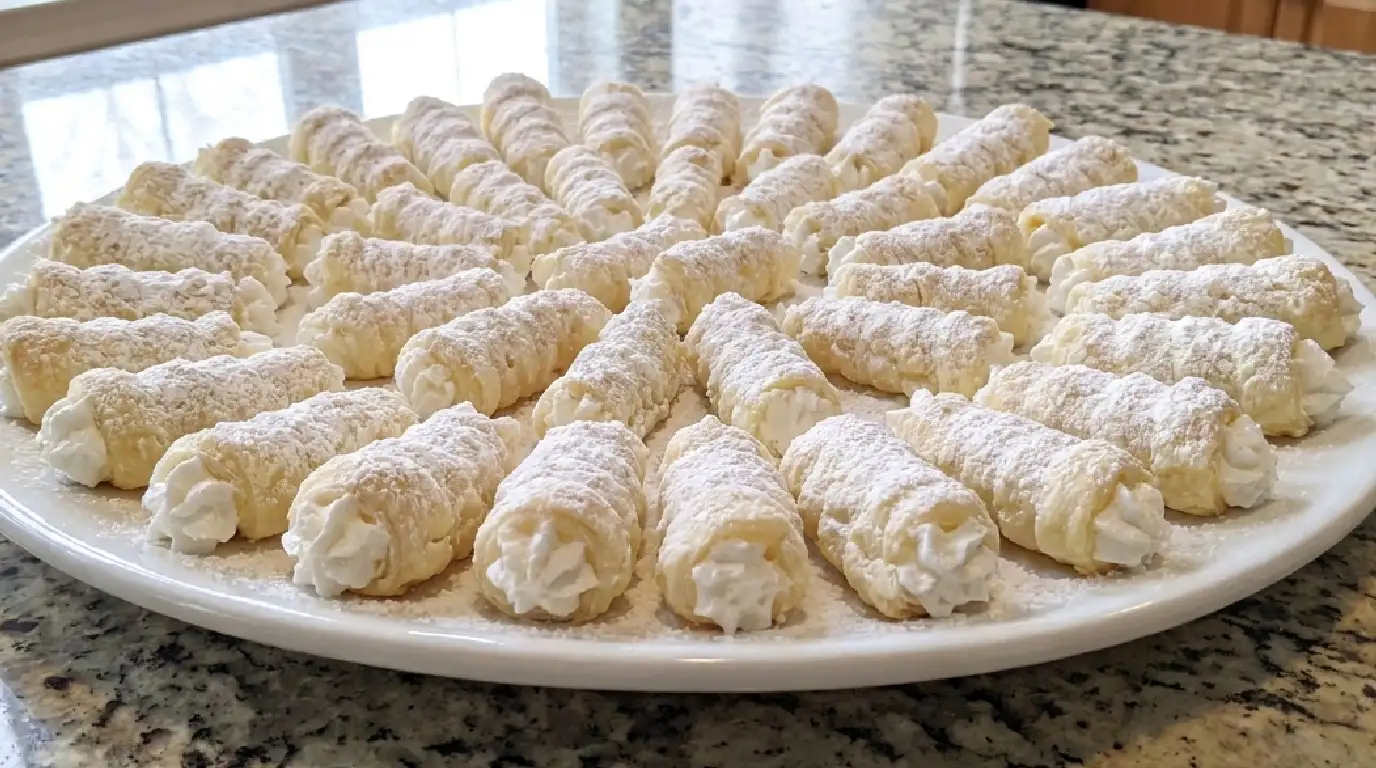
These aren’t cookies in the flat, stack-them-on-a-plate sense. They’re closer to a pastry horn — crisp, flaky, hollow tubes that get stuffed with a whipped filling right before serving. Bite into one and you get a satisfying crackle first, then that cool, sweet cream flooding in right after. It’s a strange little contrast that somehow works every single time.
Why You’ll Love This
- The shape alone makes people stop and ask what they’re eating — always a fun icebox breaker at holiday tables
- Crisp, buttery shell against soft whipped filling gives you two textures in one bite
- The dough comes together with pantry staples, no fancy equipment beyond the clothespins themselves
- They freeze beautifully unfilled, so you can bake ahead and fill fresh whenever you need them
- A genuinely old-fashioned recipe that most guests have never seen before, let alone tasted
The Backstory
My mother-in-law is not an easy woman to impress in the kitchen. She trained under her own mother, who ran a small bakery counter out of her house for decades, and she has opinions about pastry that she does not keep to herself. The first Christmas I brought clothespin cookies to her table, I braced for critique. Instead, she went quiet, took a second one before finishing the first, and finally admitted her own mother used to make something almost identical, rolled around dowels instead of clothespins, back when she was a girl. She asked for the recipe before dessert was even cleared. That’s the kind of reaction that tells you a recipe deserves to stick around.
What Makes It Special
- Butter and shortening combined — butter brings flavor, shortening keeps the dough tender and easy to roll thin without tearing
- A touch of vinegar or sour cream in the dough — this is the old trick that keeps the pastry flaky instead of tough once baked
- Real whipped cream or a whipped shortening filling — light, not too sweet, so it doesn’t fight with the crisp shell
- Vanilla and a little almond extract — a small pairing that gives the filling depth without tasting like either flavor on its own
- A dusting of powdered sugar at the end — purely visual, but it makes the whole tray look like it came from somewhere fancy
Making It Happen
Start by making the dough well ahead of time, since it needs to chill before you can work with it. Cream your butter and shortening together until smooth, then work in the dry ingredients along with your liquid — milk, a beaten egg, and that small splash of vinegar that keeps everything tender. The dough will feel soft at first. Wrap it and let it rest in the fridge for at least an hour, longer if you can spare the time, because a cold dough is what lets you roll it thin without a fight.
Once it’s chilled, roll it out on a floured surface until it’s thin, closer to pie crust than cookie dough. Cut it into long strips, wide enough to wrap around a greased clothespin with a slight overlap. Wind each strip around the clothespin in a spiral, pinching the seam gently so it holds during baking. Set them seam-side down on a parchment-lined baking sheet and into a moderate oven they go, just until they turn a light golden brown along the edges.
Here’s the part that takes a little nerve: while they’re still warm, twist each clothespin gently to loosen the pastry, then slide it out. Do this too late and the pastry sticks. Do it too early and it collapses. A minute or two of cooling is usually the sweet spot. Let the hollow shells cool completely on a rack before you even think about filling them, otherwise the cream will melt into a puddle instead of holding its shape.
For the filling, whip your cream (or whipped shortening, if you want something closer to the old bakery-style version) with powdered sugar and vanilla until it holds soft peaks. Load it into a piping bag and pipe it into both ends of each cooled shell until it’s generously filled. Dust with powdered sugar right before serving.
You Must Know
- Grease the clothespins well with shortening or butter before wrapping dough around them, or you’ll fight to get them out later
- Roll the dough thin — anything too thick won’t crisp properly and will feel doughy in the middle
- Don’t skip the chilling step; warm dough tears and won’t wrap cleanly around the clothespin
- Fill only right before serving, since the filling will soften the shell if it sits too long
- Bake in small batches if your oven runs hot in spots, since these go from golden to overly browned fast
Serving Ideas & Pairings
These are rich enough to stand alone with just a cup of coffee, but they shine at a dessert spread alongside something citrusy or fruit-forward to cut the sweetness, like a simple orange salad or fresh berries. For drinks, a strong black coffee or espresso balances the cream nicely. If you’re serving them for a holiday table, a spiced tea or a glass of dessert wine works just as well.
Make It Different
- Swap the vanilla filling for a chocolate whipped cream by folding in melted, cooled chocolate or cocoa powder
- Add lemon zest to the dough for a brighter, slightly tangy shell that pairs well with a berry filling
- Use a dairy-free whipped topping and plant-based butter for a version that fits dairy-restricted diets
- Roll the finished, filled cookies in crushed nuts or toasted coconut for extra texture
- Dip the ends in melted chocolate before the powdered sugar dusting for a bakery-case look
Storage & Reheating
Unfilled shells keep well at room temperature in an airtight container for a few days, and they freeze beautifully for up to two months if you want to bake a big batch ahead. Just thaw them at room temperature before filling. Once filled with cream, though, they’re a same-day dessert — refrigerate any leftovers in an airtight container and eat within a day, since the shell will soften the longer it sits with the filling inside. These aren’t a reheat-in-the-oven situation; there’s no reheating a cream-filled pastry without ruining it, so plan to fill only what you’ll serve.
Success Tips
Work with cold dough and warm hands as little as possible — the less you handle it, the flakier the result. If your clothespins are new, wash and dry them well before greasing, since new wood can carry a faint smell that transfers to the pastry. When wrapping the dough strips, a slight overlap at each turn keeps the spiral from splitting open in the oven. And if a few shells crack while baking, don’t toss them — a light patch of extra dough pressed on before baking (or just filling them anyway) still works fine for family, if not for a photo.
Frequently Asked Questions
Can I use dowels instead of actual clothespins? Yes. Any clean, food-safe wooden dowel about the same width as a clothespin works fine. Just make sure it’s well greased before wrapping.
Why did my dough tear while wrapping it around the clothespin? It’s usually because the dough got too warm while you were working. Pop it back in the fridge for ten minutes and try again with a lightly floured surface.
Can I make the filling ahead of time? You can whip it a few hours ahead and keep it covered in the fridge, but for the best texture, pipe it into the shells as close to serving time as possible.
Do I have to use both butter and shortening? No, but the combination is what gives the classic texture — all butter will taste richer but can be slightly less flaky, while all shortening loses some flavor. A mix gives you the best of both.
Can I make these smaller for a party platter? Absolutely. Cut narrower strips and use shorter clothespins or dowels for a bite-sized version — just watch the baking time closely since smaller shells cook faster.
Recipe Card Info
Prep time: 30 minutes (plus 1 hour chilling)
Cook time: 12 minutes per batch
Total time: About 2 hours
Servings: 18 cookies
Category: Dessert
Difficulty: Intermediate
Cuisine: European-American, Old-Fashioned Bakery
Yield: 18 filled cookies
Equipment:
18 clean wooden clothespins or dowels, rolling pin, baking sheets, parchment paper, piping bag, wire cooling rack
Ingredients:
For the dough:
- 2 1/2 cups all-purpose flour
- 1/2 cup unsalted butter, softened
- 1/2 cup vegetable shortening
- 1/2 cup granulated sugar
- 1 large egg
- 1/4 cup milk
- 1 teaspoon white vinegar
- 1 teaspoon vanilla extract
- 1/2 teaspoon salt
For the filling:
- 1 1/2 cups heavy cream
- 1/3 cup powdered sugar, plus extra for dusting
- 1 teaspoon vanilla extract
- 1/4 teaspoon almond extract (optional)
Directions:
- Cream the butter, shortening, and sugar together until smooth and light.
- Beat in the egg, milk, vinegar, and vanilla until fully combined.
- Gradually mix in the flour and salt until a soft dough forms.
- Wrap the dough and chill in the refrigerator for at least 1 hour.
- Preheat the oven to 375°F (190°C) and line baking sheets with parchment paper.
- Roll the chilled dough thin on a floured surface and cut into long strips.
- Grease clothespins or dowels well, then wrap each strip around one in a slight spiral, pinching the seam.
- Place seam-side down on the baking sheets and bake for 10 to 12 minutes, until lightly golden.
- While still warm, gently twist and slide each shell off its clothespin, then cool completely on a wire rack.
- Whip the cream with powdered sugar, vanilla, and almond extract until soft peaks form.
- Pipe the filling into both ends of each cooled shell just before serving.
- Dust with powdered sugar and serve.
Notes:
Bake shells ahead and store unfilled at room temperature or in the freezer; only fill what you plan to serve that day, since the shells soften once filled.
Nutrition (per cookie, approximate):
Calories: 160, Fat: 10g, Carbohydrates: 15g, Sugar: 6g, Protein: 2g