
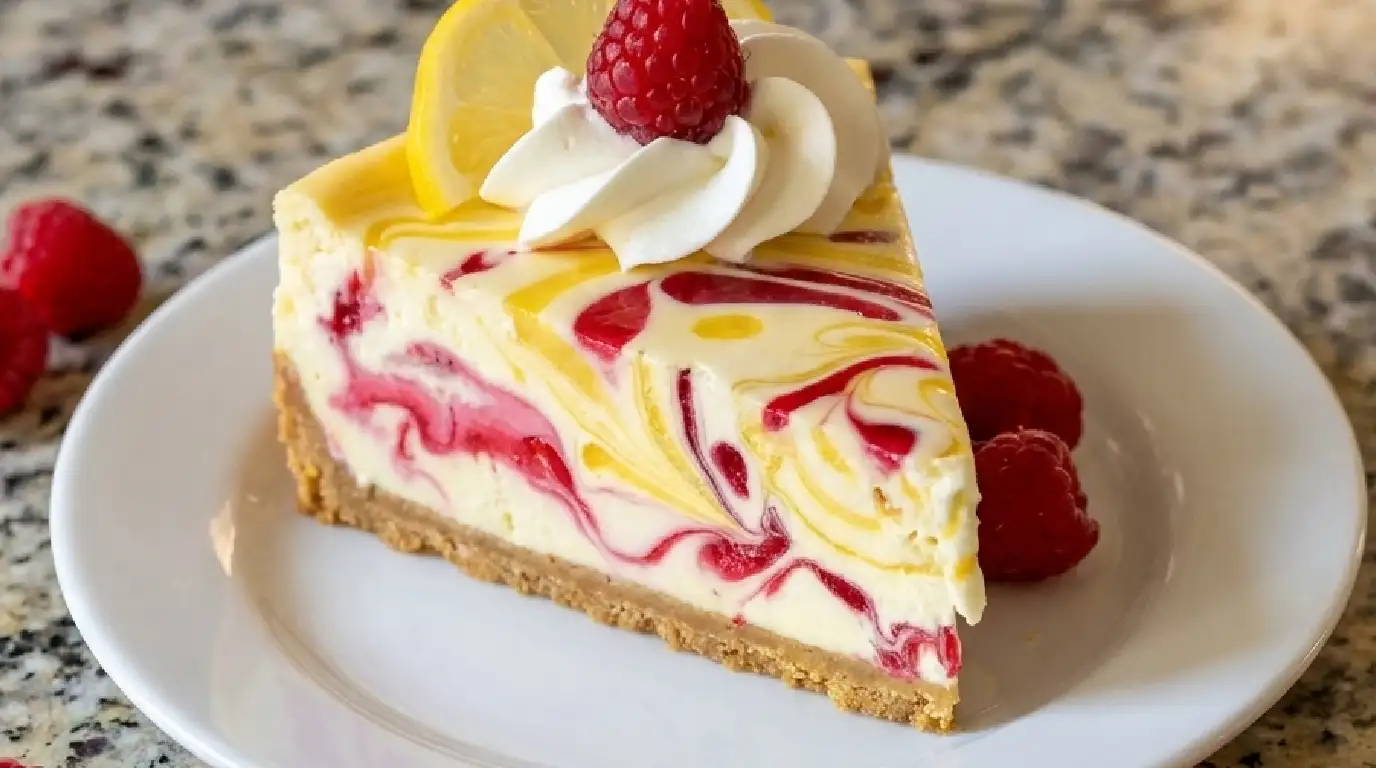
Lemon Raspberry Cheesecake Recipe That Tastes Like Sunshine on a Plate
There’s a particular kind of quiet that falls over a kitchen table when someone takes their first bite of good cheesecake. Forks pause mid-air. Conversation drops to a hum. That’s what happens every single time I set this lemon raspberry cheesecake down in front of people.
I started making this recipe years ago after a disastrous attempt at a store-bought cheesecake for my mother’s birthday — dense, chalky, and about as exciting as cardboard. I swore I’d figure out how to make one properly, and this is the version that stuck. The filling is silky and rich, with just enough bright lemon to cut through the sweetness, and the raspberries bring this tart, jammy contrast that makes every bite feel a little different from the last. The crust is buttery and holds its shape when you slice into it, which honestly took me a few tries to nail down.
This isn’t a fussy, restaurant-only dessert. It’s the kind of thing you can make on a lazy Sunday afternoon, let chill overnight, and pull out the next day looking like you spent hours on it — because you sort of did, but most of that time is just waiting.
Why You’ll Love This
- It strikes that rare balance between rich and refreshing, so it never feels heavy even after a big meal
- The lemon and raspberry combination is genuinely crowd-pleasing — kids and grandparents both go back for seconds
- Make-ahead friendly, since it needs to chill anyway, which means zero stress on the day you’re serving it
- The color alone (pale gold with streaks of deep pink) makes it look far more impressive than the effort required
- Leftovers, if you’re lucky enough to have any, taste even better the next day
The Backstory
My father-in-law is famously suspicious of desserts that aren’t apple pie. He’ll poke at anything with the word “gourmet” attached to it and mutter something about how food shouldn’t be complicated. The first time I brought this cheesecake to a family dinner, I honestly didn’t expect him to touch it. He took one small bite out of politeness, went quiet for a second, and then quietly cut himself a second, much larger slice without saying a word. My mother-in-law leaned over and whispered that she hadn’t seen him do that since Thanksgiving. That’s the moment I knew this recipe wasn’t just good — it was the kind of good that changes minds.
What Makes It Special
- Cream cheese — the backbone of the filling, giving it that dense, velvety texture that a good cheesecake needs
- Fresh lemon zest and juice — brings a sharp, sunny brightness that keeps the richness in check
- Raspberries — their natural tartness plays beautifully against the sweet, creamy filling, and they add gorgeous color
- Graham cracker crust — buttery, slightly salty, with just enough crunch to contrast the smooth filling
- Sour cream — a small addition that makes the texture noticeably silkier and adds a subtle tang
Making It Happen
Start with the crust, since it needs a little time in the oven before anything else happens. Crushed graham crackers get mixed with melted butter and a touch of sugar until the mixture looks like wet sand, then it’s pressed firmly into the bottom of a springform pan. A short bake sets it so it won’t turn soggy once the filling goes in.
While the crust cools, the filling comes together in one bowl. Cream cheese gets beaten until it’s completely smooth — no lumps allowed, or they’ll show up later — then sugar, eggs, sour cream, lemon zest, and lemon juice go in one at a time. The key here is not overbeating once the eggs are added, since too much air in the batter can cause cracking as it bakes.
Half the raspberries get gently folded in or swirled through the top with a knife, creating those beautiful ribbons of pink through the batter. The whole thing goes into the oven at a low, steady temperature, often with a water bath to keep the heat gentle and even. This is what prevents the surface from cracking and keeps the texture creamy all the way through.
Once it’s baked, the cheesecake needs patience more than anything else. It cools slowly in the oven with the door cracked, then finishes cooling on the counter, then chills in the fridge for several hours or overnight. This slow process is what gives it that dense, sliceable texture instead of a soft, pudding-like one.
You Must Know
- Room temperature ingredients are non-negotiable — cold cream cheese and eggs will leave lumps in your filling no matter how long you beat it
- A water bath sounds intimidating but it’s just a pan of hot water the cheesecake pan sits in while baking, and it makes a real difference in preventing cracks
- Don’t open the oven door repeatedly to check on it — sudden temperature changes are a common cause of a sunken or cracked top
- Let it chill for at least six hours, ideally overnight, before slicing, or you’ll end up with a mess instead of clean slices
- A hot, dry knife (run it under hot water and wipe it between cuts) gives you those clean, bakery-style slices
Serving Ideas & Pairings
A slice of this cheesecake pairs beautifully with a light dusting of powdered sugar and a few extra fresh raspberries on top. For something more decadent, a drizzle of white chocolate or a spoonful of raspberry coulis takes it further. On the beverage side, a cup of strong coffee or espresso cuts nicely through the richness, and if you’re serving it for a special occasion, a glass of chilled moscato or prosecco complements the tartness of the lemon without competing with it.
Make It Different
- Gluten-free version: swap the graham crackers for a gluten-free cookie or cracker alternative — the texture holds up well
- Different berries: blueberries or blackberries work nicely in place of raspberries if that’s what you have on hand
- No-bake version: for warmer months, a no-bake cream cheese filling set with gelatin can replace the baked version, though the texture will be softer
- Extra tang: add a bit more lemon zest or a splash of lemon extract if you want the citrus flavor to come through even stronger
- Individual portions: press the crust and filling into muffin tins lined with paper cups for mini cheesecakes, adjusting the bake time down significantly
Storage & Reheating
This cheesecake keeps well in the refrigerator, covered tightly, for up to five days. There’s no reheating involved here — it’s meant to be served cold or at cool room temperature. If you want to freeze it, wrap individual slices tightly in plastic wrap and then foil, and they’ll keep well for up to two months. Thaw slices overnight in the refrigerator rather than on the counter, which helps the texture stay smooth instead of watery.
Success Tips
Weighing your cream cheese and other ingredients rather than eyeballing them makes a noticeable difference in consistency, especially if you bake this often enough to want it perfect every time. Also, resist the urge to rush the cooling process — I know it’s tempting to slice into it right away, but the texture genuinely transforms after a full night in the fridge. Lastly, taste your raspberries before folding them in; if they’re especially tart, a small extra pinch of sugar in the swirl keeps the balance right.
Frequently Asked Questions
Can I use frozen raspberries instead of fresh? Yes, though you’ll want to thaw and drain them first so the excess liquid doesn’t water down your filling or swirl pattern.
Why did my cheesecake crack on top? Cracking usually comes from overbaking, overbeating the eggs into the batter, or a sudden temperature change like opening the oven door too often. A water bath helps prevent this significantly.
Do I have to use a springform pan? It’s strongly recommended, since it lets you release the sides without disturbing the shape of the cheesecake. A regular pan will make it very hard to remove cleanly.
Can I make this ahead of time for a party? Absolutely — in fact, it’s better made a day ahead. The flavors settle and the texture firms up nicely overnight in the fridge.
How do I know when the cheesecake is done baking? The edges should look set while the center still has a slight jiggle, almost like gelatin. It will continue to firm up as it cools, so don’t wait for the center to look completely solid in the oven.
Recipe Card Info
Prep time: 30 minutes Cook time: 60 minutes Total time: 8 hours (includes chilling) Servings: 12 slices Category: Dessert Difficulty: Intermediate Cuisine: American Yield: One 9-inch cheesecake Equipment: 9-inch springform pan, mixing bowls, electric mixer, roasting pan (for water bath), aluminum foil
Ingredients
For the crust:
- 2 cups graham cracker crumbs
- 6 tablespoons unsalted butter, melted
- 3 tablespoons granulated sugar
- Pinch of salt
For the filling:
- 32 oz (four 8 oz blocks) cream cheese, softened to room temperature
- 1 1/3 cups granulated sugar
- 1/3 cup sour cream, room temperature
- 4 large eggs, room temperature
- Zest of 2 lemons
- 1/4 cup fresh lemon juice
- 1 teaspoon vanilla extract
- 1 1/2 cups fresh raspberries, plus extra for topping
Directions
Step 1: Preheat the oven to 325°F (163°C). Wrap the outside of a 9-inch springform pan tightly with aluminum foil to prepare for the water bath.
Step 2: Mix graham cracker crumbs, melted butter, sugar, and salt until the texture resembles wet sand. Press firmly into the bottom of the prepared pan and bake for 8 to 10 minutes. Set aside to cool.
Step 3: Beat the softened cream cheese on medium speed until completely smooth, scraping down the sides of the bowl as needed.
Step 4: Add the sugar gradually, beating until fully combined. Mix in the sour cream, lemon zest, lemon juice, and vanilla extract.
Step 5: Add the eggs one at a time, mixing on low speed just until each one is incorporated. Avoid overbeating once the eggs are added.
Step 6: Gently fold half the raspberries into the batter, or reserve them to swirl on top for a marbled effect.
Step 7: Pour the filling over the cooled crust. Scatter the remaining raspberries on top and use a knife to gently swirl them into the surface.
Step 8: Place the springform pan into a larger roasting pan and fill the outer pan with hot water, reaching about halfway up the sides of the springform pan.
Step 9: Bake for 55 to 65 minutes, until the edges are set and the center has a slight jiggle. Turn off the oven and let the cheesecake sit inside with the door cracked open for about an hour.
Step 10: Remove from the oven and water bath, then let cool completely at room temperature before covering and refrigerating for at least 6 hours, preferably overnight.
Step 11: Run a hot, dry knife around the edge before releasing the springform pan. Slice with a clean, hot knife for the best presentation.
Notes
For the cleanest slices, wipe your knife with a warm, damp cloth between each cut. If the top browns too quickly during baking, loosely tent the pan with foil for the remaining bake time. This cheesecake also freezes well, making it a good make-ahead option for holidays or events planned weeks in advance.
Nutrition
(Approximate values per slice, based on 12 servings) Calories: 420 Total Fat: 29g Saturated Fat: 16g Cholesterol: 135mg Sodium: 310mg Total Carbohydrates: 34g Sugar: 26g Protein: 7g
