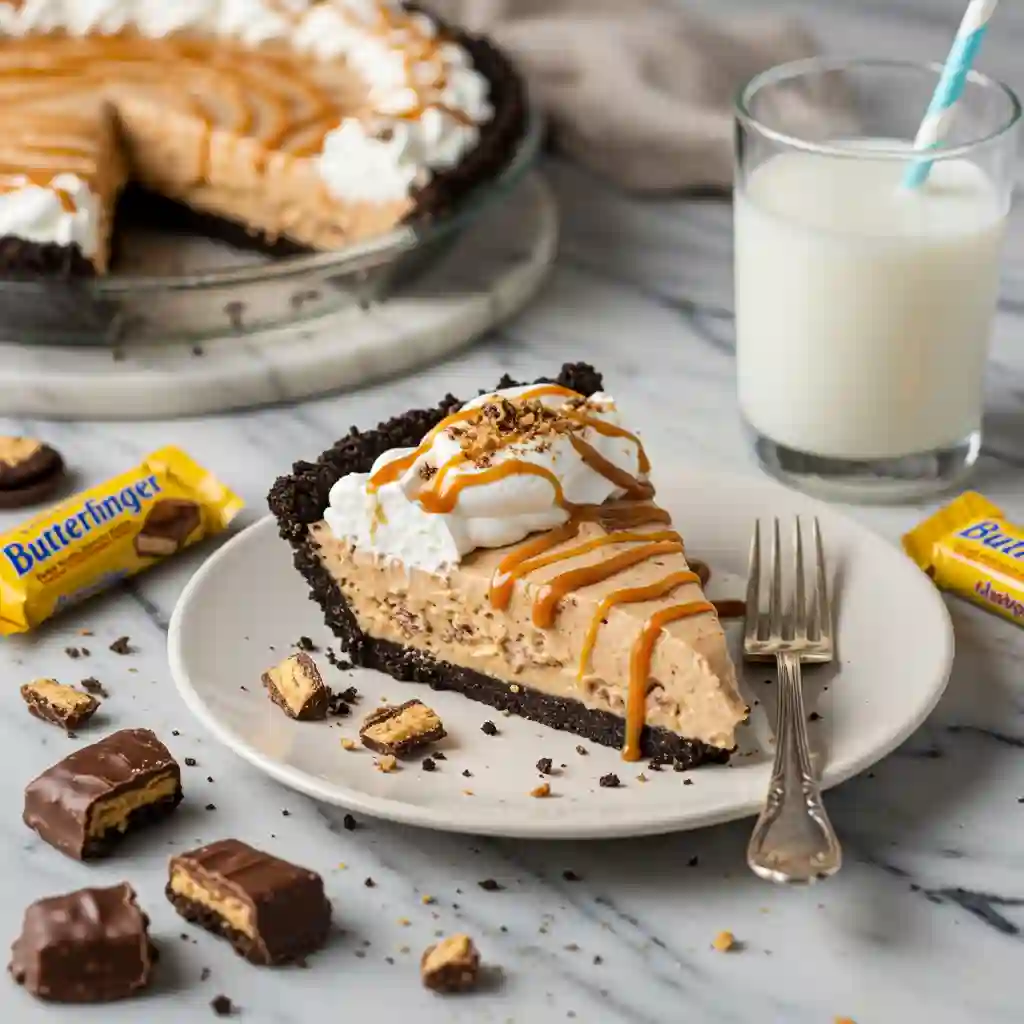
No-Bake Butterfinger Pie: A Crunchy, Creamy Dream Dessert
There’s something magical about the way Butterfinger candy bars shatter into golden, crispy bits, especially when folded into a velvety peanut butter filling and nestled in a rich Oreo crust. This No-Bake Butterfinger Pie is my go-to dessert when I need something irresistibly decadent without turning on the oven. The first time I made it, my toughest critic—my chocolate-skeptic uncle—took one bite, paused, and then silently reached for a second slice. That’s the power of this pie: it turns doubters into believers with its perfect balance of sweet, salty, and crunch.
Why You’ll Love This No-Bake Butterfinger Pie
Effortless elegance – No baking required, just mix, chill, and watch it disappear.
Nostalgia in every bite – The crispy, honey-combed Butterfinger candy brings back childhood memories.
Crowd-pleasing magic – Perfect for potlucks, birthdays, or “just because” desserts.
Make-ahead friendly – Stays delicious in the fridge for days (if it lasts that long).
Endlessly customizable – Swap candies, crusts, or toppings to make it your own.
The Unexpected Fan
I’ll never forget the time I brought this pie to a family gathering where my cousin’s notoriously picky 7-year-old declared, “This is the best thing EVER.” (High praise from a kid who usually survives on chicken nuggets.) Even my health-conscious sister, who usually avoids sweets, couldn’t resist the creamy peanut butter filling and that addictive Butterfinger crunch.
What Makes It Special
Butterfinger bars – Their unique crispy texture and toffee-like flavor melt into the filling while keeping a satisfying crunch.
Oreo crust – Deeply chocolatey, buttery, and sturdy enough to hold the creamy filling.
Peanut butter & cream cheese – Creates a luxuriously smooth, tangy-sweet base.
Cool Whip – Lightens the filling, making it fluffy yet rich.
Making It Happen
Let’s start with the crust: Pulse those Oreos into fine, dark crumbs in a food processor (or smash them in a zip-top bag with a rolling pin—therapy in dessert form). Mix the crumbs with melted butter until they clump together like damp sand, then press them firmly into a pie plate. Pop it in the fridge to set while you whip up the filling.
In a bowl, beat the cream cheese and peanut butter until they’re completely smooth—no lumps allowed! Gradually add the powdered sugar and vanilla, tasting as you go (chef’s privilege). Now, the fun part: crush those Butterfingers into chunky bits (some fine crumbs, some hearty pieces for texture). Fold most of them into the filling along with the Cool Whip, reserving a handful for sprinkling on top.
Spread the filling over the chilled crust, scatter the remaining Butterfinger bits over the top like edible confetti, and let the pie chill for at least 4 hours (overnight is even better). The wait is torture, but the first silky, crunchy bite? Worth it.
You Must Know
Room-temperature cream cheese is key – Cold cream cheese = lumpy filling.
Don’t overmix the Cool Whip – Gently fold to keep the filling airy.
Freeze Butterfingers for easier crushing – 10 minutes in the freezer prevents sticky shards.
Press the crust firmly – Use a glass or measuring cup to compact it evenly.
Chill thoroughly – Slicing too soon = messy (but still delicious) pie.
Serving Ideas
Pair with cold milk (classic), salted caramel coffee, or a creamy chocolate shake.
Add a scoop of vanilla ice cream for an over-the-top sundae pie.
Garnish with whipped cream swirls and drizzled chocolate sauce.
Make It Different
Gluten-free? Use gluten-free Oreos or a nut-based crust.
Nut-free? Swap peanut butter for sunflower seed butter and omit Butterfingers for crushed Heath bars.
Lighter version – Use reduced-fat cream cheese and sugar-free Cool Whip.
Extra chocolatey – Add mini chocolate chips to the filling.
Different candy – Try Snickers, Reese’s Cups, or Kit Kats instead.
Storage & Reheating Tips
Fridge: Cover with plastic wrap; keeps for 3–4 days.
Freezer: Wrap tightly; freeze for up to 1 month. Thaw in fridge before serving.
No reheating needed—this pie is best served cold!
Pie Success Tips
For clean slices, dip your knife in hot water before cutting.
If the crust sticks to the plate, run a butter knife around the edge first.
For a festive twist, use holiday-themed Butterfingers (like the orange Halloween ones).
Frequently Asked Questions
1. Can I use a store-bought crust?
Absolutely! A pre-made Oreo or graham cracker crust saves time.
2. My filling is too soft. What went wrong?
Did you chill it long enough? If it’s still runny after 4 hours, your Cool Whip may have been overfolded or not fully thawed.
3. Can I use natural peanut butter?
Yes, but the texture might be oilier. Stick with no-stir varieties for best results.
4. How do I prevent the Butterfingers from getting soggy?
The candy stays crispy for 1–2 days; for longer storage, add extra topping right before serving.
5. Can I make this vegan?
Try vegan cream cheese, coconut whipped cream, and dairy-free Butterfinger alternatives (like “Butterfinger-ish” bars from vegan brands).
No-Bake Butterfinger Pie Recipe Card
Prep Time: 20 mins
Chill Time: 4 hours
Total Time: 4 hours 20 mins
Category: Dessert
Difficulty: Easy
Cuisine: American
Yield: 8 servings
Ingredients
For the Crust:
20 Oreo cookies (about 2 cups crumbs)
¼ cup butter, melted
For the Filling:
1 (8 oz) package cream cheese, softened
½ cup creamy peanut butter
1½ cups powdered sugar
2 tsp vanilla extract
1 (10.2 oz) bag fun-sized Butterfinger bars, crushed (reserve ½ cup for topping)
1 (8 oz) container Cool Whip, thawed
Instructions
Make the crust: Pulse Oreos into fine crumbs. Mix with melted butter, then press into a 9-inch pie plate. Chill.
Make the filling: Beat cream cheese and peanut butter until smooth. Add powdered sugar and vanilla; mix well.
Fold in crushed Butterfingers (reserving ½ cup) and Cool Whip until combined.
Assemble: Spread filling into crust, top with reserved Butterfinger bits, and chill for 4+ hours.
Notes
Shortcut: Use a store-bought Oreo crust.
No food processor? Crush cookies in a zip-top bag with a rolling pin.
Candy swap: Substitute 4 full-sized Butterfinger bars if needed.
Tools You’ll Need
Food processor or rolling pin
Mixing bowls
Hand mixer or stand mixer
Allergy Info
Contains: Gluten, dairy, peanuts, soy.
Nutrition (per serving)
Calories: 520 | Fat: 28g | Carbs: 62g | Protein: 7g