The Melt-in-Your-Mouth Milk Chocolate Cheesecake That Stole My Heart (and Every Party!)
Remember that feeling of pure, unadulterated bliss when you first tasted something truly magical? For me, it was a sliver of impossibly creamy, milk chocolate-drenched cheesecake at a tiny Parisian patisserie years ago. The memory – the silky smooth texture, the deep chocolate flavor that was rich but not overwhelming, the satisfying buttery crunch of the crust – never left. After countless trials (and happy taste-testers!), I’ve recreated that magic in my own kitchen. This isn’t just any cheesecake; it’s my Milk Chocolate Cheesecake, a decadent love letter to that moment, designed to be surprisingly approachable for home bakers. It’s the dessert that turns dinner guests silent, eyes wide, lost in pure chocolatey ecstasy. Get ready to make memories (and empty plates!).
Why You’ll Love This Milk Chocolate Cheesecake
Pure Decadence, Made Easy: Achieve that luxurious, bakery-style texture without professional skills. It’s impressive but totally doable.
The Perfect Chocolate Balance: Rich milk chocolate delivers deep flavor without the intense bitterness of dark chocolate, making it a crowd-pleaser for all ages.
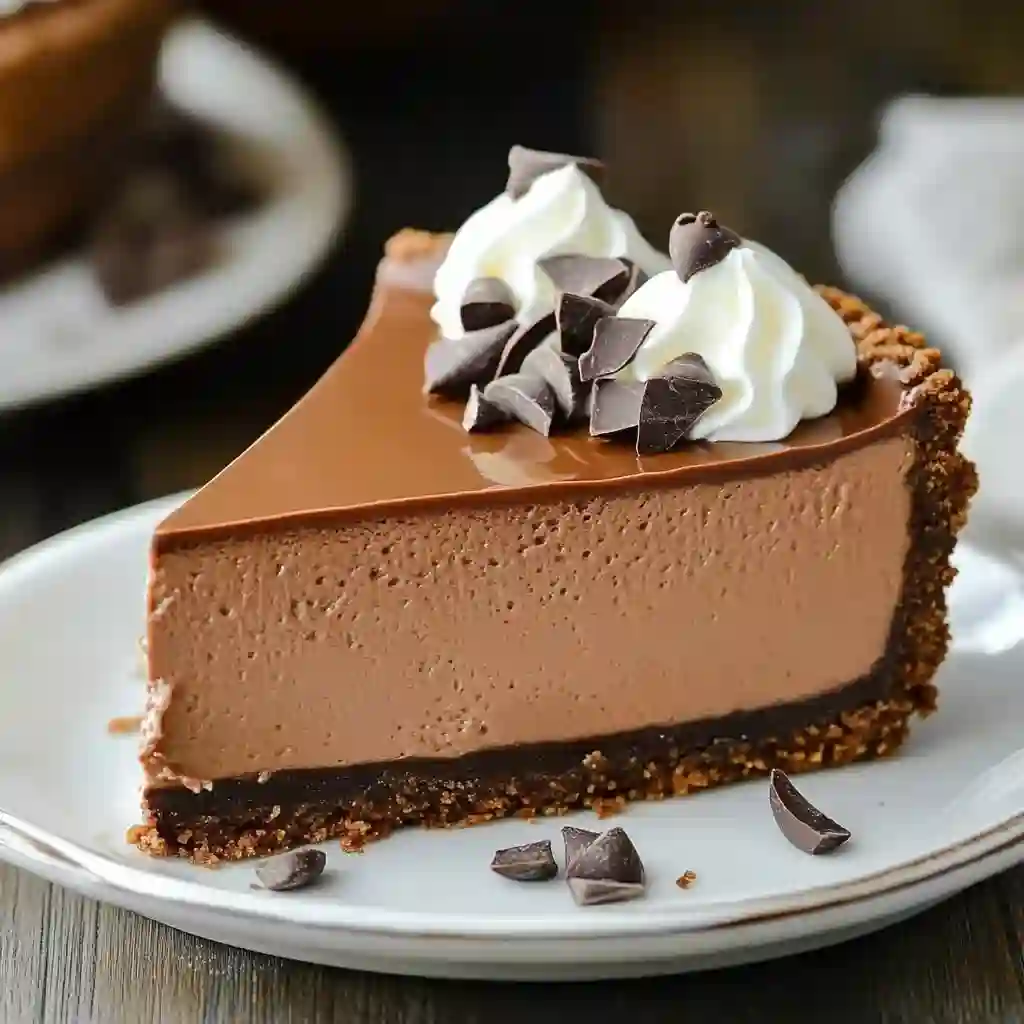
Unforgettable Texture: Experience the dreamy contrast of the velvety, melt-in-your-mouth filling against the crisp, golden graham cracker crust.
Make-Ahead Marvel: This cheesecake actually loves chilling overnight, making it the ultimate stress-free dessert for entertaining.
Instant Crowd-Pleaser: Be prepared for recipe requests! It’s universally adored, from kids to the most discerning dessert connoisseurs.
The Picky Eater Convert: A Sweet Victory
My nephew, Leo, is famously particular. Vegetables? Suspicious. New textures? Questionable. Desserts? Usually only vanilla ice cream makes the cut. When I presented this Milk Chocolate Cheesecake, he eyed it skeptically. One tiny, reluctant forkful later, his eyes lit up. “Auntie,” he mumbled through a mouthful, “this is like chocolate… cloud!” He polished off his slice and quietly asked for “just a little bit more.” Seeing a notoriously picky eater transformed into a cheesecake evangelist? That’s the real magic of this recipe. It wins hearts, one creamy bite at a time.
What Makes This Milk Chocolate Cheesecake Special
It’s all in the quality and harmony of the ingredients:
Premium Milk Chocolate: Using high-quality chocolate bars (like Ghirardelli, Lindt, or Callebaut) instead of chips ensures a smoother melt and richer, more complex flavor. This is the star!
Full-Fat Cream Cheese: Absolutely essential for that signature luxuriously creamy texture and rich mouthfeel. Low-fat versions just won’t set or taste the same.
Real Sour Cream: Adds a subtle tang that perfectly balances the sweetness and contributes to an incredibly silky, dense-yet-light consistency.
Pure Vanilla Extract: Enhances the chocolate flavor beautifully, adding depth and warmth.
Farm-Fresh Eggs: Provide structure and richness. Room temperature eggs incorporate more smoothly for a seamless batter.
The Perfect Crust: A simple blend of finely ground graham crackers, melted sweet cream butter, and a touch of sugar creates the ideal crispy, sandy foundation that holds its own against the luscious filling.
Making It Happen: Your Journey to Cheesecake Bliss
Let’s bake this dream! First, preheat your oven to 325°F (160°C). Grab your trusty 9-inch springform pan – it’s your cheesecake’s best friend.
Crafting the Golden Foundation: Blitz your graham crackers into fine crumbs in a food processor or sealed bag with a rolling pin. Combine them in a bowl with the sugar, then pour in that glorious melted butter. Stir until it resembles damp sand. Press this mixture firmly and evenly into the bottom of your springform pan – I like to use the bottom of a measuring cup to get it nice and compact. Pop it in the oven for 10 minutes. It’ll emerge fragrant and lightly toasted. Let it cool on a rack while you work on the star attraction.
The Silky Chocolate Heart: Now, the good stuff! Break your premium milk chocolate into chunks and gently melt it with the heavy cream. You can do this in a heatproof bowl over simmering water (double boiler) or carefully in the microwave in short bursts, stirring frequently. Let this luscious ganache cool slightly while you tackle the cheese. Using your stand mixer or hand beaters, whip the room-temperature cream cheese on medium until it’s completely smooth and creamy – no lumps allowed! This is crucial! Gradually beat in the sugar until fluffy. Beat in the sour cream and vanilla. Now, add the eggs, one at a time, beating just until the yellow disappears after each. Overbeating eggs incorporates too much air, which can lead to cracks. Finally, pour in that gorgeous, slightly cooled milk chocolate mixture. Gently fold it in with a spatula until you have a uniformly rich, velvety chocolate batter, the color of melted milk chocolate truffles.
The Water Bath Ritual (Don’t Skip This!): Wrap the outside bottom and sides of your springform pan tightly with heavy-duty aluminum foil – this is your leak-proof shield. Place the pan in a large roasting pan. Pour the filling over your cooled crust. Now, carefully pour boiling water into the roasting pan around the springform pan until it comes about halfway up the sides. This gentle steam bath is the secret to even cooking and preventing cracks!
The Bake & The Big Chill: Slide this beautiful setup into your preheated oven. Bake for 55-70 minutes. The edges should look set, but the center (about a 2-3 inch circle) should still have a gentle, delicate wobble when you nudge the pan – like barely set Jell-O. Turn off the oven, crack the door open slightly (I wedge a wooden spoon handle in), and let the cheesecake cool inside for 1 hour. This slow cooling prevents drastic temperature changes that cause cracks. After its oven nap, remove it from the water bath, carefully peel off the foil, and let it cool completely on a rack. Then comes the hard part: patience! Cover it loosely and refrigerate it for at least 4 hours, but preferably overnight. This essential chilling time allows the flavors to meld and the texture to become perfectly firm yet creamy.
You MUST Know These Tips for Success
Room Temp is Non-Negotiable: Ensure cream cheese, eggs, and sour cream are truly at room temperature (about 1-2 hours out of the fridge). This prevents lumps and ensures a silky batter.
Don’t Overmix After Eggs: Once eggs are added, mix just until incorporated. Overbeating incorporates air bubbles that expand during baking and cause cracks.
Water Bath is Your Best Friend: Seriously, don’t skip the foil wrap and water bath! It creates a humid oven environment for even, gentle cooking and a flawless top.
Patience is a Virtue: Rushing the cooling and chilling steps is the top cause of texture issues and cracks. Let it cool slowly in the oven, then chill thoroughly.
Use a Springform Pan: Essential for clean removal. Ensure it’s tightly wrapped in foil to prevent water seepage.
Serving Ideas: The Grand Finale
Run a thin knife around the chilled cheesecake’s edge before unclasping the springform ring for a clean release. For beautiful slices, dip a sharp knife in hot water and wipe it clean between each cut. Serve this heavenly Milk Chocolate Cheesecake simply dusted with cocoa powder, or elevate it:
Dollops: Freshly whipped cream or a cloud of vanilla mascarpone.
Sauces: A drizzle of warm salted caramel, raspberry coulis, or extra melted chocolate.
Freshness: Scatter fresh raspberries, strawberries, or chocolate shavings on top.
Perfect Pairings: Strong coffee, espresso, a cold glass of milk, a sweet dessert wine like a Sauternes, or a ruby port.
Make It Your Own: Delicious Variations
Dark Chocolate Devotee: Swap half or all of the milk chocolate for high-quality dark chocolate (60-70%) for a more intense experience.
Nutty Crunch: Add 1/4 cup finely chopped toasted pecans, hazelnuts, or almonds to the graham cracker crust.
Peanut Butter Swirl: Melt 1/3 cup creamy peanut butter with 2 tbsp cream. Dollop over the filling and gently swirl with a knife before baking.
Mocha Magic: Add 1-2 tsp instant espresso powder to the melted chocolate/cream mixture.
Gluten-Free: Use certified gluten-free graham crackers or gluten-free cookie crumbs for the crust.
Mini Marvels: Bake in a muffin tin lined with cupcake liners (reduce baking time significantly, start checking at 20 mins).
Storing Your Masterpiece & Reheating (If Needed!)
Refrigeration: Store tightly covered in the fridge for up to 5 days. The flavor often improves over 1-2 days!
Freezing: Freeze whole or in slices. Wrap tightly in plastic wrap, then foil. Freeze for up to 2 months. Thaw overnight in the refrigerator.
Reheating: Cheesecake is best served cold. If you prefer a slightly softer texture, let individual slices sit at room temperature for 15-20 minutes before serving. Do not microwave.
Cheesecake Success Pointers (Beyond the Tips!)
Avoid Peeking: Resist the urge to open the oven door during the first 45 minutes of baking. Sudden temperature drops can cause cracks.
Test for Doneness Correctly: The jiggle test (center wobbles slightly) is more reliable than a toothpick, which should come out with moist crumbs, not wet batter.
High-Quality Chocolate Matters: This is the star flavor! Using good chocolate makes a noticeable difference.
Smooth Batter is Key: Take the time to beat the cream cheese until completely smooth before adding anything else. Lumps are hard to eliminate later.
Release the Ring Gently: After chilling, run that knife around the edge before releasing the springform clamp to avoid pulling the crust.
Frequently Asked Questions (FAQ)
Can I use chocolate chips instead of baking chocolate? You can, but baking chocolate (bars or chunks) melts smoother and has a better flavor profile for baking. Chips contain stabilizers that can sometimes make the texture slightly less silky. Opt for high-quality bars if possible!
My cheesecake cracked! What did I do wrong? Don’t despair! Cracks happen. Common culprits: overmixing after adding eggs, temperature shock (cooling too fast), oven too hot, or skipping the water bath. They don’t affect taste! Cover it with whipped cream or toppings. Focus on the water bath and slow cooling next time.
Can I make this without a springform pan? A springform pan is highly recommended for clean removal. If you must use a regular cake pan, line the bottom and sides with parchment paper extending over the edges for lifting out. Removal will be trickier.
How do I know it’s done baking? The edges should be set, and the center (about 2-3 inches in diameter) should still have a slight, gentle jiggle when you nudge the pan – like Jell-O. It will firm up significantly during cooling.
Is it really necessary to chill it overnight? While you can technically serve it after 4 hours, the overnight chill is highly recommended. It allows the flavors to fully develop and the texture to become perfectly firm and creamy. It’s worth the wait!
Milk Chocolate Cheesecake Recipe
Yield: 12 servings
Prep Time: 30 minutes (+ 1 hour cooling, 4+ hours chilling)
Cook Time: 60 minutes
Total Time: 1 hour 30 minutes active (+ significant chilling)
Category: Dessert
Cuisine: American
Difficulty: Intermediate
Ingredients
For the Crust:
1 ½ cups (150g) graham cracker crumbs (about 10-12 full sheets)
¼ cup (50g) granulated sugar
6 tablespoons (85g) unsalted butter, melted
Pinch of salt
For the Milk Chocolate Filling:
10 ounces (285g) high-quality milk chocolate, finely chopped
½ cup (120ml) heavy cream
24 ounces (680g) full-fat cream cheese, softened to room temperature
1 cup (200g) granulated sugar
1 cup (240g) full-fat sour cream, room temperature
2 teaspoons pure vanilla extract
4 large eggs, room temperature
¼ teaspoon salt
Tools You’ll Need
9-inch springform pan
Heavy-duty aluminum foil
Large roasting pan
Stand mixer or hand mixer
Food processor or rolling pin + zip-top bag (for crumbs)
Medium heatproof bowl (for melting chocolate)
Rubber spatula
Measuring cups and spoons
Sharp knife (for releasing/serving)
Instructions
Prep & Preheat: Preheat oven to 325°F (160°C). Tightly wrap the outside bottom and sides of the springform pan with heavy-duty aluminum foil (2 layers recommended). This prevents water seepage in the bath. Lightly grease the inside bottom and sides of the pan.
Make the Crust: Combine graham cracker crumbs, ¼ cup sugar, and salt in a medium bowl. Pour in melted butter and stir until evenly moistened and the mixture resembles wet sand. Press firmly and evenly into the bottom of the prepared springform pan. Bake for 10 minutes. Remove and place on a wire rack to cool slightly.
Melt Chocolate & Cream: Place chopped milk chocolate and heavy cream in a medium heatproof bowl. Melt gently over a pot of barely simmering water (double boiler), stirring constantly until smooth. Alternatively, microwave in 30-second bursts at 50% power, stirring well between bursts, until melted and smooth. Set aside to cool slightly.
Beat Cream Cheese & Sugar: In the bowl of a stand mixer fitted with the paddle attachment (or using a hand mixer), beat the softened cream cheese on medium speed until completely smooth and creamy, scraping down the sides and bottom as needed (about 2-3 minutes).
Add Sugar, Sour Cream & Vanilla: Gradually add the 1 cup sugar and beat on medium until combined. Beat in the sour cream and vanilla extract until smooth. Scrape down the bowl.
Incorporate Eggs: Add the eggs one at a time, beating on low speed just until each egg is incorporated before adding the next. Scrape down the bowl after each addition. Be careful not to overmix once eggs are added.
Fold in Chocolate: Ensure the melted chocolate mixture is just warm, not hot. Pour it into the cream cheese mixture. Using a rubber spatula, gently fold the chocolate into the batter until just combined and no streaks remain. Be careful not to deflate the mixture. The batter will be thick and luxurious.
Prepare Water Bath: Place the foil-wrapped springform pan inside the large roasting pan. Pour the filling over the cooled crust and smooth the top.
Bake: Carefully pour boiling water into the roasting pan around the springform pan until it reaches about halfway up the sides of the springform pan.
Bake: Carefully transfer the roasting pan to the preheated oven. Bake for 55-70 minutes, or until the edges are set but the center still has a slight wobble (like Jell-O) when gently nudged. The center temperature should be around 150°F (65°C) if using a thermometer.
Cool in Oven: Turn off the oven. Crack the oven door open slightly (use a wooden spoon handle to prop it open). Let the cheesecake cool inside the oven for 1 hour. This gradual cooling helps prevent cracks.
Cool Completely: Remove the roasting pan from the oven. Carefully lift the springform pan out of the water bath, remove the foil, and place it on a wire rack. Run a thin knife around the inside edge of the pan to loosen it (helps prevent cracking as it shrinks while cooling). Let it cool completely at room temperature.
Chill: Once completely cool, cover the top loosely with plastic wrap or foil and refrigerate for at least 4 hours, but preferably overnight (for best flavor and texture).
Serve: Before serving, run a thin knife around the edge again to ensure it’s loose. Unclasp and remove the springform ring. Transfer the cheesecake to a serving plate (optional: slide a large spatula under the crust to loosen it from the pan bottom before transferring). Slice with a sharp knife dipped in hot water and wiped clean between cuts. Serve chilled with desired toppings.
Notes
Chocolate Quality: Using a good quality milk chocolate bar (not chips) makes a significant difference in flavor and smoothness.
Room Temperature: Do not shortcut letting the cream cheese, eggs, and sour cream come fully to room temperature. This is vital for a smooth, lump-free batter.
Water Bath Leaks: Ensure the foil wrap is tight and leak-proof! Use heavy-duty foil and double-wrap if needed.
Chilling Time: Overnight chilling is truly recommended for the best texture and flavor development. It firms up perfectly.
Cracks: If cracks appear, don’t worry! They happen and taste just as delicious. Cover them with whipped cream or toppings.
Allergy Information:
Contains: Dairy, Eggs, Gluten (graham crackers), Soy (often in chocolate/butter), Wheat.
Potential Allergens: Check chocolate ingredients for nuts if processed in a facility with allergens.
Gluten-Free Option: Use certified gluten-free graham crackers or cookies for the crust.
Vegetarian: Yes.
Nutrition Disclaimer: Nutritional information is an estimate provided for informational purposes only and may vary based on specific ingredients used and portion sizes. It is not a substitute for professional dietary advice. A typical serving may contain significant calories, fat, and sugar. Enjoy in moderation as part of a balanced diet.