The Ultimate Chocolate Chip Cheesecake Cookies Recipe: A Dreamy Dessert Mashup
A Cookie That Feels Like a Hug
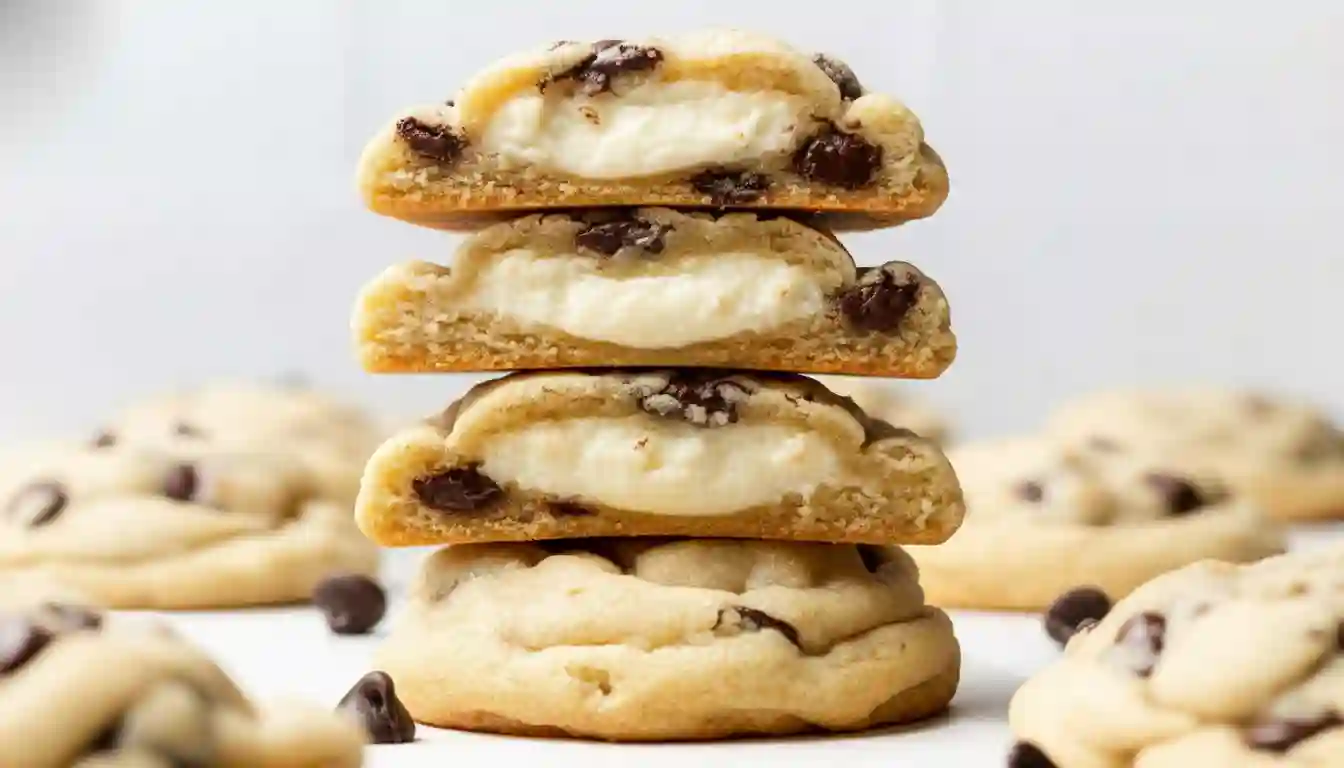
I have a theory that the best recipes are born from a little bit of kitchen chaos and a serious craving. This one came to me on a rainy Sunday, caught between a desire for the gooey, comforting warmth of a chocolate chip cookie and the cool, creamy luxury of cheesecake. Why choose, I thought? The result was a happy accident that has since become my most requested treat. The moment you break one open—warm from the oven, the steam rising to mingle with the scent of brown butter and vanilla—you’ll understand. The crispy, golden edges give way to a soft, buttery center, only to reveal a surprise pocket of tangy, melted cream cheese filling. It’s not just a cookie; it’s an experience.
Why You’ll Love This Recipe
The Ultimate Flavor Mashup: You get the nostalgic, homey comfort of a classic chocolate chip cookie combined with the rich, decadent pleasure of cheesecake in one perfect, handheld bite.
Impressively Simple: While they look and taste like they came from a professional bakery, the process is straightforward and approachable for bakers of any skill level.
The “Wow” Factor: That hidden, creamy center is a delightful surprise for anyone you serve them to, making you look like a culinary genius.
Perfect Texture Balance: We achieve a crispy, buttery exterior that protects a soft, cake-like crumb and a molten, tangy heart.
An Unexpected Rave Review
I’ll never forget the time I brought a batch to a family gathering. My nephew, a famously picky eater whose diet largely consists of “beige” foods, eyed them suspiciously. After some gentle coaxing, he took a small bite. His eyes went wide. “What is this?” he whispered, before promptly devouring the rest and asking for another. He didn’t just like them; he was captivated by them. It was the first time I’d seen him truly excited about a homemade dessert. That’s the magic of these cookies—they win over even the toughest critics.
What Makes It Special
The magic of these chocolate chip cheesecake cookies lies in the thoughtful combination of ingredients and technique.
The Cream Cheese Filling: This isn’t just a swirl; it’s a solid, frozen core of sweetened cream cheese that bakes into a lush, creamy pocket, creating a stunning contrast with the warm cookie.
Brown Sugar & Butter Base: The classic cookie dough is elevated with a blend of white and brown sugar, the latter lending a subtle molasses depth and chewy tenderness that pairs perfectly with the tangy filling.
The Double Chill Method: Freezing the filling solid and then chilling the assembled dough balls is the secret to preventing a messy bake. It ensures the cream cheese melts inside the cookie instead of leaking out.
A Perfectly Balanced Dough: The cookie itself is intentionally designed to be a sturdy yet tender vessel, with just the right amount of chocolate chips to complement without overwhelming the star of the show.
Making It Happen: Your Step-by-Step Guide
This is where the fun begins. First, we’ll prepare our secret weapon: the cream cheese filling. Simply beat the softened cream cheese with the powdered sugar until it’s smooth and dreamy. Using a teaspoon, dollop little mounds onto a parchment-lined plate and slide them into the freezer. Give them a solid hour to become frozen little pucks; this patience is your greatest ally.
While the filling chills, let’s build our cookie dough. Whisk together your flour, baking soda, and salt in a bowl and set it aside. In a larger mixing bowl, beat the softened butter with both sugars until the mixture becomes pale, fluffy, and wonderfully creamy. This step is key for that perfect cookie texture. Beat in the egg, the extra egg yolk (which adds incredible richness), and the vanilla extract until everything is beautifully combined.
Now, gently add your dry ingredients to the wet, mixing just until the flour disappears. Over-mixing is the enemy of a tender cookie. Fold in the chocolate chips, and your dough is ready for its final assembly.
Once your cream cheese centers are frozen solid, it’s time to create the magic. Scoop out tablespoon-sized balls of dough. For half of them, use the back of a teaspoon to press a little well into the top. Retrieve your frozen cream cheese disks and place one into each well. Now, take a second plain ball of dough, place it on top, and gently but firmly pinch and seal the edges all the way around, forming a tall, stuffed ball of dough. Don’t squeeze too hard, or you’ll squish the filling. Pop all your assembled cookie dough balls onto a baking sheet and give them a final rest in the fridge while your oven preheats to 350°F.
Bake them one sheet at a time for that perfect, even heat. In about 9 to 12 minutes, you’ll see the edges turn a beautiful golden brown while the tops look just set. Pull them out and this is crucial—let them rest on the hot baking sheet for a full 10 to 15 minutes. They’re still cooking and firming up, and that frozen center needs time to settle. Transfer them to a wire rack to cool completely, and try to resist eating one immediately (though I won’t judge if you do).
You Must Know: Non-Negotiable Tips for Success
Freeze the Filling Solid: This is the single most important step. A semi-frozen center will melt and leak during baking. Wait until the disks are firm to the touch.
Don’t Skip the Chill: Chilling the assembled dough balls before baking prevents them from spreading too thin and helps the cookies hold their shape, ensuring the cream cheese stays locked inside.
Measure Your Flour Correctly: Too much flour is the most common culprit for dry, crumbly cookies. For best results, use a kitchen scale. If you don’t have one, fluff your flour with a spoon, spoon it into your measuring cup, and level it off with a knife.
Let Them Rest After Baking: The cookies are very soft and fragile straight from the oven. Allowing them to cool on the baking sheet is what gives them the perfect, stable texture.
Serving Ideas
These cookies are sublime all on their own, still slightly warm from the oven. For a truly decadent dessert, serve them alongside a scoop of high-quality vanilla bean ice cream. The hot-and-cold contrast is heavenly. A tall, cold glass of milk is the classic pairing, but for the adults, a cup of strong black coffee or a glass of rich port wine makes for a sophisticated end to any meal.
Make It Different: Customize Your Cookies
Flavor Twists: Add a teaspoon of orange zest to the dough, or use dark chocolate chunks instead of semisweet chips. A pinch of cinnamon in the dough is also a wonderful addition.
Dietary Swaps: Use your favorite vegan butter, vegan cream cheese, and a flax egg to make this recipe entirely plant-based. Remember to decrease the powdered sugar to ¼ cup if using vegan cream cheese, as noted in the recipe card.
Nutty Crunch: Fold in a half-cup of chopped toasted pecans or walnuts for added texture and flavor.
Storage and Reheating Recipe Tips
Store any leftover cookies in an airtight container in the refrigerator for 3-4 days. They can also be frozen for up to 3 months; just thaw them in the fridge overnight. To recapture that just-baked warmth and texture, reheat a cookie in the microwave for 10-15 seconds, or in a 300°F oven for 5 minutes.
Final Success Tips
For the absolute best results, use full-fat, brick-style cream cheese for the filling, as it freezes and holds its shape better than spreadable versions. When sealing the dough balls, make sure there are no cracks or thin spots for the filling to escape. And finally, trust the process—the initial freeze and subsequent chill are what make this ambitious cookie not only possible, but perfectly executed every single time.
Frequently Asked Questions (FAQ)
Can I prepare the cookie dough balls ahead of time?
Absolutely! You can assemble the stuffed dough balls and keep them in an airtight container in the freezer for up to 2 months. When you’re ready to bake, simply place them on a baking sheet and bake from frozen, adding 1-2 minutes to the baking time.
My cream cheese filling leaked a little. What did I do wrong?
This usually happens if the filling wasn’t frozen solid enough, the dough wasn’t sealed completely, or the dough balls weren’t chilled before baking. Ensure a tight seal and don’t rush the freezing and chilling steps.
Can I use pre-made cookie dough?
While you can, I don’t recommend it. The specific texture of this from-scratch dough is designed to hold the filling. Pre-made dough is often too soft and can lead to significant leaking.
Why is my cookie dough so dry and crumbly?
This is almost always due to accidentally using too much flour. Please use the “spoon and level” method or a kitchen scale for perfect results every time.
Is the egg yolk really necessary?
The extra egg yolk adds fat, which contributes to a richer, more tender crumb and a chewier texture. It’s a small step that makes a big difference in the final product.
Chocolate Chip Cheesecake Cookies Recipe Card
Prep time: 30 minutes (plus 1 hour freezing)
Cook time: 12 minutes
Total time: 1 hour 42 minutes
Servings: 19 cookies
Category: Dessert
Difficulty: Intermediate
Cuisine: American
Yield: 19 large cookies
Ingredients
Cookies
1 cup butter (regular or vegan), softened
¾ cup white sugar
¼ cup brown sugar
1 large egg
1 large egg yolk
1 tsp vanilla extract
1 tsp baking soda
¼ tsp salt
2¾ cups all-purpose flour (330g) *SEE NOTES
½-¾ cup semisweet chocolate chips
Cream Cheese Filling
¾ cup cream cheese (regular or vegan), softened (6 oz)
⅓ cup powdered sugar *SEE NOTES if using vegan cream cheese
Instructions
Line a small baking sheet or plate with parchment paper. In a small bowl, mix the cream cheese with powdered sugar until smooth. Place 19 heaping teaspoons of the mixture onto the sheet and freeze for at least 1 hour, or until solid.
Line two large baking sheets with parchment paper. Whisk together the flour, salt, and baking soda; set aside.
In a separate bowl, beat the butter and sugars together until light and fluffy (1-2 minutes). Mix in the egg, egg yolk, and vanilla extract.
Add the dry ingredients and mix until just combined. Stir in the chocolate chips.
Scoop one tablespoon-sized ball of dough for each cookie. Press an indent into half of them. Place a frozen cream cheese disk into each indent.
Top with a second ball of dough, pinching the edges firmly to seal completely, forming a tall ball. Place on a baking sheet and refrigerate.
Preheat oven to 350°F (175°C). Bake chilled cookies one sheet at a time for 9-12 minutes, until edges are golden.
Let cookies cool on the baking sheet for 10-15 minutes before transferring to a wire rack to cool completely.
Notes
For best results, use a kitchen scale to measure flour.
If using vegan cream cheese, decrease powdered sugar to ¼ cup (30g).
Storage: Keep in an airtight container in the fridge for 3-4 days or freeze for up to 3 months.
Nutrition (per cookie, estimated): Calories: 285kcal | Carbohydrates: 33g | Protein: 3g | Fat: 16g | Saturated Fat: 10g | Cholesterol: 55mg | Sodium: 205mg | Fiber: 1g | Sugar: 19g