Table of Contents
ToggleStrawberry Crunch Cheesecake Tacos: A Fun & Easy Dessert
I have a soft spot for desserts that break the rules. The kind that make you smile before you even take a bite. These Strawberry Crunch Cheesecake Tacos were born on a sunny afternoon when my niece, a dedicated taco Tuesday enthusiast, declared that all food would be better if it came in a taco shell. Challenge accepted.
We started playing in the kitchen, and what we created was pure magic. It’s the nostalgic, sweet taste of a strawberry shortcake ice cream bar, but reimagined as a handheld dessert taco. The moment we bit through the crisp, chocolate-dipped shell into the cloud-like creamy filling, we knew we had found something special. It’s a dessert that’s as fun to make as it is to eat.
Why You’ll Love This Recipe
Pure Joy in Every Bite: This recipe combines playful presentation with decadent flavor. It turns a simple dessert into a memorable experience.
Surprisingly Simple: While they look impressive, the components are straightforward. It’s a fantastic recipe for building confidence in the kitchen.
The Perfect Make-Ahead Dessert: You can assemble these tacos a day in advance, taking the stress out of entertaining and leaving you free to enjoy your guests.
A Crowd-Pleasing Showstopper: These tacos are guaranteed to be the star of any potluck, birthday party, or summer gathering.
I’ll never forget serving these to my father-in-law, a man whose dessert preferences are strictly traditional: pie or nothing. He eyed the tacos with a hint of suspicion before taking a cautious bite. The silence that followed was broken by a simple, “Well, I’ll be.” He then proceeded to eat three. It’s the ultimate testament to a dessert that can win over any heart.
What Makes It Special
The magic of this dish lies in the harmony of its components:
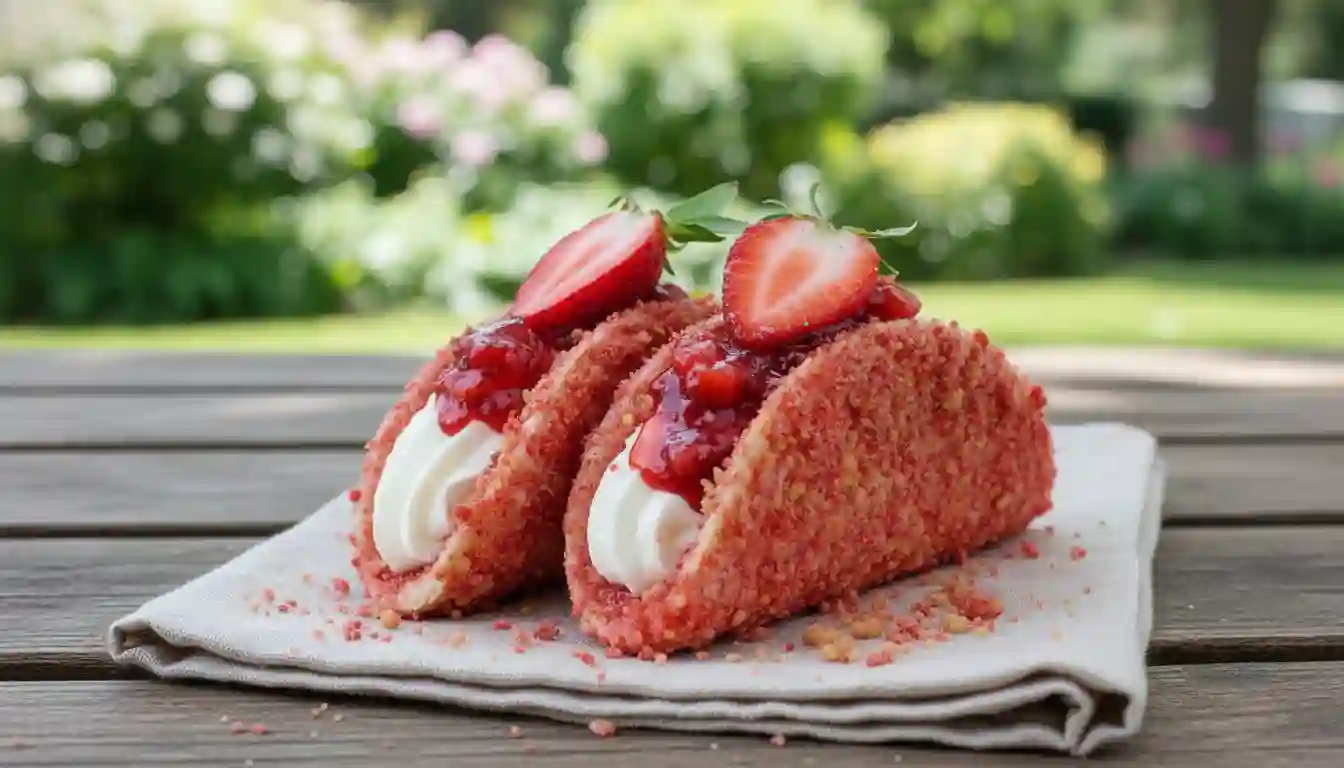
The Crispy Vessel: Flour tortillas, baked until golden and buttery, provide a sturdy yet delicate shell that shatters beautifully.
The Sweet, Crunchy Armor: A coating of melted white chocolate acts as a glue for the strawberry crunch, sealing in the shell’s crispness and adding a layer of creamy sweetness.
The Nostalgic Crunch: The strawberry crunch coating delivers that signature flavor and texture we all love from the classic ice cream bar.
The Creamy Dream Filling: A lush, no-bake cheesecake filling is light, airy, and perfectly tangy, balancing the sweetness of the shell.
The Fresh Finish: Juicy, fresh strawberries and a drizzle of strawberry syrup add a burst of freshness and a beautiful, glossy finish.
Making It Happen
Let’s walk through creating these delightful tacos. First, we’ll craft our edible containers. Preheat your oven to 350°F (175°C). Using a 4-inch cookie cutter, stamp out perfect circles from your flour tortillas. Gently brush each circle with melted butter—this will help them turn a beautiful golden brown. For the signature taco shape, drape these buttered circles over the inverted cups of a muffin tin. The tortillas will slump into a perfect taco shell curve as they bake. Bake for just 5-6 minutes, until the edges are lightly golden and crisp. Let them cool in the tin for a minute before transferring to a wire rack. They will continue to crisp up as they cool.
While the shells are cooling, it’s time to create their sweet, crunchy coating. Melt your white chocolate gently. I prefer a double boiler to prevent seizing: place a heatproof bowl over a pot of simmering water (ensure the bowl doesn’t touch the water) and stir until smooth. If using a microwave, use short 20-second bursts, stirring in between. Once melted, use a pastry brush to paint a thin layer of white chocolate inside and outside each cooled shell. Then, gently press the chocolate-coated shells into your strawberry crunch mixture, coating them thoroughly. Place them on a parchment-lined tray to set completely. The chocolate shell acts as a barrier, keeping the crispy tortilla safe from the creamy filling.
Now, for the star of the show: the cheesecake filling. In a large bowl, beat the softened cream cheese, powdered sugar, and vanilla extract until it’s completely smooth and lump-free. In a separate, chilled bowl, whip the heavy whipping cream until stiff peaks form. This means when you lift the beaters, the cream should hold a firm, upright point. Gently fold the whipped cream into the cream cheese mixture until just combined. Be careful not to overmix, or you’ll deflate all that beautiful air you just whipped in. Transfer this fluffy cloud of filling to a piping bag fitted with your favorite tip (or simply use a zip-top bag with a corner snipped off).
To assemble, find a way to make your shells stand upright. An upside-down muffin tin works perfectly, or you can nestle them in a 9×13-inch baking dish. Pipe the creamy cheesecake filling generously into each shell. Just before serving, top with a tumble of fresh, diced strawberries and a final, artistic drizzle of strawberry syrup.
You Must Know
Poke to Prevent Bubbles: Before baking, use a fork to prick the tortilla circles a few times. This allows steam to escape and prevents large air bubbles from forming.
Watch the Clock: Do not overbake the tortilla shells. They continue to crisp up as they cool, and overbaking can make them too brittle and prone to cracking when you coat them.
Quality Chocolate Matters: Using good-quality white chocolate will make the melting process smoother and the final flavor far superior to candy melts or lower-quality brands.
Room Temp is Key: Ensure your cream cheese is fully softened at room temperature. This is the secret to a silky-smooth filling with no annoying lumps.
Keep it Cold: For the best results, your heavy whipping cream should be very cold to help it whip up into those perfect, stiff peaks.
Serving It Up
These cheesecake tacos are a complete dessert on their own, but for a true showstopping spread, consider serving them alongside a scoop of vanilla bean ice cream. The contrast of temperatures is divine. For a drink pairing, a glass of cold milk is a classic choice, or for the adults, a glass of Prosecco or a rosé wine complements the strawberry flavors beautifully.
Make It Different
Gluten-Free: Use your favorite gluten-free flour tortillas.
Different Crunch: Swap the strawberry crunch for crushed golden Oreos, graham crackers, or even freeze-dried raspberry powder.
Filling Flavors: Add a tablespoon of lemon zest to the filling for a bright, citrusy twist, or fold in some mini chocolate chips.
Chocolate Lovers: Use melted milk or dark chocolate to coat the shells and roll them in chocolate cookie crumbs.
Storing Your Creation
Store any leftover tacos in a single layer in an airtight container in the refrigerator for up to 3 days. The shells will soften slightly over time but will still be delicious. I do not recommend freezing these, as the texture of the filling and shells can become compromised.
Success Tips
The most common issue is a cracked shell. This is almost always due to the tortilla being overbaked. Remember, they need only a few minutes in the oven to become crisp. If your white chocolate is too thick, you can thin it with a tiny amount of coconut oil to make it easier to brush on.
Frequently Asked Questions
Can I use pre-made taco shells?
I don’t recommend it. The baked flour tortilla shells have a neutral, buttery flavor that works perfectly as a base. Pre-made corn taco shells have a savory flavor that would clash with the sweet ingredients.
My white chocolate seized up. What did I do wrong?
White chocolate is very sensitive to moisture. Even a single drop of water or steam can cause it to seize and become grainy. Always ensure your bowls and utensils are completely dry. If it does seize, you can sometimes save it by stirring in a teaspoon of vegetable oil at a time until it becomes smooth again.
Can I make the components ahead of time?
Absolutely! You can bake and coat the shells a day ahead, storing them in an airtight container at room temperature. The filling can also be made a day ahead and kept in a piping bag (or covered bowl) in the fridge. Assemble no more than a few hours before serving to keep the shells as crisp as possible.
What can I use if I don’t have a piping bag?
No problem! You can use a zip-top plastic bag and snip off one corner, or simply spoon the filling carefully into the shells using two spoons.
Where can I find strawberry crunch?
You can often find it in the baking aisle near the ice cream toppings. If you can’t find it, you can make your own by pulsing golden Oreos (filling removed) with a packet of strawberry Jell-O powder and a few freeze-dried strawberries.
Recipe Card: Strawberry Crunch Cheesecake Tacos
Prep Time: 45 minutes
Cook Time: 6 minutes
Total Time: 51 minutes
Servings: 15 tacos
Category: Dessert
Difficulty: Intermediate
Cuisine: American Fusion
Yield: 15 cheesecake tacos
Ingredients
TACO SHELLS:
5 large flour tortillas
1 tablespoon unsalted butter, melted
13 ounces high-quality white chocolate, chopped
1 ½ cups strawberry crunch topping
CHEESECAKE FILLING:
8 ounces full-fat cream cheese, softened to room temperature
1/2 cup powdered sugar
1 teaspoon pure vanilla extract
1 cup heavy whipping cream, cold
TOPPING:
2/3 cup strawberry syrup or sauce
2 cups fresh strawberries, hulled and diced
Instructions
Preheat oven to 350°F (175°C). Using a 4-inch round cookie cutter, cut 15 circles from the flour tortillas.
Brush both sides of each tortilla circle with melted butter. Drape them over the inverted cups of a muffin tin to form taco shapes.
Bake for 5-6 minutes, or until edges are just turning golden. Let cool in the tin for 1 minute before transferring to a wire rack to cool completely.
Melt the white chocolate using a double boiler or in the microwave in 20-second intervals, stirring until smooth.
Using a pastry brush, coat the inside and outside of each cooled taco shell with the melted white chocolate.
Immediately dip and press the chocolate-coated shells into the strawberry crunch topping until fully covered. Place on a parchment-lined baking sheet to set completely.
For the filling: In a large bowl, beat the softened cream cheese, powdered sugar, and vanilla extract until smooth and creamy.
In a separate chilled bowl, whip the cold heavy whipping cream until stiff peaks form.
Gently fold the whipped cream into the cream cheese mixture until just combined. Do not overmix.
Transfer the filling to a piping bag. Once the shells are set, pipe the filling generously into each shell.
Top with diced fresh strawberries and a drizzle of strawberry syrup just before serving.
Nutrition Information (Estimated):
Calories: 320
Total Fat: 18g
Saturated Fat: 11g
Cholesterol: 35mg
Sodium: 150mg
Total Carbohydrates: 38g
Dietary Fiber: 1g
Sugars: 28g
Protein: 4g