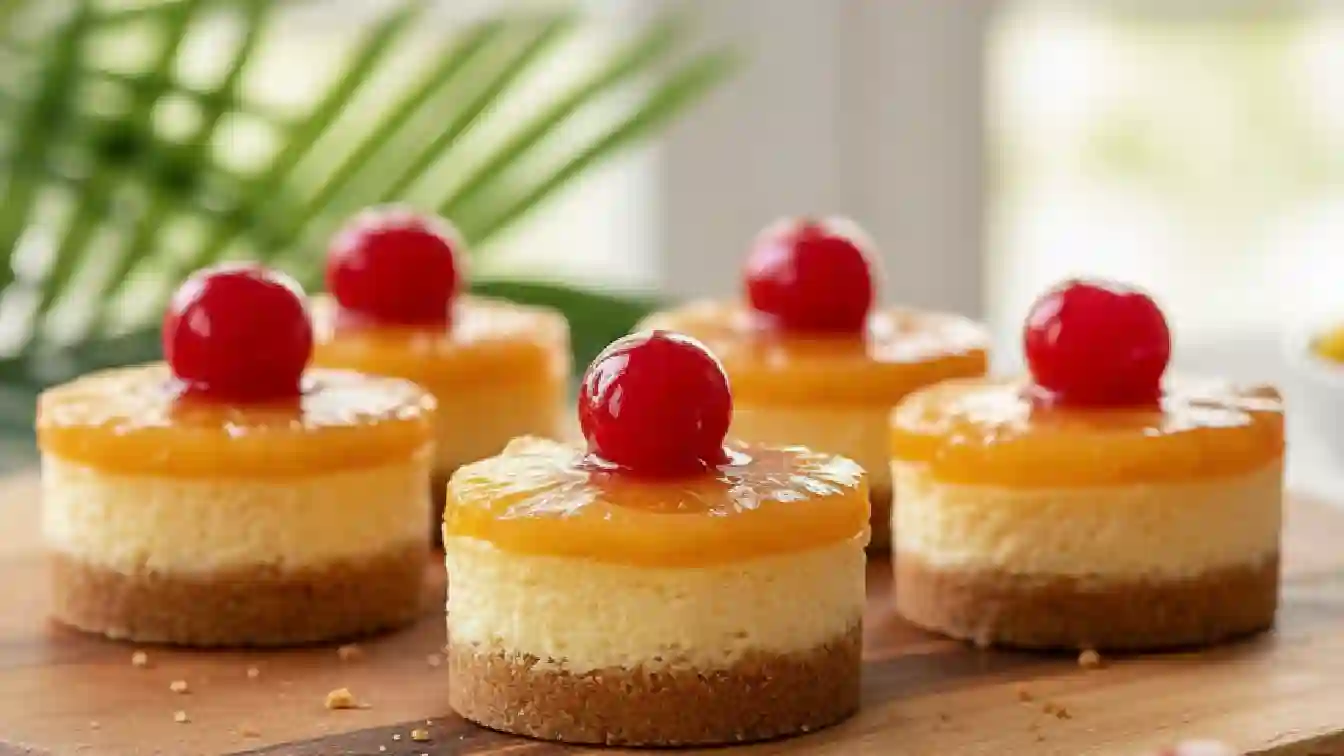
Pineapple Upside-Down Cheesecakes Recipe: Individual Bites of Joy
There’s a certain magic in a dessert that arrives at the table with a little flair. I learned this from my grandmother, whose classic pineapple upside-down cake was a centerpiece of every family gathering. The moment she’d flip that pan, revealing the glistening, caramelized fruit, felt like a quiet celebration. I wanted to capture that same sense of theater and warmth, but in a personal, no-fuss way. These Pineapple Upside-Down Cheesecakes are my answer: all the nostalgic charm of that beloved cake, swirled with the rich, creamy luxury of cheesecake, and perfectly portioned into individual delights. They’re little edible sunsets, golden and sweet, guaranteed to turn any Tuesday into a special occasion.
Why You’ll Love This Recipe
Nostalgia, Perfected: It wraps the comforting, familiar flavors of a classic pineapple upside-down cake into an elegant, creamy package.
Surprisingly Simple: Don’t let the impressive look fool you. Using a standard muffin tin and simple steps, this recipe is approachable for any skill level.
The “Wow” Factor: Flipping each cheesecake to reveal the glossy pineapple topping never fails to delight guests and family.
Make-Ahead Magic: These need dedicated chilling time, meaning you can prepare them hours or even a day ahead, making entertaining stress-free.
Perfectly Portable: They’re ideal for potlucks, picnics, or gifting—each one is its own neatly packaged treat.
I once brought a batch to a neighborhood barbecue, where the host’s father, a man famously skeptical of any dessert that wasn’t “just plain pie,” eyed them with polite doubt. After one bite, his eyebrows shot up. He finished it quietly, then simply said, “Now, that’s clever.” He asked for the recipe before he left. It’s a dish that wins over the traditionalists while exciting the adventurous eaters.
What Makes It Special
The magic is in the carefully chosen layers and how they work together.
The Caramel & Pineapple Base: A touch of caramel sauce under each pineapple chunk creates a deep, buttery glaze when baked and flipped, while a sprinkle of sugar encourages a perfect, lightly crispy edge on the fruit.
The Buttery Crust: A simple graham cracker crust pressed over the pineapple acts as a delicious barrier, keeping the juicy fruit separate from the filling so it doesn’t become soggy.
The Luxurious Filling: Using full-fat, room-temperature cream cheese is non-negotiable. It whips into an impossibly smooth, creamy, and rich batter that bakes into a velvety texture with just the right amount of tang to balance the sweet pineapple.
Making It Happen
Start by preheating your oven to a gentle 325°F (163°C). This lower temperature is key for a creamy cheesecake that bakes evenly without cracking. Line a muffin pan with cupcake liners—this is your secret to a clean release.
Now, create the sweet foundation. Into each liner, spoon half a teaspoon of caramel sauce. Place a single, proud pineapple chunk right in the center of that caramel puddle. A tiny pinch of granulated sugar over the top will be the catalyst for a beautiful, golden caramelization.
For the crust, stir together graham cracker crumbs and melted butter until it resembles wet sand. Press a firm, even tablespoon of this mixture directly on top of each pineapple chunk. This layer is your delicious dam.
The heart of the matter is the filling. In a bowl, beat the softened cream cheese with sugar for a good two to three minutes, until it’s completely smooth and no lumps remain. This patience is what gives you that silky texture. Add the eggs, one at a time, mixing on low speed after each until they’re just incorporated. Overmixing here incorporates too much air, which can lead to puffing and cracking. A stir of vanilla extract is the final aromatic touch.
Divide this creamy batter among your prepared cups, filling them nearly to the top. Slide the pan into the oven and bake for 18 to 22 minutes. You’re looking for the edges to be set, but the centers should still have a slight, gentle jiggle—they’ll firm up beautifully as they chill. Let them cool in the pan, then transfer to the refrigerator for at least two hours. This waiting period is crucial for the perfect sliceable-yet-creamy texture.
When you’re ready to serve, the moment of truth arrives. Carefully peel away the liners and place each mini cheesecake upside-down on a plate, revealing the glossy, jewel-like pineapple top.
You Must Know
Room Temperature is Rule #1: Ensure your cream cheese and eggs are truly at room temperature. This allows them to blend seamlessly, preventing a lumpy or over-aerated batter.
Don’t Over-mix: Once the eggs are added, mix on low speed and only until the yolk disappears. Over-beating incorporates excess air, which can cause the cheesecakes to rise and fall dramatically, leading to cracks.
The Jiggle Test is Your Guide: The cheesecakes are done when the outer edges look set but the very center (about the size of a quarter) has a slight, soft jiggle when you gently shake the pan.
Chill Completely: Rushing the chilling step will result in a cheesecake that’s too soft to hold its shape when flipped. Patience yields perfection.
Serving Ideas
Serve these golden gems as they are, or with a dollop of freshly whipped cream or a sprinkle of toasted coconut for extra flair. For a dinner party, pair them with a cup of strong coffee or a glass of off-dry Riesling or Moscato d’Asti, whose sweetness will complement the caramelized pineapple beautifully.
Make It Different
Gluten-Free: Use gluten-free graham-style crackers for the crust.
Flavor Twists: Substitute the caramel sauce with dulce de leche for a deeper flavor, or add a teaspoon of rum or coconut extract to the cheesecake filling.
Fruit Swap: Try using well-drained mandarin orange segments or even a halved maraschino cherry in place of the pineapple chunk.
Nutty Crust: Replace half the graham crumbs with finely ground pecans or walnuts for a toasted, nutty flavor in the crust.
Storage & Reheating Tips
Store cooled cheesecakes in an airtight container in the refrigerator for up to 4 days. They are best served cold. For longer storage, freeze them (without garnishes) on a parchment-lined tray until solid, then transfer to a freezer bag for up to 2 months. Thaw overnight in the refrigerator. Do not microwave.
Success Tips
For ultra-smooth filling, you can beat the cream cheese alone for a minute before adding the sugar to ensure any lumps are gone.
Use a cookie scoop or a small ice cream scoop to evenly distribute the crust mixture and the batter into the muffin cups for uniform baking.
If you’re using fresh pineapple, make sure to pat the chunks very dry to prevent excess moisture from seeping into the crust.
Frequently Asked Questions (FAQ)
Q: Can I use fresh pineapple instead of canned?
A: Absolutely! Just make sure to cut it into chunks similar in size to the canned version and pat them thoroughly dry. Fresh pineapple contains more enzymes, but the short baking time minimizes any issue with breaking down the dairy.
Q: My caramel sauce sank into the crust. What happened?
A: This usually means the crust wasn’t pressed firmly enough. Make sure you’re creating a compact, even layer to act as a proper seal over the caramel and pineapple.
Q: Can I make one large cheesecake instead of individuals?
A: You can, but the baking time will increase significantly (likely 45-60 minutes). You’ll also need to adjust the pineapple layer to cover the bottom of a springform pan. The water bath method is recommended for a large cake to prevent cracking.
Q: Why did my cheesecakes puff up and then crack?
A: This is typically due to over-mixing the batter after adding the eggs, or from baking at too high a temperature. Mixing on low speed and using the correct oven temperature are crucial for a smooth, crack-free surface.
Q: How do I know for sure they are done baking?
A: Trust the jiggle test. At 18 minutes, gently shake the pan. The centers should jiggle like soft Jell-O, not like liquid. The edges will look matte and set. They will firm up perfectly in the fridge.
Pineapple Upside-Down Cheesecakes Recipe
Prep Time: 25 minutes
Cook Time: 20 minutes
Total Time: 3 hours 45 minutes (includes chilling)
Servings: 12 cheesecakes
Category: Dessert
Difficulty: Easy
Cuisine: American
Yield: 12 individual cheesecakes
Ingredients
For the Pineapple Layer:
12 pineapple chunks (canned and well-drained, or fresh)
6 teaspoons caramel sauce
1 tablespoon granulated sugar (for sprinkling)
For the Crust:
1 cup (100g) graham cracker crumbs
3 tablespoons (42g) unsalted butter, melted
For the Cheesecake Filling:
12 ounces (340g) full-fat cream cheese, softened to room temperature
1/3 cup (67g) granulated sugar
2 large eggs, room temperature
1 teaspoon vanilla extract
Directions
Preheat your oven to 325°F (163°C). Line a 12-cup standard muffin pan with cupcake liners.
Assemble the Pineapple Layer: To each liner, add ½ teaspoon of caramel sauce. Place one pineapple chunk squarely in the center of the caramel. Sprinkle a small pinch of the granulated sugar over each pineapple chunk.
Make the Crust: In a small bowl, mix the graham cracker crumbs and melted butter until fully combined and the mixture resembles wet sand. Press about 1 tablespoon of this mixture firmly and evenly into each liner, directly on top of the pineapple chunk.
Prepare the Cheesecake Batter: In a medium bowl using a hand mixer or stand mixer with the paddle attachment, beat the softened cream cheese and 1/3 cup sugar together on medium speed for 2-3 minutes, until completely smooth and creamy. Scrape down the bowl. Add the eggs one at a time, mixing on low speed after each addition until just combined. Stir in the vanilla extract. Do not over-mix.
Assemble and Bake: Divide the cheesecake batter evenly among the prepared muffin cups, filling them nearly to the top. Bake for 18-22 minutes, until the edges are set but the centers still have a slight, gentle jiggle.
Cool and Chill: Allow the cheesecakes to cool in the pan on a wire rack for 15-20 minutes. Then, transfer the pan to the refrigerator and chill for at least 2 hours, or until completely firm.
Serve: Carefully peel away the cupcake liners. Place each cheesecake upside-down on a serving plate to showcase the pineapple-caramel topping. Garnish as desired.
Notes
For the cleanest slices when serving, use a sharp knife dipped in hot water and wiped dry between cuts.
Nutrition Information (per cheesecake, estimated): Calories: 210 | Fat: 14g | Saturated Fat: 8g | Carbohydrates: 18g | Sugar: 14g | Protein: 4g