No-Bake Mini Banana Cream Pies: An Easy, Dreamy Dessert
There’s a certain kind of magic in a dessert that comes together without ever turning on the oven. It feels like a little secret, a clever shortcut to something that tastes like you fussed for hours. That’s the charm of these No-Bake Mini Banana Cream Pies. I remember first making them for a last-minute summer gathering, my kitchen already warm from the afternoon sun. The thought of baking was out of the question. In mere minutes, I had these adorable, creamy, and satisfying little pies chilling in the fridge. The moment I bit into one—the cool, velvety pudding, the sweet slice of ripe banana, the crispy, buttery crust, and that cloud of real whipped cream—I knew this recipe was a keeper. It’s nostalgia in a miniature form, simple enough for a weeknight treat yet elegant enough for guests.
Why You’ll Love This
Effortless Elegance: They look like you spent all day in the kitchen, but the secret is the simple, no-bake assembly.
The Perfect Portion: Individual servings mean no messy slicing and everyone gets their own perfect little pie.
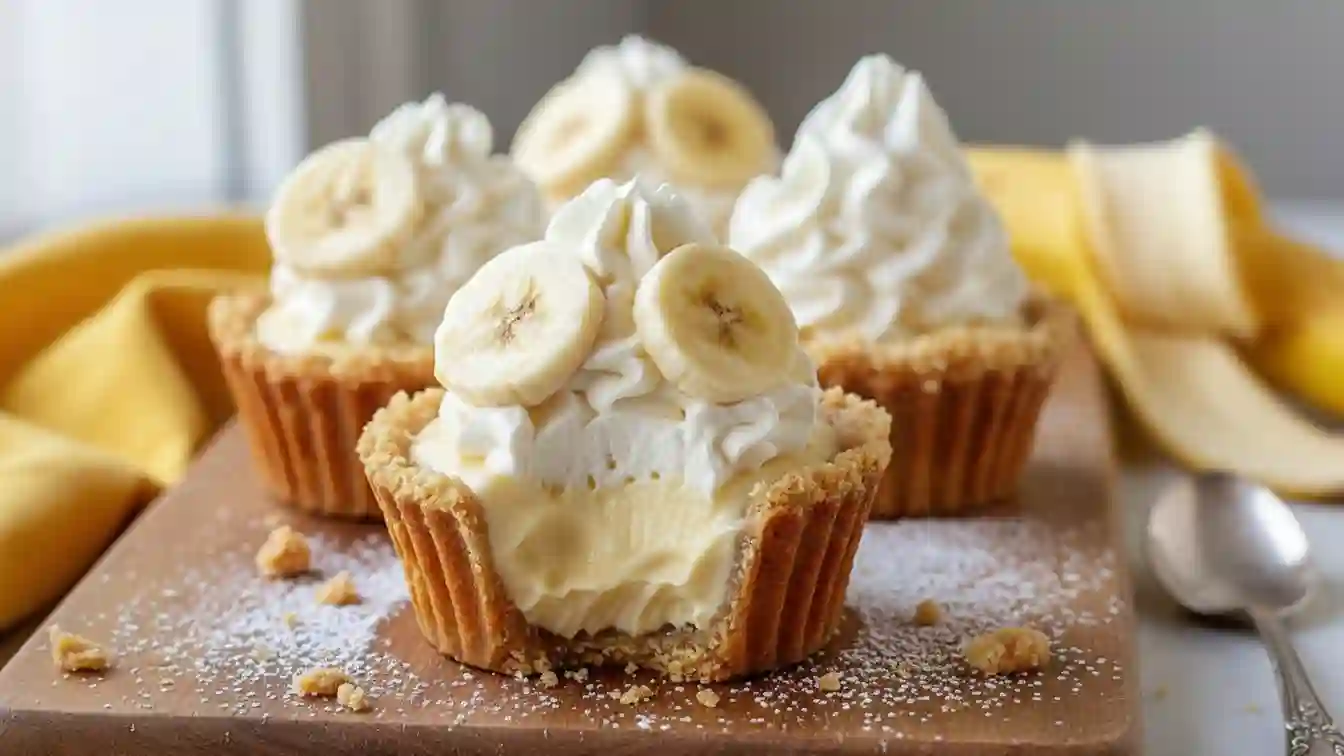
A Textural Dream: Experience the wonderful contrast of creamy filling, tender banana, and crunchy graham crust in every bite.
Cooling & Comforting: The ultimate dessert for warm days when you crave something sweet and refreshing without the heat of the oven.
I once brought a tray of these to a neighborhood potluck, tucked in between more elaborate cakes and pastries. A friend’s father, a renowned skeptic of “fancy desserts” and a lifelong chocolate cake devotee, quietly took one. I watched him take a bite, then promptly go back for a second. Later, he sought me out just to say, “Now that’s a proper pie.” It was the ultimate testament: when you win over the traditionalists with something so simple, you know you’ve got a winner.
What Makes It Special
Real Whipped Cream: Using heavy whipping cream whipped to firm peaks creates a luxuriously light and creamy topping that’s far superior to any canned alternative.
Banana Instant Pudding: This is our flavor powerhouse and thickening hero, delivering that classic, beloved banana cream taste instantly.
Fresh Bananas: They provide essential fresh, tender bites and authentic fruit flavor that artificial fillings can’t replicate.
Graham Cracker Shells & Crumbs: The shells offer a crispy, honey-kissed foundation, while the extra crumbs sprinkled on top add a delightful buttery crunch.
Making It Happen
Let’s start by creating the crowning glory: the real whipped cream. Pour your heavy whipping cream into a large, cool bowl. Using a hand mixer or stand mixer, beat it until those soft, billowy peaks turn firm and hold their shape. This usually takes about 4-6 minutes. Be patient; you’ll see it transform from liquid to a voluminous, spreadable cloud. Scoop it all into a piping bag fitted with a large star tip—this makes for a beautiful finish, but a simple spoon works just as well.
Now, for the assembly. Take your mini graham cracker shells and place them on your serving tray. Into each one, spoon about two tablespoons of the banana instant pudding, creating your first creamy layer. Next, take your fresh bananas and line each pie with about five thin slices, pressing them gently into the pudding. For a little extra texture and that quintessential banana cream pie flavor, sprinkle a pinch of graham cracker crumbs over the banana layer.
Now, pipe or dollop a generous swirl of your freshly whipped cream right into the center of each pie. Finish with one last light sprinkle of those golden graham cracker crumbs for visual appeal and crunch. For the brightest flavor and to avoid browning, add any extra banana slices as a garnish right before you serve.
You Must Know
Chill Out: For the best texture, let the assembled pies chill in the refrigerator for at least 30 minutes before serving. This helps the layers set.
Banana Timing: To prevent the bananas from turning brown inside the pie, assemble them no more than a few hours before serving. Garnish with fresh slices just as you bring them to the table.
Cream Confidence: Ensure your heavy whipping cream is very cold before whipping for the best volume and stability.
Pudding Perfection: If your instant pudding mix seems too thick right out of the package, you can whisk in a tablespoon or two of milk to make it easier to spoon into the shells.
Serving Ideas
These mini pies are stars on their own, but for a fuller spread, serve them alongside a cup of strong, dark roast coffee or a glass of cold milk. For a dinner party, they pair beautifully with a digestif like a tawny port or a simple cup of herbal tea.
Make It Different
Chocolate Lover’s Twist: Use chocolate graham cracker shells or add a layer of chocolate pudding beneath the banana layer.
Nutty Crunch: Sprinkle chopped toasted pecans or walnuts on top with the graham crumbs.
Dairy-Free: Use coconut cream (chilled) for whipping and a compatible brand of instant pudding.
Flavor Infusion: Add a teaspoon of vanilla extract or a pinch of cinnamon to the whipped cream as you beat it.
Storage and Keeping Tips
Store any assembled pies, tightly covered, in the refrigerator for up to 2 days. Be aware that the crust will slowly soften, and the bananas will brown over time. For longer storage, you can prepare the whipped cream and pudding separately and assemble individual pies just before you plan to eat them.
Success Tips
The key to the perfect whipped cream is not to rush or overbeat. Stop mixing the moment you see firm peaks; overbeating will lead to a grainy texture that can eventually turn to butter. If your kitchen is very warm, chilling your mixing bowl beforehand can help the cream whip up faster and higher.
Frequently Asked Questions (FAQ)
Can I make these ahead of time?
You can prepare the whipped cream and have your ingredients ready, but for the best texture and to prevent sogginess and browning, full assembly is best done a few hours before serving.
My whipped cream is runny. What happened?
This usually means it was under-whipped, the cream wasn’t cold enough, or the bowl was warm. Start with everything cold and keep beating until the cream forms distinct, firm peaks that don’t slump over.
Can I use regular pie crust?
This specific recipe is designed for the convenience and texture of ready-made graham cracker shells. A pre-baked traditional pie crust could be used, but you would need to adjust the quantities and the “no-bake” aspect would be lost.
What can I use instead of a piping bag?
No problem! Simply use a spoon to dollop the whipped cream on top. For a prettier finish without a tip, you can spoon the cream into a zip-top bag, snip off a corner, and pipe simple rounds.
Can I use a different pudding flavor?
Absolutely. While banana pudding gives the classic flavor, vanilla or even cheesecake-flavored pudding would work wonderfully and let the fresh banana shine.
No-Bake Mini Banana Cream Pies
Prep time: 15 minutes
Cook time: 0 minutes
Total time: 15 minutes (plus chilling)
Servings: 6
Category: Dessert
Difficulty: Easy
Cuisine: American
Yield: 6 mini pies
Ingredients
6 Mini Graham Cracker Shells
8 oz Heavy Whipping Cream
2 Medium Bananas, sliced
2 ounces Graham Cracker Crumbs
1 cup Banana Instant Pudding mix (dry)
Instructions
Real Whipped Cream: In a large glass or metal bowl, beat the heavy whipping cream until firm peaks form, about 4-6 minutes. Transfer to a piping bag fitted with a large star tip.
Assemble Pies: To each graham shell, add 2 tablespoons of dry banana pudding mix. Layer with about 5 slices of banana. Sprinkle with a portion of the graham cracker crumbs.
Top & Finish: Pipe whipped cream onto the center of each pie. Sprinkle with remaining graham cracker crumbs.
Serve: For best results, garnish with extra banana slices just before serving. Chill until ready to eat.
Notes
*Nutritional information is an estimate. For the best texture and appearance, assemble the pies close to serving time. Store any leftovers, covered, in the refrigerator for up to 2 days.