The Best Japanese Strawberry Sponge Cake Recipe: Light, Airy, and Authentic
There is a specific kind of magic found in a Japanese bakery. It is a quiet, elegant magic that smells of vanilla and fresh cream. If you have ever walked through a Tokyo train station or a high-end department store, you have seen this cake. It sits behind glass, glowing with a minimalist beauty—perfectly white whipped cream, vibrant red strawberries, and a sponge so yellow and light it looks like it might float away. For years, I tried to replicate that “cloud-like” texture at home, failing more times than I care to admit until I realized that this cake isn’t about complexity; it’s about patience and the gentle handling of simple ingredients. This recipe is the result of that journey, designed to bring that exact delicate balance of sweetness and airy texture into your own kitchen.
Why You’ll Love This
- The texture is incomparably light, mimicking the famous “melt-in-your-mouth” quality of authentic Japanese patisserie.
- It is a “not-too-sweet” dessert, allowing the natural brightness of the strawberries and the richness of the cream to shine.
- The appearance is effortlessly sophisticated, making it the perfect centerpiece for birthdays, anniversaries, or a quiet Sunday afternoon.
- It uses pantry staples like eggs, flour, and sugar to create something that feels incredibly luxurious.
A Cake for the Skeptics
I remember serving this for the first time to my father-in-law, a man who famously claims he “doesn’t have a sweet tooth” and usually declines dessert in favor of a second helping of savory greens. He watched skeptically as I sliced into the soft layers. After the first bite, the room went quiet. He didn’t say a word until the entire slice was gone. He later confessed that he always found Western cakes too heavy and sugary, but this was different—it felt like eating a sweetened breeze. Since that day, it’s the only cake he asks for on his birthday.
What Makes It Special
- Fresh Eggs: Using the freshest eggs possible is the secret to a high rise; they provide the structural integrity needed for a sponge that doesn’t collapse.
- Triple-Sifted Flour: Sifting the all-purpose flour three times aerates it completely, ensuring there are no heavy clumps to weigh down the delicate batter.
- Whipped Meringue: The separation of yolks and whites allows for a controlled, stable foam that gives the cake its signature height.
- Simple Syrup: A light brushing of sugar syrup on the sponge layers keeps the cake moist and creates a professional finish.
Making It Happen
The process begins with preparation. You’ll want to preheat your oven to 180°C (356°F) and carefully coat your cake tin with butter and a light dusting of flour. The heart of this cake lies in the eggs. Start by beating your yolks with most of the sugar until they transform into a thick, pale ribbon that holds its shape for a few seconds when lifted. In a separate, clean bowl, whisk your egg whites until they double in volume, then gradually add the remaining sugar until you achieve firm, glossy peaks.
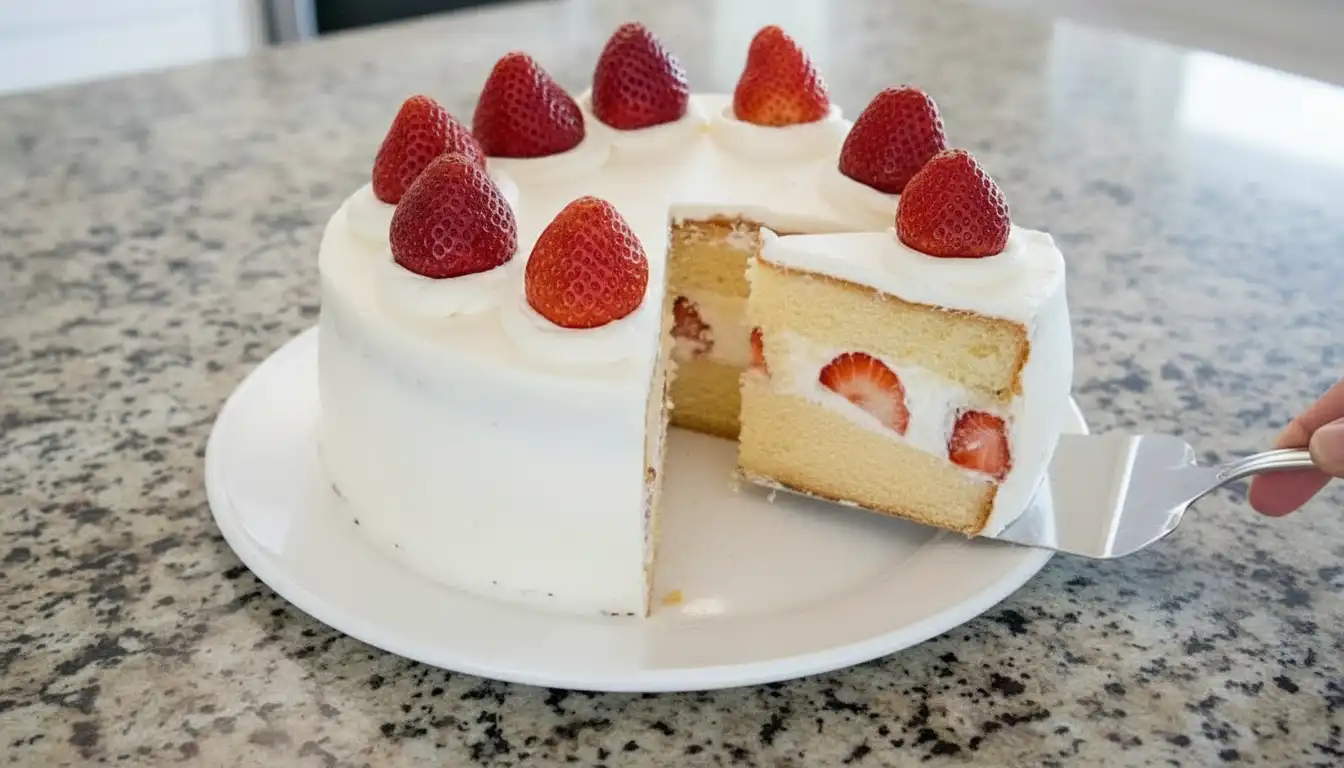
Folding is where the soul of the cake is found. You will sift the flour into the yolks and fold gently, then introduce a third of your meringue to loosen the mixture. Slowly fold in the remaining meringue in batches, followed by the melted butter. The goal is to keep as much air in the batter as possible. Once baked and cooled upside down to maintain its height, the assembly is like a calm ritual. You’ll slice the sponge horizontally, brush it with a delicate sugar syrup, and layer it with clouds of freshly whipped cream and halved strawberries. The final touch is a smooth coat of cream and a circle of whole berries on top, ready to be chilled and enjoyed.
You Must Know
- Always use eggs at room temperature; they incorporate much more air than cold eggs.
- When folding the flour and meringue, use a “cut and fold” motion rather than stirring to preserve the bubbles.
- The cake tin should be non-springform if possible to avoid a dented base, though a springform will work in a pinch.
- Don’t skip the “drop” of the tin after baking; it releases the steam trapped in the cells and prevents the cake from shrinking.
Serving Ideas
This cake is best served chilled, which allows the cream to set and the flavors to meld. It pairs beautifully with a pot of hot Genmaicha or a delicate Earl Grey tea. If you are serving this in the evening, a glass of chilled Moscato d’Asti or a light sparkling rosé complements the strawberry notes perfectly. A sprig of fresh mint on the side adds a nice pop of green to the plate.
Make It Different
- Fruit Swaps: While strawberries are traditional, you can easily use sliced peaches, kiwifruit, or a mix of summer berries.
- Adult Twist: Add a half-teaspoon of Kirsch or Grand Marnier to the sugar syrup for a sophisticated depth of flavor.
- Chocolate Version: Replace 15g of the flour with high-quality cocoa powder for a light chocolate sponge.
- Dairy-Free: While difficult to replicate exactly, a stable coconut whipped cream can be used for the frosting if you prefer to avoid dairy.
Storage and Recipe Tips
This cake is at its absolute peak on the day it is made or the day after. Because it uses fresh cream and fresh fruit, it should always be stored in the refrigerator. Use a cake dome or a large airtight container to prevent the sponge from absorbing any fridge odors. I recommend consuming it within 48 hours; by the third day, the strawberries may begin to release juice, which can soften the cream and sponge more than desired.
Success Tips
The most critical moment is the meringue. You want “firm peaks”—this means when you lift the whisk, the point of the egg white stands up straight with perhaps just the very tip curling over. If the meringue is too soft, the cake will be flat; if it is over-beaten and chunky, it won’t fold into the batter smoothly. Also, remember to cool the cake upside down on a wire rack. This gravity-defying trick ensures the crumb remains open and fluffy while it sets.
Frequently Asked Questions
Why did my sponge cake turn out flat?
This usually happens if the eggs weren’t fresh, the meringue wasn’t beaten to firm peaks, or the batter was over-mixed during the folding process, which deflates the air bubbles.
Can I use cake flour instead of all-purpose?
Yes, cake flour will actually result in an even finer, softer crumb. If using all-purpose, just ensure you sift it the recommended three times.
The cream is sliding off the cake. What did I do wrong?
Make sure the cake is completely cool before frosting. If the cake is even slightly warm, it will melt the fat in the cream. Also, ensure your cream is chilled before whipping.
Can I make the sponge a day in advance?
Absolutely. You can bake the sponge, let it cool, wrap it tightly in plastic wrap, and store it at room temperature overnight. Assemble with cream and fruit the day you plan to serve.
Is the sugar syrup really necessary?
While the cake is delicious without it, the syrup is a hallmark of Japanese bakeries. It provides that professional “moist” mouthfeel and helps the cream adhere to the sponge.
Japanese Strawberry Sponge Cake
| Category | Detail |
|---|---|
| Prep Time | 40 minutes |
| Cook Time | 25-30 minutes |
| Total Time | 1 hour 10 minutes (plus cooling) |
| Servings | 8 people |
| Difficulty | Medium |
| Cuisine | Japanese / Fusion |
| Yield | One 18cm (7″) round cake |
| Equipment | 18cm cake tin, electric whisk, sifter, spatula, piping bag with round nozzle |
Ingredients
Sponge Cake
- 125g (4.4oz) all-purpose flour, sifted 3 times
- 100g (3.5oz) sugar
- 4 large eggs, yolks and whites separated (must be very fresh)
- 60g (2.1oz) butter, melted
- Extra butter and flour for coating the pan
Decoration & Filling
- 18 medium strawberries (approx. 450g)
- 400ml (0.8pt) heavy whipping cream
- 10g (0.4oz) sugar
- Optional: 1/2 tsp liquor (e.g., Kirsch)
Syrup (Optional)
- 40ml (1.4oz) water
- 10g (0.4oz) sugar
Instructions
- Prep the Tin: Preheat oven to 180°C (356°F). Grease an 18cm cake tin with butter, dust with flour, and tap out the excess.
- Yolk Mixture: Beat egg yolks with 2/3 of the sugar until thick and pale. It should reach a “ribbon stage” where the trail lasts for several seconds.
- Prepare Meringue: In a clean bowl, whisk egg whites until bubbly. Gradually add the remaining sugar in batches, whisking until firm peaks form.
- Combine: Sift flour into the yolk mixture and fold gently. Stir in 1/3 of the meringue to lighten the batter. Carefully fold in the remaining meringue in two batches.
- Add Butter: Pour melted butter over the batter and fold a few times until just combined.
- Bake: Pour into the tin, drop it once on the counter to settle bubbles, and bake for 25–30 minutes. A skewer should come out clean.
- Cool: Drop the tin again upon removal to prevent shrinking. Invert the cake onto a rack and cool completely upside down.
- Prepare Components: Make the syrup by boiling water and sugar until dissolved; let cool. Whip the cream with sugar until soft peaks form. Halve 10 strawberries for the filling.
- Assemble: Slice the cooled cake horizontally. Brush both cut sides with syrup. Spread cream and a layer of halved strawberries on the bottom half. Top with more cream to fill gaps.
- Final Touch: Place the top layer on, coat the entire cake with a thin “crumb coat,” and chill for 10 minutes. Finish with a final thick layer of cream. Pipe 8 mounds on top and crown each with a whole strawberry.