Irresistible Homemade Cheesy Garlic Breadsticks – Step-by-Step Recipe
There are few aromas as comforting and instantly transportive as yeast blooming and dough rising. It’s the smell of home, of warmth, and of something genuinely good coming out of your own kitchen. But when you layer that with the sharp, pungent scent of fresh garlic melting into creamy, golden butter and a blanket of bubbling, salty cheese? That, my friends, is pure alchemy.
This Homemade Cheesy Garlic Breadsticks Recipe isn’t just about recreating a favorite restaurant side dish; it’s about elevating it to a whole new level of tender, chewy perfection. My recipe journey started years ago when I was trying to impress my very Italian grandmother with something that wasn’t pasta. I wanted that perfect balance—a breadstick that was soft and chewy on the inside, with a perfectly crisp, golden crust that was absolutely drenched in buttery, garlicky goodness. After much tweaking, this is the version that finally won her over, and I know it will become your family’s go-to, too.
Why You’ll Love This
Restaurant-Quality Crunch and Chew: The secret is the high oven temperature and the initial rest, giving you a gorgeously textured breadstick that’s far superior to frozen versions.
The Power of Fresh Garlic: We’re using fresh, minced garlic here—no powder! This provides a much brighter, more potent flavor that truly cuts through the cheese.
A Simple, Honest Dough: Making the dough from scratch is incredibly satisfying and surprisingly simple, requiring just a few staple ingredients and about an hour of passive rising time.
Ultimate Comfort Food: It’s cheesy, buttery, carby perfection. The kind of food that makes everyone stop talking and just enjoy the moment.
It was at a low-key game night that this Homemade Cheesy Garlic Breadsticks Recipe truly proved its worth. My friend Sarah brought her 9-year-old son, Ethan, a known picky eater who usually subsisted on plain crackers and air. When I pulled the piping hot tray of golden, bubbly breadsticks from the oven, he hesitantly took one. I watched, braced for the usual rejection. Instead, his eyes widened, he took a huge bite, and without a word, reached for another. He ate five. Five! Seeing a notoriously selective kid devour my homemade bread with such unadulterated joy was the highest compliment a cook could receive.
What Makes It Special
The magic is always in the ingredients. We’re aiming for fresh, high-quality components for the best cheesy garlic breadsticks flavor.
Active Dry Yeast: The powerhouse that gives our dough its beautiful rise and signature light, airy texture.
Bread Flour (or All-Purpose): Using bread flour, if you have it, adds a higher protein content, resulting in a chewier, more authentic texture. All-purpose works well, too, for a softer bite.
White Vinegar: This unexpected ingredient helps tenderize the dough and gives the yeast a small boost, leading to a lighter, more flavorful crumb.
Freshly Grated Parmesan Cheese: Skip the pre-shredded tubs. Freshly grated parmesan melts better and offers a sharper, nuttier flavor that complements the creamy mozzarella.
Salted Butter: The salt in the butter balances the sweetness of the dough and the richness of the cheese, enhancing the overall savory profile.
Making It Happen
Creating these perfect, cheesy garlic breadsticks is a lovely kitchen process.
First, you’ll awaken the yeast. In a large mixing bowl or your stand mixer, combine half a cup of your warm water with the sugar and yeast. Give it a gentle stir and let it sit quietly for about five minutes. You’re looking for a frothy, foamy top—that tells you your yeast is alive and ready to work. Now, pour in the remaining warm water, the olive oil, the salt, and that splash of white vinegar.
Next, it’s time to incorporate the flour. Start your mixer on a low speed and begin gradually adding the flour, a half-cup at a time. The dough will start shaggy and gradually come together. Keep kneading for a few minutes until the dough becomes smooth and elastic. The key texture here is slightly sticky. It should just barely cling to a clean fingertip, but it shouldn’t leave a residue. Mine usually hits that sweet spot right at 1 1/2 cups of flour. Cover your bowl with a dry kitchen towel and find a warm, cozy spot—like the top of the fridge or near a sunny window—for the dough to rest and double in size, which should take about an hour.
Once your dough is plump and ready, punch it down gently to release the air. Preheat your oven to a scorching 475 degrees F. This high heat is crucial for a beautifully crisp crust. Place your pizza stone or an upside-down cookie sheet inside while the oven preheats—getting it hot helps crisp the bottom instantly. On your counter, lay out a piece of parchment paper. Use your hands, or a rolling pin if you prefer precision, to coax the dough into a rustic, approximately 1/3-inch thick rectangle.
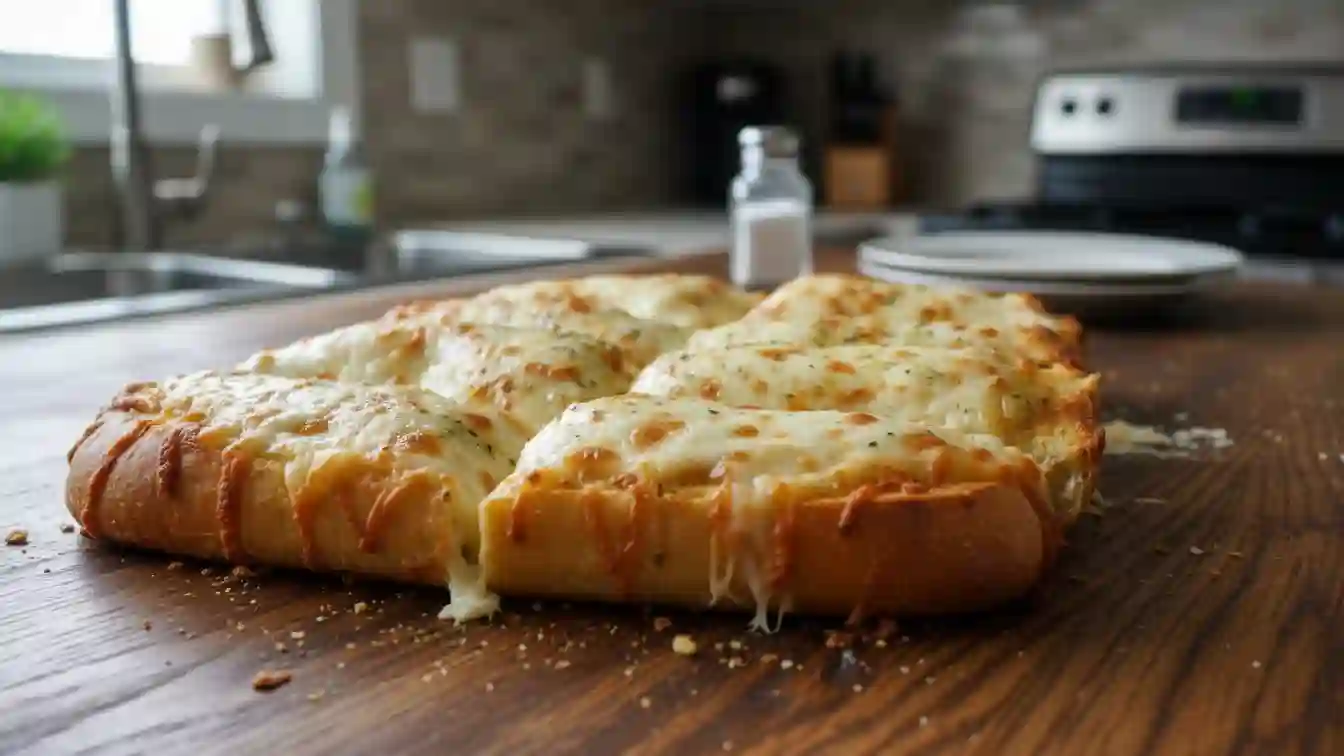
Finally, the topping! Melt your butter and stir in the minced garlic. Brush this fragrant, buttery mixture all the way to the edges of your dough. Layer on the sharp parmesan, followed by the generous helping of creamy mozzarella. Slide the parchment paper with the dough onto the hot pizza stone or cookie sheet. Bake for 8 to 12 minutes. You want the cheese to be bubbly, melted, and the crust to be a gorgeous, inviting golden brown. Slice, serve immediately, and watch them disappear!
You Must Know: 5 Tips for Success
The Water Temperature Matters: Make sure your water is between 105°F and 115°F (40°C to 46°C). Too cold and the yeast won’t activate; too hot and you’ll kill it.
Preheat Power: Don’t skip preheating the pizza stone or sheet pan. The blast of heat from underneath is what gives the breadsticks their wonderfully crispy bottom crust.
The Barely Sticky Test: If your dough is too dry, your breadsticks will be tough. If it’s too sticky, they’ll be flat and dense. Aim for a dough that feels slightly tacky to the touch.
High-Heat Baking: The 475°F oven is intentional. This short, hot bake ensures a crusty exterior while keeping the inside beautifully tender.
Don’t Over-Bake: As soon as the edges are golden and the mozzarella is bubbly and lightly browned, take them out. Over-baking will dry out your delicious garlic breadsticks.
Serving & Pairing Ideas
These cheesy garlic breadsticks are perfect on their own, but they truly shine as a side dish.
Classic Dipping: Serve them with a rich, slow-simmered marinara sauce for dipping or a cool, herby ranch dressing.
Soup and Salad Companion: They are the ideal accompaniment to a simple Caesar salad or a hearty bowl of tomato soup or minestrone.
Drink Pairings: Pair with a light, crisp Italian white wine, like a Pinot Grigio, or for a non-alcoholic option, a classic craft root beer or a sparkling lemon soda.
Make It Different: Customization & Substitutions
Spice It Up: Add a pinch of red pepper flakes to the garlic butter for a little heat.
Herbaceous Delight: Mix 1 teaspoon of dried Italian seasoning or dried oregano into the dough before kneading.
Dairy Swap (Flavor): Replace the mozzarella with smoked provolone for a sharper, more intense flavor profile.
Vegan Option (Dough): Substitute the butter with high-quality vegan butter or olive oil, and use a vegan cheese alternative that melts well. Note: The texture may vary.
Quick Dough Option: If you are short on time, you can use store-bought pizza dough, but ensure it’s at room temperature before spreading.
Recipe Tips: Storage and Reheating
If you miraculously end up with leftovers, here is how to keep your homemade garlic breadsticks fresh.
Storage: Store cooled breadsticks in an airtight container at room temperature for up to two days.
Reheating: The best way to regain that lovely crunch is to reheat them in a toaster oven or on a baking sheet in a 350°F oven for about 5–7 minutes, until the cheese is melted and they are hot and crispy again. Avoid the microwave, as it will make them soggy.
Make-Ahead Dough: As noted, you can make the dough 3–4 hours ahead and store it in the refrigerator to slow-rise. Just let it come back to room temperature for 30 minutes before punching down and forming.
Freezing Dough: The dough freezes beautifully! Spray the dough ball with non-stick spray, place it in a freezer-safe bag, and remove as much air as possible. Freeze for up to 3 months. Thaw overnight in the fridge and let it rest on the counter for 30 minutes before using.
Success Tips
The single biggest factor in the success of these cheesy garlic breadsticks is the quality of the melt. For truly satisfying, creamy cheese pull, use fresh mozzarella (drained and shredded) combined with a drier cheese like parmesan. And always, always use real, fresh garlic!
Frequently Asked Questions (FAQ)
Q: Can I use all-purpose flour instead of bread flour?
A: Absolutely! All-purpose flour works perfectly fine. Your final breadsticks may be slightly softer than if you used bread flour, but the flavor will be just as amazing.
Q: Why do I need to use warm water for the yeast?
A: Warm water (about 105°F to 115°F) is necessary to “wake up” the active dry yeast. It creates the perfect environment for the yeast to start eating the sugar and producing the carbon dioxide that makes the dough rise.
Q: My breadsticks turned out tough. What did I do wrong?
A: The most common culprit is adding too much flour. Over-flouring or over-kneading the dough will develop too much gluten, resulting in a tough texture. Remember the barely sticky rule—use the minimum amount of flour needed to create a smooth dough.
Q: What is the best kind of cheese to use for the best melt?
A: A mix is best! We use low-moisture, part-skim mozzarella for the classic stretch, combined with a sharp, freshly grated parmesan for a more complex, salty flavor.
Q: Do I really need to use parchment paper on the hot stone?
A: Yes, especially if you are using a pizza stone! The parchment paper allows you to quickly and safely transfer the soft dough onto the blazing hot surface without risking burns or having the dough stick to the stone.
Ingredients
Dough:
1 1/8 teaspoons active dry yeast
1 teaspoon granulated sugar
3/4 cup warm water (105°F–115°F)
1 1/2 Tablespoons olive oil
3/4 teaspoon salt
1/2 teaspoon white vinegar
1 1/2 – 2 cups bread flour, or all-purpose flour
Topping:
1 1/2 Tablespoons salted butter, melted
2 cloves garlic, minced
1/3 cup freshly grated parmesan cheese
1 1/4 cups shredded mozzarella cheese
Instructions
In a large bowl or stand mixer combine 1/2 cup of the warm water with the sugar and yeast. Stir to combine and let rest for 5 minutes until frothy. Add the remaining 1/4 cup warm water, olive oil, salt, and vinegar.
Begin mixing on medium-low speed and gradually add the flour—knead for a few minutes, or until the dough is smooth and elastic (it should be slightly sticky, but not so sticky that it sticks to your clean fingertip). Mine is usually ready with 1 1/2 cups flour. Cover the bowl with a dry towel and allow to rest in a warm place for 1 hour until doubled.
Preheat oven to 475 degrees F with a pizza stone inside or an upside-down cookie sheet inside.
Gently punch the dough down. Place a large piece of parchment paper on your counter and use your hands (or a rolling pin) to spread the dough into a rectangle about 1/3 inch thick.
Mix melted butter and garlic in a small bowl then spread mixture evenly over dough, all the way to the edges. Top with parmesan and mozzarella cheeses.
Transfer the dough (still on the parchment paper) onto the hot pizza stone in the oven. Bake for 8–12 minutes or until golden and bubbly.
Slice into strips and serve immediately with dipping sauces like marinara sauce or ranch.
Notes
Make Ahead Instructions: Make the dough 3–4 hours before you want to bake breadsticks, storing it in the refrigerator to rise (instead of at room temperature).
Freezing Instructions: Make the dough. Spray it with non-stick cooking spray and place it inside a freezer safe bag. Try to get as much air as possible out of the bag. Freeze homemade dough for 2–3 months. Allow to thaw overnight in the refrigerator. Remove to the counter for 30 minutes before forming into breadsticks.
Would you like me to suggest a specific marinara sauce recipe to pair with these homemade cheesy garlic breadsticks?