The Ultimate No-Bake Reese’s Chocolate Peanut Butter Cup Lasagna Recipe
There is something magnetic about the combination of salty peanut butter and deep, dark chocolate. It is a pairing that feels both nostalgic and indulgent. Whenever I pull this Reese’s Chocolate Peanut Butter Cup Lasagna out of the refrigerator, the room goes quiet for a second. It is a showstopper, not because it looks overly complicated, but because it promises a specific kind of decadence.
I remember the first time I put this together for a summer neighborhood gathering. The humidity was thick, and the thought of turning on an oven felt like a chore. This no-bake “lasagna” was born out of a desire for something cool, creamy, and substantial. As you press the buttery Oreo crumbs into the pan and fold together the velvety peanut butter mousse, you realize this isn’t just a dessert; it is a labor of love that rewards you with every chilled, multi-layered bite.
Why You’ll Love This
Zero Oven Time: This is a true no-bake masterpiece, keeping your kitchen cool while delivering a high-end dessert experience.
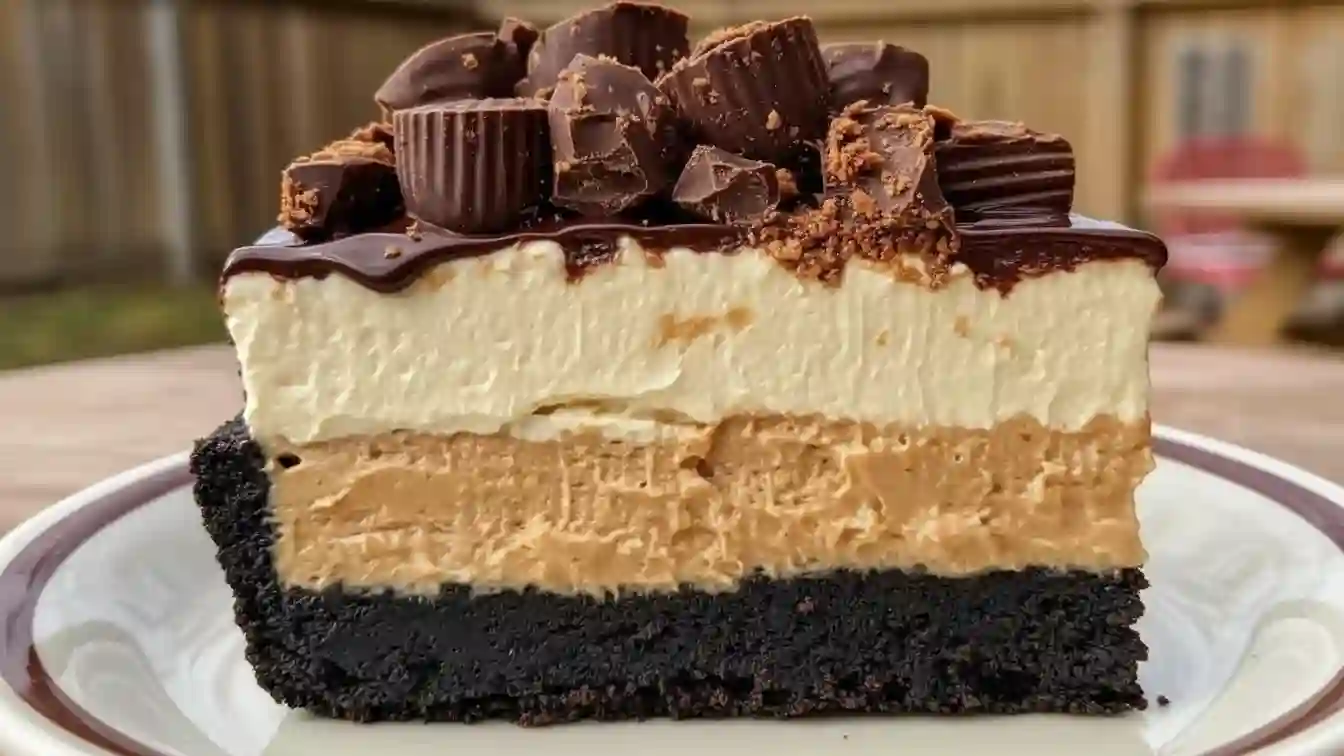
The Perfect Texture Contrast: You get the crunch of the chocolate cookie base, the silkiness of the peanut butter layer, and the airy lightness of the whipped topping.
Crowd-Pleasing Flavors: It uses the classic Reese’s flavor profile that appeals to both kids and adults, making it the safest bet for any party or holiday.
The Skeptic’s Favorite
I once served this to my uncle, a man who claims he “doesn’t really do sweets” and usually settles for a single piece of dark chocolate after dinner. He watched the layers of chocolate pudding and peanut butter cream cheese pile up with a look of pure skepticism. However, after one forkful of the chilled Oreo crust and the rich fudge drizzle, he ended up asking for a second sliver to “take home for later.” It is the kind of dish that converts people who think they don’t have a sweet tooth.
What Makes It Special
The Oreo Foundation: Using whole Oreos (creme and all) creates a sturdy, chocolatey base that holds up beautifully against the creamy layers.
Whipped Peanut Butter Mousse: The combination of softened cream cheese and whipped topping creates a cloud-like texture that isn’t too heavy.
Instant Pudding Shortcut: Using high-quality instant chocolate pudding ensures the middle layer is perfectly set and consistently smooth.
Double the Peanut Butter: With peanut butter in the filling and a warm drizzle on top, the nutty flavor is front and center.
Making It Happen
The process begins with the base. You’ll want to pulse the Oreos until they are fine, sandy crumbs before marriage them with melted butter. Once you press them into your pan, let them firm up in the freezer; this ensures the crust doesn’t crumble when you start spreading the heavier layers.
While the crust sets, you’ll whip the cream cheese and sugar until it’s light and airy, then fold in the peanut butter and whipped topping. This creates a thick, stable mousse. After spreading that over your chilled crust, you’ll whisk the chocolate pudding with cold milk. The trick here is patience—let it sit for a few minutes until it’s thick enough to hold its own. Finally, you’ll layer the pudding and the remaining whipped topping, creating that beautiful striped “lasagna” effect. The hardest part is the wait; it needs several hours in the fridge to meld into one cohesive, sliceable dessert.
You Must Know
Use Full-Fat Cream Cheese: For the best structure and a rich mouthfeel, avoid the “light” versions.
Temperature Matters: Ensure your cream cheese is completely softened to avoid lumps in your peanut butter layer.
The Clean Slice: To get those perfect, photo-ready layers, wipe your knife clean with a warm, damp cloth between every single cut.
Serving Ideas
This lasagna is quite rich, so it pairs beautifully with a strong, hot cup of black coffee or a cold glass of milk. If you are serving this at a dinner party, a side of fresh raspberries or sliced strawberries can provide a nice acidic contrast to the heavy chocolate and peanut butter.
Make It Different
Go Gluten-Free: Use gluten-free chocolate sandwich cookies for the base; the flavor remains virtually identical.
Extra Crunch: Fold a half-cup of chopped roasted peanuts into the peanut butter layer for added texture.
Dark Chocolate Twist: Swap the milk chocolate pudding for a dark chocolate or fudge version to deepen the cocoa flavor.
Storage and Recipe Tips
Keep this dessert refrigerated until the moment you are ready to serve. It will stay fresh and delicious for up to 4 days if covered tightly with plastic wrap or stored in an airtight container. While you can freeze this for a firmer, ice-cream-cake texture, the pudding layer may release a little moisture upon thawing, so it is best enjoyed straight from the fridge.
Success Tips
For the best results, use “regular” Oreos rather than Double Stuf, as the extra creme can make the crust too oily. Additionally, when you are warming the peanut butter for the drizzle, do it in short 15-second bursts in the microwave to ensure it stays fluid without scorching.
FAQ
Can I use natural peanut butter?
It is best to use a standard creamy peanut butter (like Jif or Skippy). Natural peanut butters that require stirring can be too oily and may prevent the cream cheese layer from setting properly.
How long does it actually need to chill?
While 4 hours is the minimum, 8 to 12 hours is ideal. This allows the Oreo crust to soften just enough to be bite-friendly while the pudding and mousse fully stabilize.
Can I make this in a different pan?
Yes, you can use a deep-dish 9-inch square pan for thicker layers, or even a springform pan if you want to serve it like a cake, though the 13×9 is the standard for easy “lasagna” squares.
What if my pudding isn’t thickening?
Make sure your milk is ice-cold. If it’s still thin, give it a few more minutes in the fridge before spreading it over the peanut butter layer.
Do I need to remove the white filling from the Oreos?
No, keep the filling in! It acts as a binder and adds extra sweetness to the crust.
Reese’s Chocolate Peanut Butter Cup Lasagna
Prep time: 30 minutes
Cook time: 0 minutes
Total time: 4 hours 30 minutes (includes chilling)
Servings: 12-15
Category: Dessert
Difficulty: Easy
Cuisine: American
Yield: One 13×9 inch pan
Equipment
Food processor
13×9 baking dish
Electric hand mixer or stand mixer
Large mixing bowls
Whisk
Offset spatula
Ingredients
Crust
25 regular Oreos
6 tablespoons butter, melted
Peanut Butter Layer
8 ounces cream cheese, softened
1 cup granulated sugar
1 1/4 cups peanut butter
8 ounces whipped topping, thawed
Chocolate Pudding Layer
1 large (5.9-ounce) box instant chocolate pudding mix
3 cups milk, cold
Topping
8 ounces whipped topping, thawed
1/2 cup warmed peanut butter
1/2 cup chocolate fudge topping or syrup
30 mini peanut butter cups, cut in half
Instructions
Prepare the Crust: Place the whole Oreos in a food processor and blend at high speed until they become fine crumbs. With the motor running on low, slowly pour in the melted butter. Give it a final stir to ensure all crumbs are moistened.
Set the Base: Firmly press the cookie mixture into the bottom of a 13×9 baking dish. Place the dish in the freezer for 20 minutes to firm up.
Mix the Peanut Butter Layer: In a large bowl, beat the softened cream cheese and sugar with an electric mixer until smooth and creamy. Add the 1 1/4 cups of peanut butter and continue mixing until fully incorporated. Gently fold in 8 ounces of the thawed whipped topping at low speed until no streaks remain.
Prepare the Pudding: In a separate bowl, whisk together the instant chocolate pudding mix and the cold milk. Continue whisking until the mixture begins to thicken. Let it sit for 3 minutes to reach a heavy, spreadable consistency.
Assemble the Layers: Remove the crust from the freezer. Spread the peanut butter mixture evenly over the Oreo base using an offset spatula. Carefully layer the thickened chocolate pudding over the peanut butter. Finally, spread the remaining 8 ounces of whipped topping over the top in an even layer.
Chill: Cover the dish with plastic wrap and refrigerate for at least 4 hours, though overnight provides the best results for slicing.
Garnish and Serve: Just before serving, drizzle the top with warmed peanut butter and chocolate fudge syrup. Scatter the halved mini peanut butter cups across the top. Serve chilled.
Nutrition (per serving)
Calories: 520 kcal
Fat: 32g
Carbohydrates: 54g
Protein: 8g
Sugar: 38g