No-Bake Chocolate Chip Peanut Butter Pie: An Easy, Dreamy Dessert
A Slice of Pure Joy
There are pies that require precision, patience, and a perfectly flaky crust. And then there’s this pie. This Chocolate Chip Peanut Butter Pie is a different beast entirely—a no-bake sanctuary of creamy, dreamy indulgence. It’s the dessert you make when the summer heat makes turning on the oven a punishable offense, or when a deep, undeniable peanut butter craving strikes without warning. I first made it for a last-minute backyard potluck, hoping it would set in time. The result? A silent table, save for the sound of forks scraping plates and a chorus of happy, contented sighs. It’s the kind of simple, soul-satisfying treat that creates instant core memories.
Why You’ll Love This Pie
Effortless Elegance: With no baking required, this pie is a triumph of simplicity. It comes together in minutes, yet looks and tastes like you spent hours in the kitchen.
The Ultimate Crowd-Pleaser: It effortlessly bridges the gap between peanut butter lovers and chocolate enthusiasts, making it the perfect dessert for gatherings where pleasing everyone is the goal.
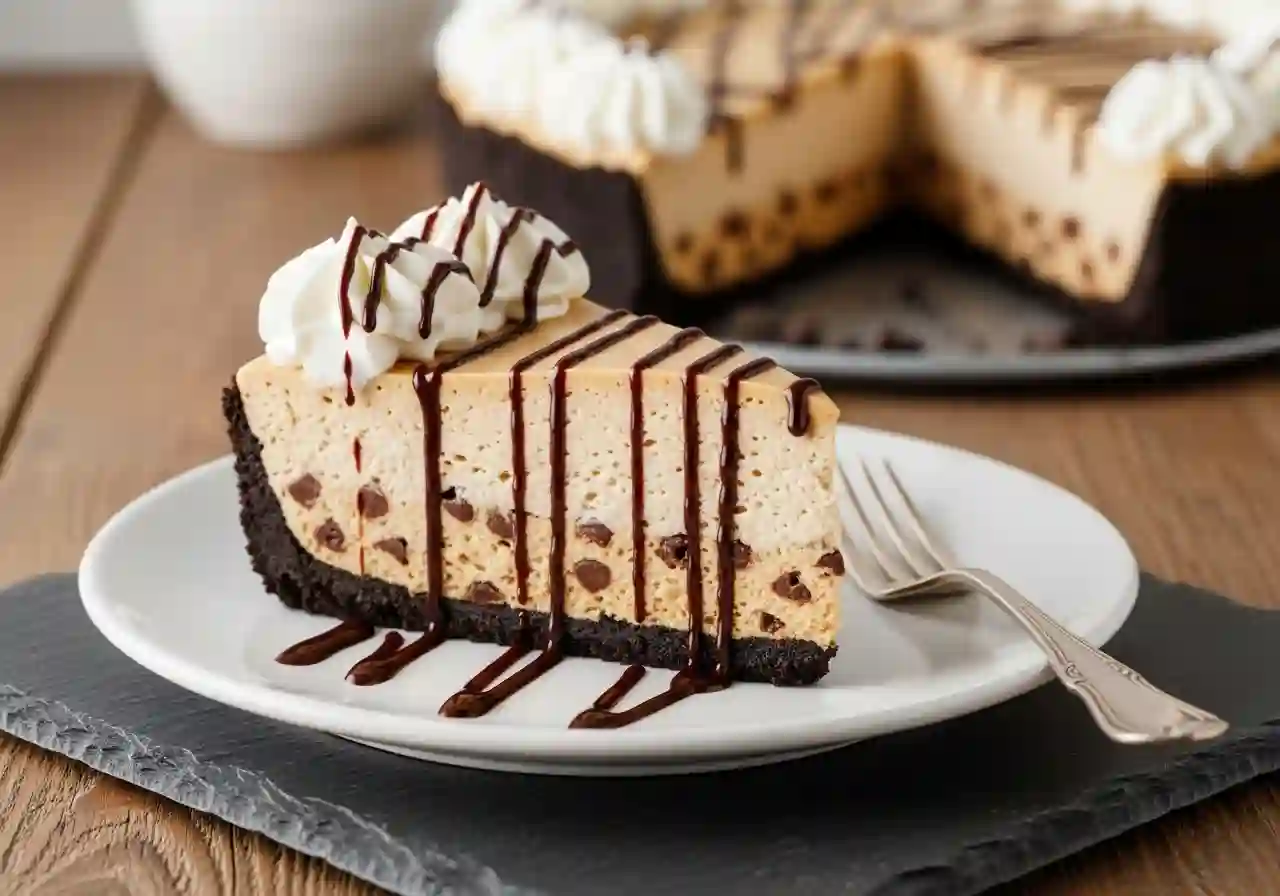
A Textural Dream: The velvety, cloud-like filling is punctuated by the gentle crunch of mini chocolate chips, all nestled in a crisp, dark chocolate Oreo crust.
Cooling and Comforting: Its frozen, mousse-like texture is incredibly refreshing, offering a cool and creamy respite on a warm day.
The Ultimate Test: A Picky Eater’s Seal of Approval
I’ll never forget serving this to my friend’s son, a renowned connoisseur of plain pasta and chicken nuggets. He eyed the pie with deep suspicion, the visible chocolate chips his only point of interest. After some gentle coaxing, he took a tiny bite. Then another. His eyes widened, and he looked at his mom, then back at the pie, as if witnessing magic. He quietly asked for a second slice, and my friend looked at me as if I had performed a miracle. It’s a pie that disarms even the most stubborn of skeptics.
What Makes It Special
It’s the harmony of a few simple ingredients that creates pure magic.
Creamy Peanut Butter: The star of the show, providing a rich, nutty, and deeply savory-sweet backbone that is both familiar and luxurious.
The Oreo Crust: This isn’t just a vessel; it’s a crucial flavor component. The dark, slightly bitter cocoa notes from the cookies provide a perfect counterbalance to the sweet, rich filling.
Frozen Whipped Topping: This is the secret to the pie’s impossibly light and airy texture, transforming the dense peanut butter and cream cheese into a mousse-like cloud.
Mini Chocolate Chips: Their small size ensures a bit of chocolate in every single bite, and their firm texture provides a delightful contrast to the creamy filling.
Making It Happen
This process is less about technical skill and more about gentle combining. Start by using an electric mixer to beat the softened cream cheese, peanut butter, and powdered sugar together. You’ll know it’s ready when the mixture is completely smooth and silky, with no streaks of cream cheese remaining.
Now, for the gentle part: add the thawed whipped topping. Instead of beating it vigorously, use a spatula to fold it in. This means cutting through the center, sliding along the bottom of the bowl, and folding the mixture over on itself. It might seem stubborn at first, but keep folding patiently. You’re preserving the air in the whipped topping, which is key to that dreamy texture. Once it’s mostly combined, gently fold in the mini chocolate chips.
Now, simply spoon this glorious, fluffy filling into your waiting Oreo crust. Use your spatula to spread it into an even layer. The final, most crucial step is patience. Cover the pie tightly with plastic wrap and tuck it into the freezer. Let it work its magic overnight, or for at least 6-8 hours, until it’s firm enough to slice cleanly.
You Must Know
Patience is a Virtue: Do not rush the freezing time. A properly frozen pie is the difference between a clean, beautiful slice and a soupy mess.
The Fold is Key: Folding, not stirring, is what keeps the filling light and airy. Over-mixing will deflate your pie.
Soften Your Cream Cheese: Truly softened cream cheese is non-negotiable. If it’s still cool, you’ll end up with tiny lumps in your otherwise smooth filling.
Serving It Right
Serve this pie straight from the freezer. For a truly decadent experience, top each chilled slice with an extra dollop of whipped cream and a generous drizzle of chocolate syrup or a sprinkle of sea salt. A hot cup of coffee is the perfect pairing, its bitterness cutting through the sweetness beautifully. For a summer party, consider serving it alongside a bowl of fresh, ripe berries to add a touch of bright, fruity acidity.
Make It Different
Nut-Free: Swap the peanut butter for sunflower seed butter for a similar texture and vibe.
Chocolate Crust: Use a pre-made graham cracker crust for a slightly sweeter, less intense base.
Flavor Twists: Add a teaspoon of vanilla extract to the filling for depth, or fold in crushed pretzels for a salty-sweet crunch.
Lighter Version: Use reduced-fat cream cheese and a light whipped topping. The texture will be slightly less rich but still delicious.
Storing Your Masterpiece
This pie is meant to live in the freezer. Keep it covered tightly with plastic wrap or in an airtight container. It will stay perfectly delicious for up to 2 weeks. There is no need to thaw it before serving; simply slice and enjoy its frozen, mousse-like texture.
Success Tips
For the cleanest slices, dip a sharp knife in hot water and wipe it dry between each cut.
If you’re using natural peanut butter (the kind that separates), be sure it is well-stirred and not overly oily, as this can affect the filling’s stability.
Let the whipped topping thaw completely in the refrigerator. Using it while still frozen will make it nearly impossible to fold in smoothly.
Frequently Asked Questions
Can I make this with a homemade crust?
Absolutely! Crush about 20 Oreo cookies (filling included) and mix with 5 tablespoons of melted butter. Press into your pie dish and chill for 30 minutes before filling.
How long can it sit out before serving?
It can sit at room temperature for about 15-20 minutes before it starts to get too soft. For the best texture, serve it well-chilled.
Can I use regular-sized chocolate chips?
You can, but mini chips distribute more evenly and are easier to slice through, ensuring you get chocolate in every bite.
I don’t have an electric mixer. Can I make this by hand?
You can, but it will require some elbow grease. Ensure your cream cheese is very soft, and use a sturdy whisk and a strong arm to beat it with the peanut butter and sugar until completely smooth.
Can I use natural peanut butter?
Yes, but ensure it’s the “no-stir” kind or that you’ve mixed the oil in thoroughly. Very oily natural peanut butter can make the filling greasy and prevent it from setting firmly.
Recipe Card: No-Bake Chocolate Chip Peanut Butter Pie
Prep time: 20 minutes
Cook time: 0 minutes
Total time: 8 hours 20 minutes (includes freezing)
Category: Dessert
Difficulty: Easy
Cuisine: American
Yield: 1 9-inch pie (8 servings)
Ingredients
8 ounces cream cheese, softened
1 cup creamy peanut butter
1 cup powdered sugar
16 ounces frozen whipped topping (like Cool Whip), thawed
1 cup mini semi-sweet chocolate chips
1 9-inch Oreo Cookie pie crust
Instructions
In a large bowl, use an electric mixer on medium speed to beat the softened cream cheese, peanut butter, and powdered sugar until the mixture is completely smooth and creamy.
Switch to a spatula. Add the thawed whipped topping to the bowl. Gently fold the whipped topping into the peanut butter mixture until just combined and no white streaks remain. Be patient during this step.
Gently fold in the mini chocolate chips until they are evenly distributed throughout the filling.
Spoon the filling into the prepared Oreo pie crust, spreading it out into a smooth, even layer.
Cover the pie tightly with plastic wrap and place it in the freezer for at least 6-8 hours, or preferably overnight, until firm.
To serve, remove from the freezer, slice, and optionally garnish with additional whipped cream and a drizzle of chocolate syrup.
Notes
Allergy Info: Contains dairy, peanuts, soy, wheat, and gluten.
Nutrition (per serving, estimate):
Calories: ~580 | Fat: 38g | Saturated Fat: 18g | Carbohydrates: 52g | Sugar: 40g | Protein: 10g