Easy Cheesy Garlic Chicken Wraps Recipe (20-Minute Meal)
There’s a certain kind of magic that happens when you’re staring into the fridge at 6 p.m., wondering what on earth to make for dinner. It was on one such chaotic weeknight, surrounded by the hum of the refrigerator and the faint sounds of the day winding down, that these Cheesy Garlic Chicken Wraps were born. I had some leftover roasted chicken, a half-empty bag of cheese, and a desperate need for something comforting. The result was a revelation—a warm, golden-brown parcel that, when sliced, revealed a creamy, garlicky, and utterly satisfying filling. The aroma of toasting garlic and melted cheese filled the kitchen, turning a moment of stress into one of pure, simple joy. It’s become our family’s go-to solution for a quick, delicious meal that feels like a hug from the inside out.
Why You’ll Love This
Weeknight Warrior: From fridge to plate in under 20 minutes, this recipe is a lifesaver on busy evenings.
Comfort in Every Bite: The combination of creamy, cheesy filling and a crispy, golden tortilla is pure, uncomplicated comfort food.
Incredibly Versatile: It’s a fantastic way to use up leftover chicken or whatever veggies you have lingering in the produce drawer.
Crowd-Pleasing Power: The flavors are a universal win for both adults and kids alike, making it a reliable choice for any table.
I’ll never forget serving these to my friend’s son, a famously picky eater whose diet seemed to consist solely of beige foods. He eyed the wrap suspiciously, noting the faint green specks of onion. With a sigh of maternal persuasion, my friend urged him to take just one bite. He did. Then he took another, and another, until the entire half-wrap was gone. He looked up and simply said, “Can we have these again tomorrow?” It was a quiet victory, proving that these wraps have a way of winning over even the toughest critics.
What Makes It Special
The beauty of this dish lies in its simple, high-impact ingredients.
Garlic: Freshly minced garlic provides a pungent, aromatic base that is far superior to the pre-minced jarred kind.
The Creamy Sauce: A duo of light mayonnaise and Greek yogurt creates a tangy, creamy binder that’s lighter than traditional mayo-based sauces but just as rich.
Hot Sauce: A touch of vinegar-based hot sauce like Frank’s doesn’t just add heat; it introduces a necessary zing that cuts through the richness.
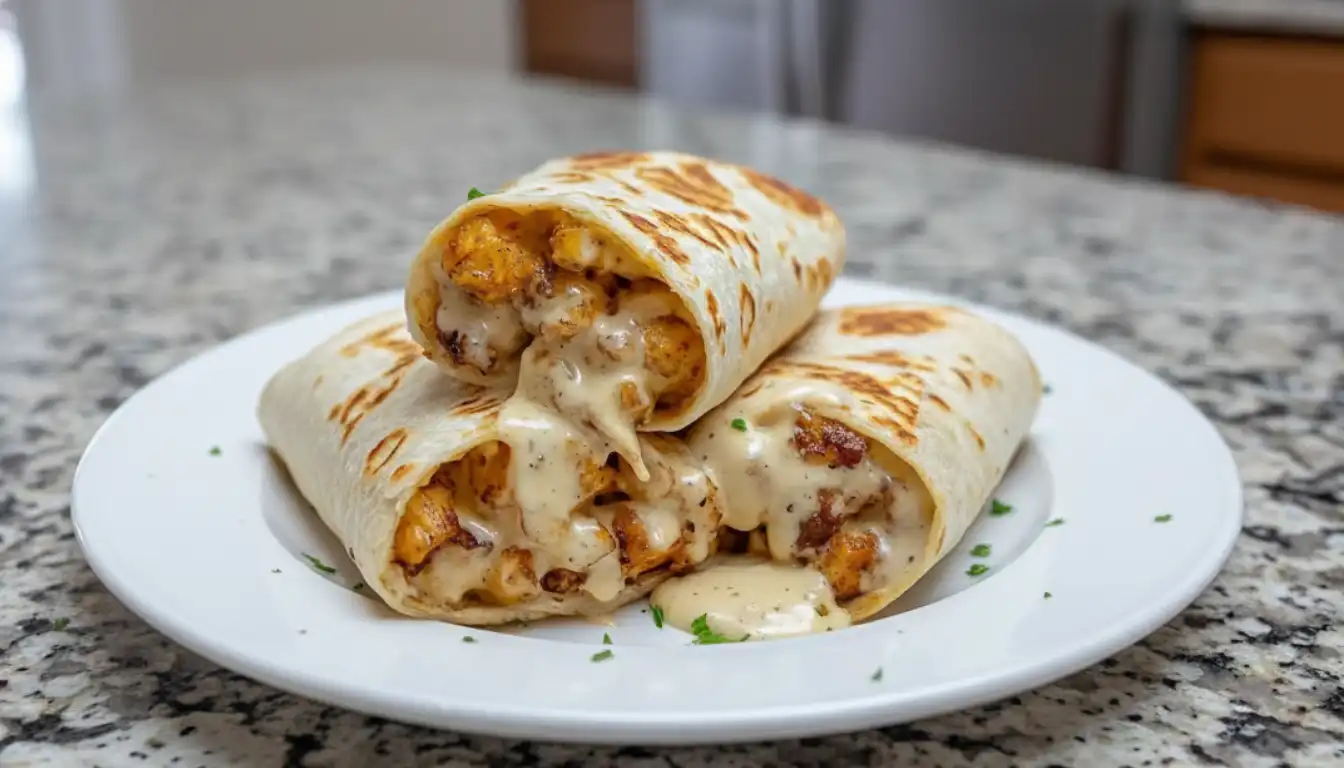
Double Cheese Action: Cheese isn’t just inside the wrap; it’s sprinkled directly onto the tortilla, creating a deliciously crispy, cheesy crust when pan-fried.
Making It Happen
Start by giving your cooked chicken a fine chop and adding it to a mixing bowl. To that, add your freshly minced garlic, the light mayonnaise, Greek yogurt, hot sauce, and a pinch of salt. Stir everything together until the chicken is evenly coated in that creamy, flavorful sauce.
Now, lay your tortilla flat on a clean surface. Take a couple of tablespoons of your grated cheddar cheese and sprinkle it in a line across the lower third of the tortilla—this is the secret to the fantastic crispy exterior. Spoon a generous amount of the chicken mixture right on top of the cheese, then finish with another sprinkle of cheese and some chopped green onion for a fresh bite.
The folding is key. Gently fold the left and right sides of the tortilla inward, then, starting from the bottom edge closest to you, roll the wrap up as tightly as you can, like a burrito.
Heat a good non-stick pan over a solid medium-high heat and give it a light spray of olive oil. Carefully place your wraps in the pan with the seam-side down—this seals them shut. Let them cook for 3-4 minutes, until you see a beautiful golden-brown crust forming. A little trick here is to cover the pan with a lid for a minute or two; this traps the heat and ensures the filling gets wonderfully hot and the cheese melts perfectly. Flip them over and repeat on the other side until it’s equally golden and crispy.
You Must Know
Dry Chicken is Key: If your cooked chicken is at all wet or was stored in a liquid, pat it dry with a paper towel. A wet filling will make your tortilla soggy.
The Tight Roll: The tighter you roll the wrap, the less chance it has of falling apart in the pan.
Don’t Skip the Lid: Covering the pan for a portion of the cooking time is a small step that makes a big difference in melting the cheese and heating the filling through completely.
Seam-Side Down First: Always start cooking with the seam-side down to create a natural seal.
Serving It Right
These wraps are a complete meal on their own, but they’re even better with a simple side. A crisp green salad with a tangy vinaigrette helps balance the richness. For a heartier meal, a bowl of tomato soup for dipping is divine. If you’re serving a crowd, a platter of sweet potato fries or crunchy veggie sticks with ranch dressing would be perfect. To drink, a cold, crisp lager or a sparkling water with a squeeze of lime complements the savory flavors beautifully.
Make It Different
Spice Lover: Add a teaspoon of taco seasoning to the chicken mixture or use a pepper jack cheese instead of cheddar.
Vegetarian Twist: Swap the chicken for a can of rinsed black beans or seasoned, crumbled firm tofu.
Lower Carb: Use a low-carb, high-protein tortilla or large lettuce leaves for a lettuce wrap version.
Extra Veggie: Sautéed mushrooms, finely chopped spinach, or diced bell peppers can be mixed into the filling for an added nutritional boost.
Storing and Reheating Your Wraps
These wraps are best enjoyed immediately, but you can store any leftovers in an airtight container in the refrigerator for up to 2 days. To reheat, avoid the microwave, as it will make the tortilla soft. Instead, warm them in a dry non-stick skillet over medium heat for a few minutes on each side to recrisp the exterior. You can also use an air fryer preheated to 375°F for 3-4 minutes.
Success Tips
For the ultimate crispy, non-soggy wrap, ensure your pan is properly preheated before adding the wraps. You should hear a gentle sizzle when they hit the surface. Also, resist the urge to overfill them. While it’s tempting to pack in as much filling as possible, a moderate amount ensures you can roll it tightly and it will heat through evenly without bursting.
Frequently Asked Questions
Can I use raw chicken instead of cooked?
Yes, but you must cook it first. Dice a raw chicken breast, season it with salt and pepper, and cook it in a skillet until no longer pink. Let it cool slightly before mixing it with the other filling ingredients.
My wrap fell apart in the pan. What happened?
This usually means it wasn’t rolled tightly enough, the seam wasn’t placed down first, or the pan wasn’t hot enough to create an instant seal. Ensure a tight roll and a properly preheated pan for best results.
Can I make these ahead of time?
You can prepare the filling up to a day in advance and store it in the fridge. However, I highly recommend assembling and cooking the wraps just before serving for the best texture.
What can I use instead of Greek yogurt?
Sour cream is an excellent 1:1 substitute for Greek yogurt and will yield a similarly tangy, creamy result.
Can I bake these instead of pan-frying?
Absolutely. For a lighter option, place the assembled wraps on a baking sheet, spray lightly with oil, and bake at 400°F (200°C) for 15-20 minutes, flipping halfway through, until golden and crispy.
Recipe Card: Cheesy Garlic Chicken Wraps
Prep time: 10 minutes
Cook time: 10 minutes
Total time: 20 minutes
Servings: 2
Category: Main Course
Difficulty: Easy
Cuisine: American
Yield: 2 wraps
Ingredients
2 large tortillas (regular or low-carb/high-protein)
7 oz cooked chicken, chopped
2 garlic cloves, minced
2 tablespoons light mayonnaise
1 tablespoon light Greek yogurt or plain yogurt
2 teaspoons hot sauce (like Frank’s)
¼ teaspoon salt
3 oz cheddar cheese, grated
1 green onion, chopped
Olive oil spray
Instructions
In a medium bowl, combine the chopped chicken, minced garlic, mayonnaise, yogurt, hot sauce, and salt. Mix until evenly combined.
Lay a tortilla flat. Sprinkle about 2 tablespoons of the grated cheese in a line across the lower third. Spoon roughly ⅔ cup of the chicken mixture on top of the cheese. Top the chicken with another tablespoon of cheese and a sprinkle of chopped green onion.
Fold the left and right sides of the tortilla inward over the filling. Then, tightly roll the tortilla up from the bottom edge to form a secure wrap.
Heat a non-stick skillet over medium-high heat. Lightly spray with olive oil.
Place the wraps in the hot pan with the seam-side down. Cook for 3-4 minutes, until golden brown and crispy. Cover the pan with a lid for the last minute or two to help melt the cheese and heat the filling through.
Carefully flip the wraps and cook for another 3-4 minutes on the other side, until golden.
Remove from the pan, let rest for a minute, then slice in half diagonally and serve immediately.
Notes
For optimal crispiness, ensure your cooked chicken is not wet before mixing it with the other ingredients. Pat it dry with a paper towel if necessary.
Nutrition (per serving, estimated):
Calories: 445 | Fat: 22g | Saturated Fat: 9g | Carbohydrates: 25g | Fiber: 2g | Sugar: 3g | Protein: 35g