The Ultimate Cheesecake Stuffed Chocolate Cupcakes Recipe: A Decadent Surprise
Imagine walking into a kitchen where the air is heavy with the scent of melting dark chocolate and sweet vanilla. There is something profoundly nostalgic about a chocolate cupcake, but this version has a secret. I first started making these when I wanted a dessert that felt more like a pastry shop creation than a standard bake-sale treat. The result is a moist, deep-cocoa cake that yields to a tangy, velvety cheesecake center. It is the kind of treat that makes the room go quiet after the first bite as everyone discovers the hidden treasure inside.
Why You’ll Love This
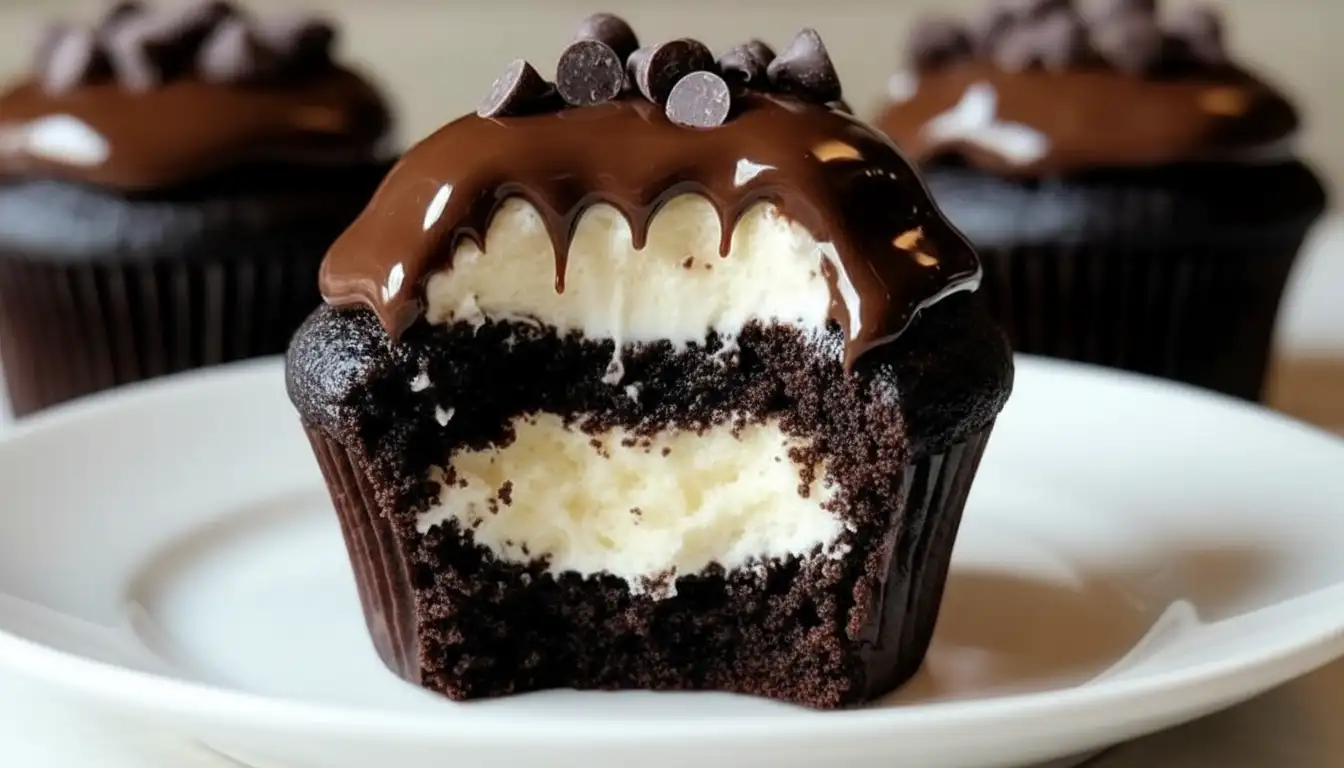
The Texture Contrast: You get the light, airy crumb of the chocolate cake paired with the dense, creamy richness of the cheesecake.
Built-in Frosting: By melting chocolate chips directly on the warm cupcakes, you create a glossy, effortless ganache-style topping without the need for extra butter or powdered sugar.
Party Favorite: They are a two-in-one dessert that satisfies both chocolate purists and cheesecake enthusiasts.
Surprisingly Simple: Despite the complex look, the batter and filling come together in just a few bowls without needing advanced techniques.
My neighbor, a self-proclaimed “savory only” person who usually turns down dessert, was the ultimate test for this recipe. I brought over a warm batch, and he skeptically took one, assuming it would be too sugary. Five minutes later, he was asking if the cheesecake center was a family secret. It is the tanginess of the cream cheese that balances the rich chocolate, making it a hit even for those who think they do not have a sweet tooth.
What Makes It Special
Melted Chocolate Chips: Instead of relying solely on cocoa powder, we use real melted semisweet chocolate in the batter for a fudgy, intense flavor profile.
Full-Fat Cream Cheese: Using a block of full-fat cream cheese provides the structural integrity needed for the stuffing so it remains a distinct layer.
The Thin Batter Method: The use of water and oil ensures the cupcakes stay incredibly moist for days, preventing that dry, crumbly texture often found in chocolate cakes.
Fine Sea Salt: A touch of sea salt in both the cake and the filling cuts through the sweetness and highlights the complex notes of the chocolate.
Making It Happen
The process begins by gently melting the chocolate chips until they are glossy and smooth, then setting them aside to cool so they don’t cook the egg on contact. In a large bowl, you whisk together the sugar, oil, and vanilla until the mixture looks pale and well-combined. Once the melted chocolate is beaten in, you gradually alternate between adding the flour mixture and the water. The batter will be thin and dark, which is exactly what you want for a tender result.
For the heart of the cupcake, you whip the cream cheese with sugar, an egg, and a pinch of salt until it is completely creamy, folding in even more chocolate chips for a bit of texture. When it is time to assemble, you fill the muffin liners halfway with the chocolate batter, drop a generous tablespoon of the cream cheese mixture into the center, and cover it with the remaining batter. As they bake, the chocolate cake rises up around the cheesecake. While they are still hot from the oven, you sprinkle the remaining chips on top, watching them turn shiny before spreading them into a smooth, dark frosting.
You Must Know
Temperature Matters: Ensure your cream cheese and egg for the filling are at room temperature to avoid a lumpy center.
Check the Batter: Do not be alarmed by how liquid the batter is; this high moisture content is what makes the chocolate cake so velvety.
The Shiny Chip Trick: Wait about five minutes after sprinkling the chips on the hot cupcakes. If you try to spread them too soon, they won’t be fully melted, and if you wait too long, the cake will cool and the chips won’t melt at all.
Serving Ideas
These are stunning when served slightly warm, allowing the chocolate topping to stay soft and fudge-like. They pair beautifully with a strong cup of black coffee or a glass of cold, whole milk. For a dinner party, serve them on a white platter alongside a handful of tart fresh raspberries or sliced strawberries to provide a bright acidity that cuts through the richness.
Make It Different
Peanut Butter Twist: Swap the chocolate chips in the cheesecake filling for peanut butter chips for a classic flavor combination.
Gluten-Free Option: Use a high-quality 1-to-1 gluten-free flour blend. The moisture from the oil and water helps maintain a great texture.
Holiday Flare: Add a half-teaspoon of peppermint extract to the chocolate batter for a festive, mint-chocolate version.
Storage and Reheating
Store your cupcakes in an airtight container at room temperature for up to two days. If you choose to refrigerate them to keep the cheesecake filling extra fresh, note that the chocolate topping will harden into a firm shell. If you prefer the softer texture, simply let them come to room temperature for about 30 minutes before serving. Remember that cakes stored in the fridge can dry out faster, so keep them tightly sealed.
Success Tips
To get a perfect “stuffed” look every time, use a small cookie scoop for the cheesecake filling. This ensures every cupcake has an even amount of cream cheese. When testing for doneness, aim your toothpick or cake tester into the chocolate part of the cupcake rather than the center; the cheesecake will naturally stay a bit softer than the cake.
Frequently Asked Questions
Can I use low-fat cream cheese for the filling?
It is best to use full-fat block cream cheese. The lower-fat versions often have a higher water content which can make the filling too runny and cause it to sink or bleed into the batter.
Why did my cheesecake filling sink to the bottom?
This usually happens if the filling is over-beaten or if too much air was incorporated. Mix the filling just until creamy and avoid over-whipping the egg.
Can I freeze these cupcakes?
Yes, they freeze remarkably well. Wrap them individually in plastic wrap and store them in a freezer-safe bag for up to three months. Thaw them in the refrigerator overnight.
What if I don’t have a microwave to melt the chocolate?
You can use a double boiler method. Place the chocolate chips in a heat-proof bowl over a pot of simmering water, stirring constantly until smooth.
Do I need a stand mixer?
While a stand mixer makes the cream cheese filling very smooth, you can easily use a hand mixer or even a sturdy whisk and some elbow grease for the entire recipe.
Prep time: 20 minutes
Cook time: 25 minutes
Total time: 45 minutes
Servings: 16 cupcakes
Category: Dessert
Difficulty: Intermediate
Cuisine: American
Yield: 16 servings
Equipment: Two standard muffin tins, paper liners, microwave-safe bowl, medium bowl, large bowl, electric mixer or whisk, wire cooling racks.
Ingredients
For the cupcakes:
2 cups (340 grams) semisweet chocolate chips, divided
1 1/2 cups (187 grams) all-purpose flour
1 teaspoon baking soda
1/2 teaspoon fine sea salt
1/2 cup (100 grams) granulated sugar
1/3 cup (66 grams) vegetable oil
1 large egg
1 teaspoon vanilla
1 cup water
For the cheesecake filling:
6 ounces (170 grams) cream cheese, at room temperature
1/4 cup (50 grams) granulated sugar
1 large egg
1/8 teaspoon fine sea salt
Instructions
For the cupcakes:
Preheat the oven to 350°F. Line two standard muffin tins with 16 paper liners. Place 1/2 cup of the chocolate chips in a small microwave-safe bowl and microwave on high for 45 seconds. Stir until smooth. If not completely melted, return to the microwave for 10 second bursts until smooth. Let cool.
In a medium bowl combine the flour, baking soda, and salt. In a large bowl vigorously whisk the sugar, oil, egg, and vanilla until well combined. Beat in the melted chocolate chips. Gradually add the flour mixture alternatively with the water. The batter will be thin.
For the filling:
In the bowl of an electric mixer beat the cream cheese, sugar, egg, and salt until creamy. Stir in 1 cup of the chocolate chips.
Fill each muffin cup half full. Spoon a tablespoon of the cream cheese filling over the batter. Spoon the remaining batter over the cream cheese filling. Bake for 20 to 25 minutes, or until a cake tester inserted in the center comes out clean.
While still hot, sprinkle the remaining 1/2 cup chocolate chips onto the cupcakes. Let cool for 5 minutes, or until the chocolate chips are shiny, then spread to frost. Remove to wire racks to cool completely.
Notes
Original recipe by Nestle. Store in an airtight container at room temperature for up to 2 days. If you refrigerate them, the chocolate topping will harden, so if you don’t prefer the texture of the harder chocolate and soft cupcake, let them come to room temperature prior to serving. Keep in mind that any cake product stored in the fridge will dry out faster.