The Ultimate Guide to the Perfect Chocolate Covered Strawberries Recipe
There is something undeniably romantic about the scent of melting chocolate wafting through a kitchen. It takes me back to the first time I tried making these for a small dinner party. I remember standing over a bowl of glossy, velvety chocolate, worried that such a simple treat wouldn’t be “enough” for dessert. But as soon as I set that first tray of ruby-red berries down, the room went quiet. There is a specific kind of magic in the contrast between a cold, succulent strawberry and the crisp snap of high-quality bittersweet chocolate. It is a timeless pairing that feels like an indulgence without requiring hours of labor.
Why You’ll Love This
The beauty of this recipe lies in its simplicity and the high-impact results it delivers every single time.
- It is the ultimate “low effort, high reward” dessert that looks like it came from a professional boutique.
- The balance of tart fruit and rich Ghirardelli chocolate creates a sophisticated flavor profile that isn’t overly sugary.
- You can customize them for any occasion, from a casual movie night to an elegant wedding shower.
- It is a naturally gluten-free treat that feels lighter than traditional cakes or heavy pastries.
The Skeptic’s Favorite
I once hosted a gathering where a close friend—a self-proclaimed “savory only” eater who usually skips the dessert tray—was in attendance. He watched me dipping the berries with a skeptical look, claiming he didn’t see the fuss about fruit and chocolate. I handed him one that was still slightly chilled, the chocolate perfectly set. He took one bite, paused to appreciate the juicy center, and ended up finishing nearly a third of the platter himself. He later admitted that he never realized how much the quality of the chocolate changed the experience. It turned a simple fruit snack into a decadent culinary event.
What Makes It Special
While the process is straightforward, the components you choose make all the difference in the world.
- Ghirardelli Baking Chips: Using bittersweet or semi-sweet chips provides a deep, complex cocoa flavor that offsets the natural sweetness of the fruit.
- Fresh, Long-Stemmed Strawberries: Keeping the stems attached isn’t just for looks; it provides a natural handle for dipping and eating.
- High-Shine Finish: The technique of lifting and twisting the berry ensures a smooth, professional coating without messy clumps.
- Parchment Paper Foundation: This ensures the chocolate sets with a clean bottom, preventing sticking and tearing.
Making It Happen
The process begins with a bit of patience. You want to start by washing your strawberries under cool water, but the real secret lies in the drying. I like to lay them out on a clean kitchen towel and gently pat them until they are bone-dry. If even a single drop of water remains, the chocolate will slide right off, or worse, cause your entire bowl of chocolate to seize and turn grainy.
While the berries air-dry, prepare your workspace. Line a baking sheet with parchment paper so you have a dedicated landing zone. To melt the chocolate, you can use a double boiler for constant, gentle heat, or the microwave if you are careful. If you choose the microwave, use 30-second intervals and stir vigorously between each one. Even when the chips look like they haven’t melted, the residual heat usually does the work for you.
Once the chocolate is luscious and smooth, hold a strawberry by its green stem. Submerge it into the dark pool of chocolate, then lift it out with a small, graceful twist. This motion helps the excess chocolate drip back into the bowl rather than pooling on your tray. If you are adding toppings like crushed nuts or toasted coconut, dip them immediately while the chocolate is still tacky. Place them on the parchment and let them rest in the refrigerator for about fifteen minutes. This short chill time is what gives the chocolate that satisfying, audible snap when you take your first bite.
You Must Know
To ensure your chocolate strawberries turn out perfectly every time, keep these essential rules in mind.
- Dry means dry. Any moisture on the strawberry surface will prevent the chocolate from adhering correctly.
- Avoid overheating. Chocolate is delicate; if it gets too hot, it loses its shine and becomes thick and difficult to work with.
- Use a tall, narrow bowl for dipping. This allows you to submerge the berries deeply even as the chocolate level drops.
- Room temperature berries are best. If the fruit is too cold when you dip it, the chocolate may set too quickly and crack.
Serving Ideas
These berries are a standout on their own, but they play very well with others. Arrange them on a marble slab alongside a selection of sharp white cheddar and creamy brie for a sophisticated dessert board. For a celebratory vibe, serve them with a chilled glass of Prosecco or a dry Rosé; the bubbles cut through the richness of the bittersweet chocolate beautifully. If you are serving them at a brunch, they make a stunning garnish for a platter of golden, buttery waffles.
Make It Different
You can easily adapt this recipe to suit your cravings or dietary needs.
- Nutty Crunch: Roll the wet chocolate in finely chopped pistachios, toasted almonds, or pecans.
- Tropical Twist: Use shredded unsweetened coconut for a chewy, flavorful exterior.
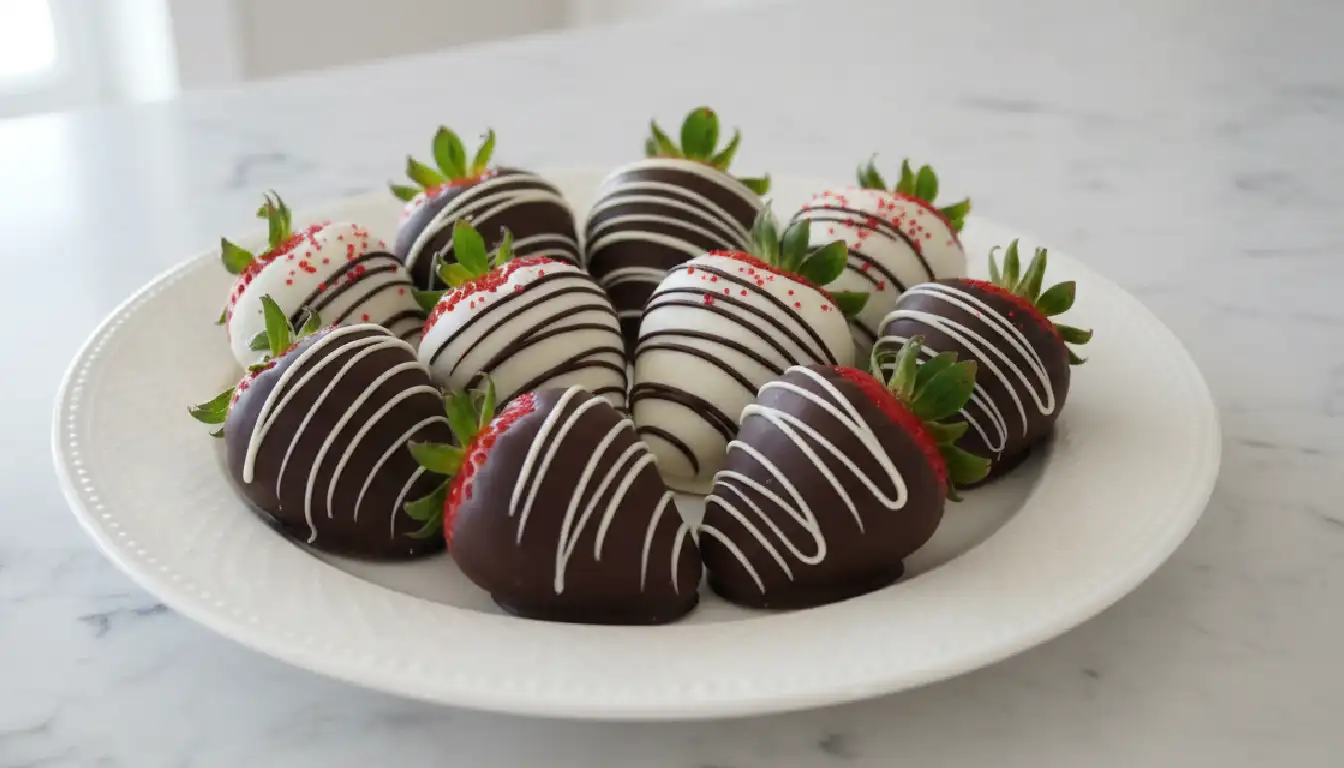
- Double Chocolate: After the dark chocolate sets, use a fork to drizzle thin ribbons of melted white chocolate across the top for a tuxedo effect.
- Sea Salt Finish: A tiny pinch of flaky sea salt on top of the dark chocolate enhances the cocoa notes and balances the sweetness.
Storage and Recipe Tips
Chocolate covered strawberries are best enjoyed the day they are made. If you must store them, keep them in a single layer in a cool, dry place. If you refrigerate them, they may develop “sweat” (small beads of condensation) when brought back to room temperature. This doesn’t affect the taste, but for the best appearance, serve them within a few hours of chilling. Do not freeze them, as the strawberries will become mushy upon thawing.
Success Tips
For a truly professional look, try “tempering” your movements. When you place the berry on the parchment, slide it forward just a fraction of an inch to prevent a large “foot” of chocolate from forming at the base. Also, if you find your chocolate is thickening too much while you work, simply pop it back in the microwave for five to ten seconds to loosen it up again.
Frequently Asked Questions
How long do chocolate covered strawberries last?
They are best within 12 hours of being made. While they can stay in the fridge for up to two days, the strawberries will eventually release moisture, making the chocolate soft.
Why did my chocolate seize and get chunky?
This usually happens if a drop of water gets into the bowl or if the chocolate is overheated. To prevent this, ensure all equipment and fruit are completely dry.
Can I use chocolate chips instead of baking bars?
Yes, high-quality chips like Ghirardelli work excellently because they are formulated to melt smoothly and provide a consistent flavor.
Do I need to add oil to the chocolate?
Some people add a teaspoon of coconut oil to make the chocolate shinier and easier to pour, but with high-quality baking chips, it isn’t strictly necessary.
How do I get the white chocolate drizzle to look neat?
Wait until the base layer of chocolate is completely set and cold. Use a fork or a small piping bag to move quickly in a back-and-forth motion across the berries.
Chocolate Covered Strawberries
Prep time: 10 minutes
Cook time: 5 minutes
Total time: 30 minutes
Servings: 6 servings
Category: Dessert
Difficulty: Easy
Cuisine: American
Yield: Approx. 24 strawberries
Equipment: Small microwave-safe bowl, baking sheet, parchment paper
Ingredients
- 10 ounce package Ghirardelli Baking Chips (Bittersweet, semi-sweet, or milk chocolate)
- 2 pounds fresh strawberries, stems attached
- Optional: White chocolate for drizzling, crushed nuts, or coconut flakes
Instructions
Begin by washing the strawberries under cool water. Place them on a clean towel and dry them very thoroughly. It is vital that no moisture remains on the skin, as water prevents the chocolate from sticking.
If you plan to use toppings like nuts or coconut, place them on small individual plates. Line your baking sheet with a fresh piece of parchment or waxed paper.
Melt the chocolate using a double boiler or a microwave. If using the microwave, heat in 30-second bursts, stirring well after each interval until the texture is silky and smooth. Be careful not to scorch the chocolate.
Pick up a strawberry by its green stem and dip it into the melted chocolate. Lift it out and give it a gentle twist to let the excess drip off. If using toppings, dip the wet berry into the nuts or coconut now.
Place the finished berry onto the parchment paper. For a decorative finish, dip a fork into melted white chocolate and drizzle it over the berries once the first layer has set.
Place the tray in the refrigerator for about 15 minutes to allow the chocolate to harden completely.
Notes
Bittersweet or semi-sweet chocolate offers the best contrast to the fruit, but milk chocolate is a crowd-pleaser for those who prefer a sweeter treat. Always apply toppings immediately after dipping before the chocolate begins to firm up.
Nutrition
Calories: Approx. 140 kcal per 3-4 berries (depending on chocolate type). Contains antioxidants from dark chocolate and Vitamin C from fresh strawberries.
I hope you find as much joy in making these as I do. Is there a specific occasion you are planning to make these for, or perhaps another fruit you’d like to try dipping?